
如何优雅的写代码,我想是每位程序员的心声。自从15年初第一次接触 Laravel 4.2 开始,我就迷上使用 Laravel 框架了。我一直都想找个时间好好写写有关 Laravel 的使用文章,由浅入深的介绍 Laravel 框架。
今天通过使用 laravel-admin 插件,来简单说说怎么优雅的写 Laravel 代码。
创建 Laravel 项目
只要跟着官方文档走,创建一个 Laravel 项目还是很简单的:
// 使用 Composer 下载 Laravel 安装程序
composer global require "laravel/installer"
// 创建 web 项目
laravel new web
具体配置数据库等:略
安装 Laravel 看官网:https://d.laravel-china.org/docs/5.5/installation
安装 laravel-admin
laravel-admin 是一个可以快速帮你构建后台管理的工具,它提供的页面组件和表单元素等功能,能帮助你使用很少的代码就实现功能完善的后台管理功能。
注:当前版本(1.5)需要安装 PHP 7+和 Laravel 5.5
看看 laravel-admin 的特性:
·内置用户和权限系统
·model-grid 支持快速构建数据表格
·model-form 支持快速构建数据表单
·model-tree 支持快速构建树状数据
·内置 40+ 种 form 元素组件、以及支持扩展组件
·支持 Laravel 的多种模型关系
·mysql、mongodb、pgsql 等多数据库支持
·支持引入第三方前端库
·数据库和 artisan 命令行工具的 web 实现
·支持自定义图表
·多种常用 web 组件
·支持本地和 oss 文件上传
有了这些功能,开发一个后台管理系统就变得相对简单了。
安装插件:
composer require encore/laravel-admin "1.5.*"
// 发布资源:
php artisan vendor:publish --provider="Encore\Admin\AdminServiceProvider"
// 安装
php artisan admin:install
简单的三条命令,即可配置好一个简单的后台管理系统,账号和密码都是 admin

代码主要集中在\APP\Admin中

相关推荐:《laravel教程》
默认系统提供一个 Dashboard 界面:
<?php
namespace App\Admin\Controllers;
use App\Http\Controllers\Controller;
use Encore\Admin\Facades\Admin;
use Encore\Admin\Layout\Column;
use Encore\Admin\Layout\Content;
use Encore\Admin\Layout\Row;
class HomeController extends Controller
{
public function index()
{
return Admin::content(function (Content $content) {
$content->header('Test Dashboard');
$content->description('Description...');
$content->row(Dashboard::title());
$content->row(function (Row $row) {
$row->column(4, function (Column $column) {
$column->append(Dashboard::environment());
});
$row->column(4, function (Column $column) {
$column->append(Dashboard::extensions());
});
$row->column(4, function (Column $column) {
$column->append(Dashboard::dependencies());
});
});
});
}
}结合界面和代码,可以看出界面主要分成这么几个部分:header、description、两个 row,后一个 row 包含三个 column 模块;具体的代码放在 Dashboard 代码中,如下:
<?php
namespace Encore\Admin\Controllers;
use Encore\Admin\Admin;
class Dashboard
{
/**
* @return \Illuminate\Contracts\View\Factory|\Illuminate\View\View
*/
public static function title()
{
return view('admin::dashboard.title');
}
/**
* @return \Illuminate\Contracts\View\Factory|\Illuminate\View\View
*/
public static function environment()
{
$envs = [
['name' => 'PHP version', 'value' => 'PHP/'.PHP_VERSION],
['name' => 'Laravel version', 'value' => app()->version()],
['name' => 'CGI', 'value' => php_sapi_name()],
['name' => 'Uname', 'value' => php_uname()],
['name' => 'Server', 'value' => array_get($_SERVER, 'SERVER_SOFTWARE')],
['name' => 'Cache driver', 'value' => config('cache.default')],
['name' => 'Session driver', 'value' => config('session.driver')],
['name' => 'Queue driver', 'value' => config('queue.default')],
['name' => 'Timezone', 'value' => config('app.timezone')],
['name' => 'Locale', 'value' => config('app.locale')],
['name' => 'Env', 'value' => config('app.env')],
['name' => 'URL', 'value' => config('app.url')],
];
return view('admin::dashboard.environment', compact('envs'));
}
/**
* @return \Illuminate\Contracts\View\Factory|\Illuminate\View\View
*/
public static function extensions()
{
$extensions = [
'helpers' => [
'name' => 'laravel-admin-ext/helpers',
'link' => 'https://github.com/laravel-admin-extensions/helpers',
'icon' => 'gears',
],
'log-viewer' => [
'name' => 'laravel-admin-ext/log-viewer',
'link' => 'https://github.com/laravel-admin-extensions/log-viewer',
'icon' => 'database',
],
'backup' => [
'name' => 'laravel-admin-ext/backup',
'link' => 'https://github.com/laravel-admin-extensions/backup',
'icon' => 'copy',
],
'config' => [
'name' => 'laravel-admin-ext/config',
'link' => 'https://github.com/laravel-admin-extensions/config',
'icon' => 'toggle-on',
],
'api-tester' => [
'name' => 'laravel-admin-ext/api-tester',
'link' => 'https://github.com/laravel-admin-extensions/api-tester',
'icon' => 'sliders',
],
'media-manager' => [
'name' => 'laravel-admin-ext/media-manager',
'link' => 'https://github.com/laravel-admin-extensions/media-manager',
'icon' => 'file',
],
'scheduling' => [
'name' => 'laravel-admin-ext/scheduling',
'link' => 'https://github.com/laravel-admin-extensions/scheduling',
'icon' => 'clock-o',
],
'reporter' => [
'name' => 'laravel-admin-ext/reporter',
'link' => 'https://github.com/laravel-admin-extensions/reporter',
'icon' => 'bug',
],
'translation' => [
'name' => 'laravel-admin-ext/translation',
'link' => 'https://github.com/laravel-admin-extensions/translation',
'icon' => 'language',
],
];
foreach ($extensions as &$extension) {
$name = explode('/', $extension['name']);
$extension['installed'] = array_key_exists(end($name), Admin::$extensions);
}
return view('admin::dashboard.extensions', compact('extensions'));
}
/**
* @return \Illuminate\Contracts\View\Factory|\Illuminate\View\View
*/
public static function dependencies()
{
$json = file_get_contents(base_path('composer.json'));
$dependencies = json_decode($json, true)['require'];
return view('admin::dashboard.dependencies', compact('dependencies'));
}
}这样我们就把代码分块的组织在一起。具体布局类看:class Content implements Renderable
其它的静态资源文件放在 /public/vendor/laravel-admin 目录下
更多内容参考 laravel-admin 官网:
http://laravel-admin.org/docs/#/zh/
写一个 demo
有了这个 laravel-admin 插件,要写一个 movies 列表,只需要几个命令行就可以完成了,非常简单:
1.建立模型,并创建 Migrations:
php artisan make:model Movie -m
2.在 Migrations,增加一个字段:name
<?php
use Illuminate\Support\Facades\Schema;
use Illuminate\Database\Schema\Blueprint;
use Illuminate\Database\Migrations\Migration;
class CreateMoviesTable extends Migration
{
/**
* Run the migrations.
*
* @return void
*/
public function up()
{
Schema::create('movies', function (Blueprint $table) {
$table->increments('id');
$table->string('name', 50)->unique();
$table->timestamps();
});
}
/**
* Reverse the migrations.
*
* @return void
*/
public function down()
{
Schema::dropIfExists('movies');
}
}3.运行 Migrations,创建对应数据库:
php artisan migrate
4.有了数据表,就需要往表里插入 fake 数据,用于测试
// 使用该插件创建 fake 数据
composer require fzaninotto/faker
5.建立 Seeder
php artisan make:seeder MovieTableSeeder
在该类中,建立1000条假数据:
<?php
use Illuminate\Database\Seeder;
class MovieTableSeeder extends Seeder
{
/**
* Run the database seeds.
*
* @return void
*/
public function run()
{
//
$faker = Faker\Factory::create();
for($i = 0; $i < 1000; $i++) {
App\Movie::create([
'name' => $faker->name
]);
}
}
}运行:
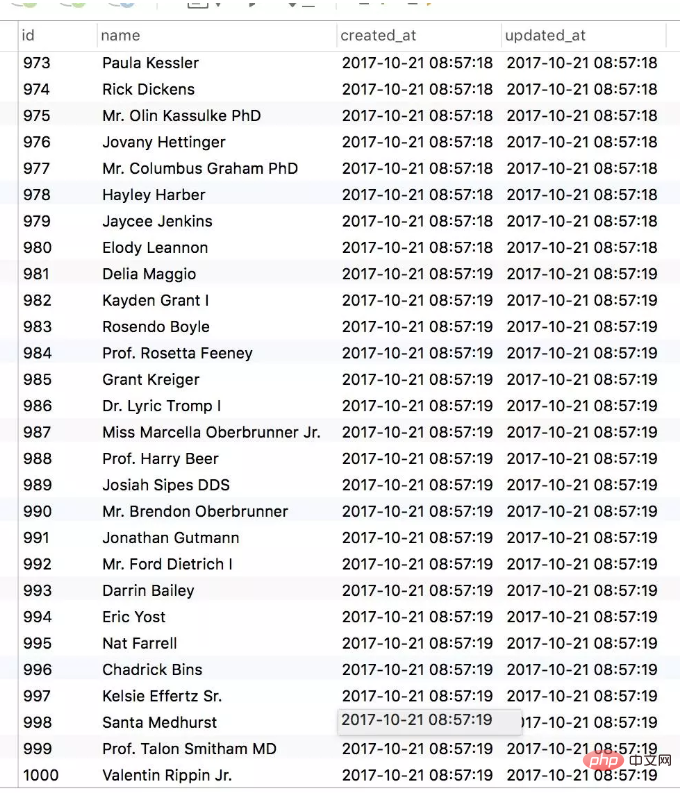
php artisan db:seed --class=MovieTableSeeder
是不是很简单,数据表直接填充 1000 条假数据:

6.建立资源 Controller
php artisan admin:make MovieController --model=App\\Movie
这样就直接有了基础的增删改查和 movie 列表功能的 Controller 了。
7.建立 route
$router->resource('movies', MovieController::class);
8.加入到 admin 的 menu 中
其中路径处需要注意的是:
其中uri填写不包含路由前缀的的路径部分,比如完整路径是http://localhost:8000/admin/demo/users, 那么就填demo/users,如果要添加外部链接,只要填写完整的url即可,比如http://laravel-admin.org/.
上图也是加了左侧 movies 菜单的效果。
这就完成了简单的 movie 资源的后台管理了,在浏览器输入链接:
http://web.app/admin/movies
就能看到一个较为完整的 movie 列表:
具体有新增、导出、筛选、操作 (删除)、撤销、分页、修改、删除等常规功能,如下几个截图:
总结
有了 Laravel 和 laravel-admin,基本不用写什么代码,敲敲几个命令就可以完成一个「功能比较齐全」的资源操作后台。极大的方便了我们的开发。
总体命令行和代码如下:
php artisan make:model Movie -m
php artisan migrate
composer require fzaninotto/faker
php artisan make:seeder MovieTableSeeder
php artisan db:seed --class=MovieTableSeeder
php artisan admin:make MovieController --model=App\\Movie
$router->resource('movies', MovieController::class);
框架和开源插件,有时候确实是能方便我们开发,所以寻找优质的框架和开源库也是促进我们生产力的。
laravel-admin 代码是如何组织的,可以具体参考网站开发。先根据官网的介绍,利用好 laravel-admin,然后学习它的源码和代码设计,最后取其精华,为你所用。
The above is the detailed content of Laravel-admin plug-in that lets you write code elegantly. For more information, please follow other related articles on the PHP Chinese website!