The following column WordPress Tutorial will introduce to you the solution for WordPress to automatically jump to the old port after changing the port. I hope it will be helpful to friends in need!

When you first install the wordpress program, nginx is configured with port 8081.
After starting the nginx and php services, visit http://www .example.com:8081/wp-admin started the installation step by step, and then successfully built the blog website.
After the website has been running for a period of time, you need to change the 8081 port to the 80 port. At this time, change the nginx configuration After changing port 8081 to port 80 and reloading the nginx configuration file, accessing the website will automatically jump to port 8081 (the old port configured last time). Clearing the browser cache and restarting nginx still cannot solve this problem.
Cause of the problem:
When you install wordpress for the first time, the homepage address of the website will be saved in the wordpress database. When you visit the website in the future, the homepage address in the database will prevail. Change nginx separately. When the access address mapped by the web server (ip, domain name, port changes), it will still automatically jump to the homepage address stored in the database.
Solution:
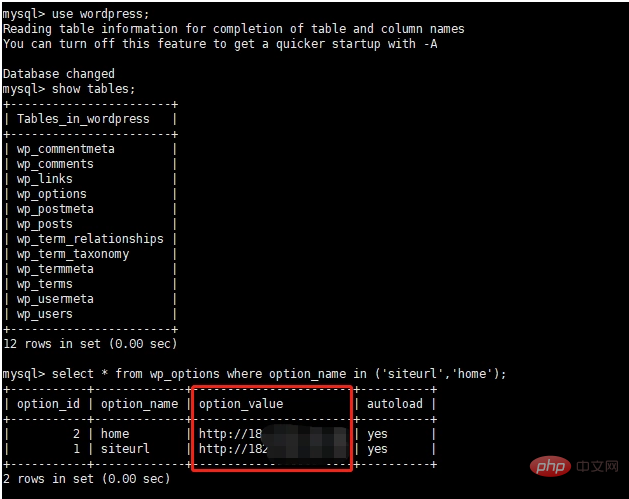
Modify the wordpress database, wp_options table, the option_name field is equal to the two records of siteurl and home
Update the option_value of these two records to your latest changed address, for example: http://www.example. com or http://www.example.com:80
After the change is successful, you can normally access the wordpress website through port 80

MySQL operation Statement:
# wp_options表 查询记录
select * from wp_options where option_name in ('siteurl','home');
# wp_options表 更新option_value的值
update wp_options set option_value='http://www.example.com:80' where option_name in ('siteurl','home');
The above is the detailed content of After WordPress changes the port, access will automatically jump to the old port. For more information, please follow other related articles on the PHP Chinese website!