How to configure phpstudy site

1. First, double-click to run phpStudy and open the software interface
2. Then, in the opened phpstudy software interface, click "Start".
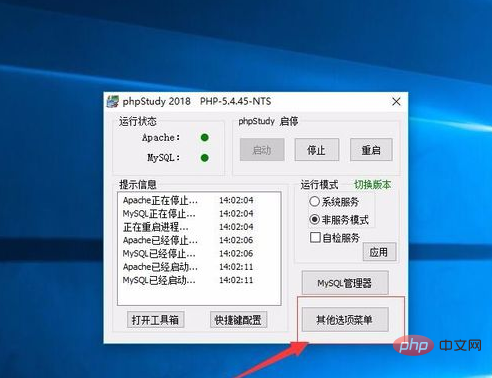
3. Next, find the "Other Options Menu" in the phpstudy software interface. As shown in the picture:

#4. Then, find "Site Domain Name Management" in the pop-up menu. As shown in the picture:

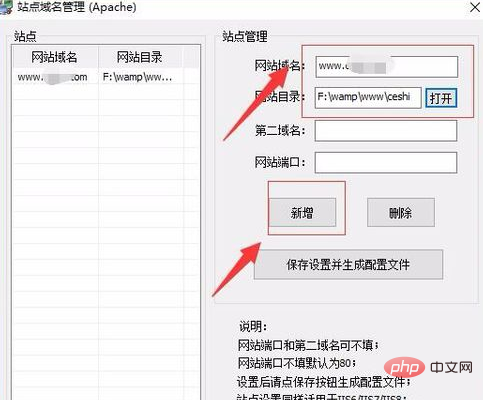
5. Then, enter your virtual domain name in the website domain name, click "Open" in the website directory, and create a new subdirectory folder. Then click "Add". As shown in the picture:

#6. After completion, you can see the virtual server we added in the list on the left. As shown in the picture:

#7. Then, in the site domain name management interface, click "Save configuration and generate configuration file". As shown in the picture:

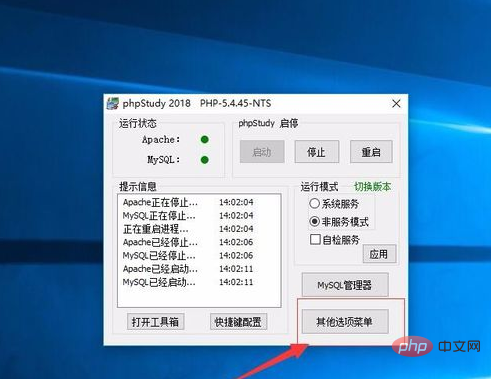
#8. Then, close the site domain name management interface. Return to the phpstudy software interface and find the "Other Options Menu" in the interface. As shown in the picture:

#9. Then, find "Open hosts" in the pop-up menu, click and the system will automatically open hosts. Next, delete the # in front of 127.0.0.1, and enter the website domain name you defined in the new virtual server after 127.0.0.1. Save the document and exit. As shown in the picture:
#10. Restart phpstudy.
Recommended tutorial: phpstudy video tutorial
The above is the detailed content of How to configure phpstudy site. For more information, please follow other related articles on the PHP Chinese website!

Hot AI Tools

Undresser.AI Undress
AI-powered app for creating realistic nude photos

AI Clothes Remover
Online AI tool for removing clothes from photos.

Undress AI Tool
Undress images for free

Clothoff.io
AI clothes remover

AI Hentai Generator
Generate AI Hentai for free.

Hot Article

Hot Tools

Notepad++7.3.1
Easy-to-use and free code editor

SublimeText3 Chinese version
Chinese version, very easy to use

Zend Studio 13.0.1
Powerful PHP integrated development environment

Dreamweaver CS6
Visual web development tools

SublimeText3 Mac version
God-level code editing software (SublimeText3)

Hot Topics
 How to add trusted sites in Google Chrome
Jul 19, 2024 pm 04:14 PM
How to add trusted sites in Google Chrome? Some users cannot browse the web normally because the page prompts that it is not secure when surfing the Internet. At this time, they can add the website as a trusted site, and we can access it normally and surf the Internet smoothly. The editor below will bring you the steps to add a trusted site in Google Chrome. The steps are simple and easy to operate, and even beginners can easily get started. Friends who need it can learn about it together. How to add a trusted site in Google Chrome: 1. Open Google Chrome and click the three dots in the upper right corner. Click [Settings]. Choose privacy settings and security. (As shown in the picture) 2. Click Website Settings at the bottom of the page. (As shown in the picture) 3. Click on the unsafe content at the bottom of the page. (As shown in the picture) 4. Click the Add button to the right of the Allow option. (As shown in the picture) 5. Lose
 The working principle and configuration method of GDM in Linux system
Mar 01, 2024 pm 06:36 PM
Title: The working principle and configuration method of GDM in Linux systems In Linux operating systems, GDM (GNOMEDisplayManager) is a common display manager used to control graphical user interface (GUI) login and user session management. This article will introduce the working principle and configuration method of GDM, as well as provide specific code examples. 1. Working principle of GDM GDM is the display manager in the GNOME desktop environment. It is responsible for starting the X server and providing the login interface. The user enters
 Understand Linux Bashrc: functions, configuration and usage
Mar 20, 2024 pm 03:30 PM
Understanding Linux Bashrc: Function, Configuration and Usage In Linux systems, Bashrc (BourneAgainShellruncommands) is a very important configuration file, which contains various commands and settings that are automatically run when the system starts. The Bashrc file is usually located in the user's home directory and is a hidden file. Its function is to customize the Bashshell environment for the user. 1. Bashrc function setting environment
 How to install phpstudy pro
Apr 02, 2024 pm 03:15 PM
PHPstudy Pro is a web development environment software package that enables rapid deployment and testing of web applications. The installation steps are as follows: Download the installation package from the official website. Run the installer and select the installation path and language. After the installation is complete, launch PHPstudy and configure PHP, MySQL, Apache settings. To verify the installation, enter "localhost" in your browser or run the command "php -v" to check the PHP version.
 MyBatis Generator configuration parameter interpretation and best practices
Feb 23, 2024 am 09:51 AM
MyBatisGenerator is a code generation tool officially provided by MyBatis, which can help developers quickly generate JavaBeans, Mapper interfaces and XML mapping files that conform to the database table structure. In the process of using MyBatisGenerator for code generation, the setting of configuration parameters is crucial. This article will start from the perspective of configuration parameters and deeply explore the functions of MyBatisGenerator.
 Why can't phpstudy be installed?
Apr 02, 2024 pm 03:42 PM
PHP Study installation failure may be due to the following reasons: 1. System compatibility issues; 2. Insufficient permissions; 3. File conflicts; 4. Abnormal network connection; 5. Anti-virus software interference; 6. Path problems; 7. System errors. If you encounter a problem that cannot be solved, you can seek support through the PHP Study forum, GitHub or the official website.
 How to change the phpstudy configuration file
Apr 02, 2024 pm 03:57 PM
You can modify the phpStudy configuration file through the following steps: Find the configuration file (Windows: C:\Windows\phpStudy\php\php.ini; Mac: /Applications/phpStudy/php/php.ini) Open it with a text editor and find the file you want to modify Edit the value of the setting, such as modifying the time zone: date.timezone = Asia/Shanghai Save the changes and restart the Apache service
 How to change the port in phpstudy
Apr 02, 2024 pm 04:24 PM
In order to change the PHPSTUDY port, follow these steps: Open the Control Panel and navigate to the built-in Web server settings; modify the number in the port number field; save the changes and restart the server; enter the website URL and new port number to verify the changes.


