

How to set permissions for WPS shared documents

The first step is to open wps, import the document, and click "Security".

Related recommendations: "php Getting Started Tutorial"
The second step is to click "Document Permissions".

#The third step is to turn on "Private Document Protection" in the pop-up window.

The above is the detailed content of How to set permissions for WPS shared documents. For more information, please follow other related articles on the PHP Chinese website!

Hot AI Tools

Undresser.AI Undress
AI-powered app for creating realistic nude photos

AI Clothes Remover
Online AI tool for removing clothes from photos.

Undress AI Tool
Undress images for free

Clothoff.io
AI clothes remover

AI Hentai Generator
Generate AI Hentai for free.

Hot Article
Hot Tools

Notepad++7.3.1
Easy-to-use and free code editor

SublimeText3 Chinese version
Chinese version, very easy to use

Zend Studio 13.0.1
Powerful PHP integrated development environment

Dreamweaver CS6
Visual web development tools

SublimeText3 Mac version
God-level code editing software (SublimeText3)
Hot Topics


 WPS and Office do not have Chinese fonts, and Chinese font names are displayed in English.
Jun 19, 2024 am 06:56 AM
WPS and Office do not have Chinese fonts, and Chinese font names are displayed in English.
Jun 19, 2024 am 06:56 AM
My friend's computer, all Chinese fonts such as imitation Song, Kai style, Xing Kai, Microsoft Yahei, etc. cannot be found in WPS and OFFICE. The editor below will tell you how to solve this problem. The fonts in the system are normal, but all fonts in the WPS font options are not available, only cloud fonts. OFFICE only has English fonts, not any Chinese fonts. After installing different versions of WPS, English fonts are available, but there is also no Chinese font. Solution: Control Panel → Categories → Clock, Language, and Region → Change Display Language → (Region and Language) Management → (Language for Non-Unicode Programs) Change System Regional Settings → Chinese (Simplified, China) → Restart. Control Panel, change the view mode in the upper right corner to "Category", Clock, Language and Region, change
 Enable root permissions with one click (quickly obtain root permissions)
Jun 02, 2024 pm 05:32 PM
Enable root permissions with one click (quickly obtain root permissions)
Jun 02, 2024 pm 05:32 PM
It allows users to perform more in-depth operations and customization of the system. Root permission is an administrator permission in the Android system. Obtaining root privileges usually requires a series of tedious steps, which may not be very friendly to ordinary users, however. By enabling root permissions with one click, this article will introduce a simple and effective method to help users easily obtain system permissions. Understand the importance and risks of root permissions and have greater freedom. Root permissions allow users to fully control the mobile phone system. Strengthen security controls, customize themes, and users can delete pre-installed applications. For example, accidentally deleting system files causing system crashes, excessive use of root privileges, and inadvertent installation of malware are also risky, however. Before using root privileges
 How to use wps translation function_How to use wps translation function
Mar 27, 2024 pm 04:46 PM
How to use wps translation function_How to use wps translation function
Mar 27, 2024 pm 04:46 PM
1. First, we open wpsoffice on the mobile phone. 2. Then click Apply. 3. Click the image to translate. Method 2 1. First, we open wpsoffice on the mobile phone. 2. Open the document that needs to be translated and click the tool in the lower left corner. 3. Click Review and Translate.
 How to set the scheduled time for publishing works on Douyin? How does it set the video duration?
Mar 27, 2024 pm 06:11 PM
How to set the scheduled time for publishing works on Douyin? How does it set the video duration?
Mar 27, 2024 pm 06:11 PM
Publishing works on Douyin can attract more attention and likes, but sometimes it may be difficult for us to publish works in real time. In this case, we can use Douyin's scheduled release function. Douyin’s scheduled release function allows users to automatically publish works at a scheduled time, which can better plan the release plan and increase the exposure and influence of the work. 1. How to set the scheduled time for publishing works on Douyin? To set a scheduled release time, first go to Douyin's personal homepage, find the "+" button in the upper right corner, and click to enter the release page. There is a clock icon in the lower right corner of the publishing page. Click to enter the scheduled publishing interface. In the interface, you can choose the type of work you want to publish, including short videos, long videos, and live broadcasts. Next, you need to set a time for your work to be published. TikTok provides
 Introduction to the method of editing watermark with WPS
Mar 27, 2024 pm 02:06 PM
Introduction to the method of editing watermark with WPS
Mar 27, 2024 pm 02:06 PM
1. We use WPS to open a document. There is a watermark in it. It looks messy. How to remove it? Look down. 2. Find the Insert tab in the menu bar, select the header and footer icons under this tab, and click on them with the left mouse button. 3. At this time, the text on the page becomes gray and cannot be edited, but the watermark on the back of the text can be edited at this time. 4. Click on the watermark, you can see that this is a picture watermark, because there are several small squares around the picture, and the picture can be edited at this time. 5. Use the delete key on the keyboard to delete the picture, and you can see that the watermark is gone. 6. Double-click the mouse on the page to exit the header and footer editing mode. The text on the page returns to normal color and can be edited, but at this time the watermark on the page has disappeared. 7.
 How to create a QR code using wps
Mar 28, 2024 am 09:41 AM
How to create a QR code using wps
Mar 28, 2024 am 09:41 AM
1. Open the software and enter the wps text operation interface. 2. Find the insert option in this interface. 3. Click the Insert option and find the QR code option in its editing tool area. 4. Click the QR code option to pop up the QR code dialog box. 5. Select the text option on the left and enter our information in the text box. 6. On the right side, you can set the shape of the QR code and the color of the QR code.
 How to set WPS value to automatically change color according to conditions_Steps to set WPS table value to automatically change color according to condition
Mar 27, 2024 pm 07:30 PM
How to set WPS value to automatically change color according to conditions_Steps to set WPS table value to automatically change color according to condition
Mar 27, 2024 pm 07:30 PM
1. Open the worksheet and find the [Start]-[Conditional Formatting] button. 2. Click Column Selection and select the column to which conditional formatting will be added. 3. Click the [Conditional Formatting] button to bring up the option menu. 4. Select [Highlight conditional rules]-[Between]. 5. Fill in the rules: 20, 24, dark green text with dark fill color. 6. After confirmation, the data in the selected column will be colored with corresponding numbers, text, and cell boxes according to the settings. 7. Conditional rules without conflicts can be added repeatedly, but for conflicting rules WPS will replace the previously established conditional rules with the last added rule. 8. Repeatedly add the cell columns after [Between] rules 20-24 and [Less than] 20. 9. If you need to change the rules, you can just clear the rules and then reset the rules.
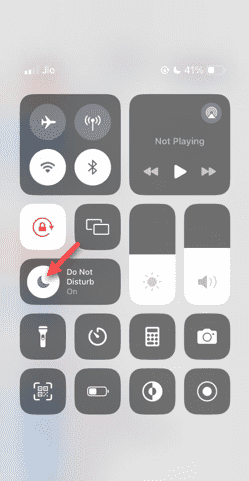 Do Not Disturb Mode Not Working in iPhone: Fix
Apr 24, 2024 pm 04:50 PM
Do Not Disturb Mode Not Working in iPhone: Fix
Apr 24, 2024 pm 04:50 PM
Even answering calls in Do Not Disturb mode can be a very annoying experience. As the name suggests, Do Not Disturb mode turns off all incoming call notifications and alerts from emails, messages, etc. You can follow these solution sets to fix it. Fix 1 – Enable Focus Mode Enable focus mode on your phone. Step 1 – Swipe down from the top to access Control Center. Step 2 – Next, enable “Focus Mode” on your phone. Focus Mode enables Do Not Disturb mode on your phone. It won't cause any incoming call alerts to appear on your phone. Fix 2 – Change Focus Mode Settings If there are some issues in the focus mode settings, you should fix them. Step 1 – Open your iPhone settings window. Step 2 – Next, turn on the Focus mode settings
