PS avatar changing tutorial detailed process

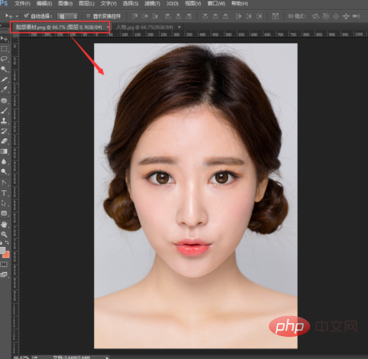
1. Start PS and open both photos in PS. There will be two tabs under the ruler of the top property bar. Click the [Facial Material] tab to switch. to the photo we want to cut out. Let’s cut out the character’s face first.
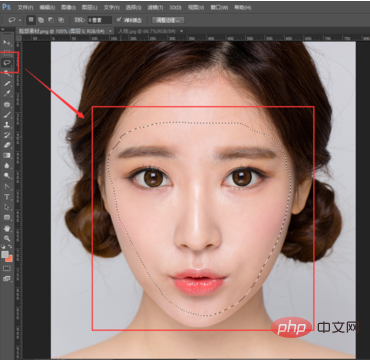
2. Then we select the [Lasso Tool] in the left toolbar and slowly circle the character’s face. The edge we selected will Automatically becomes a selection. (The character’s eyebrows, eyes, nose and mouth must remain intact)
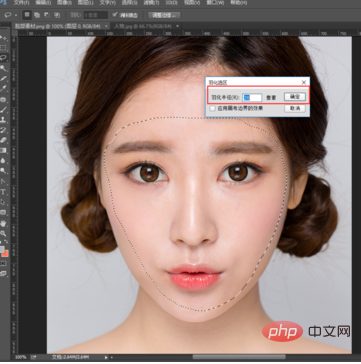
3. Click [Select]-[Modify]-[Feather] (shortcut key Shift F6), fill in the corresponding feathering value in the feathering pop-up window
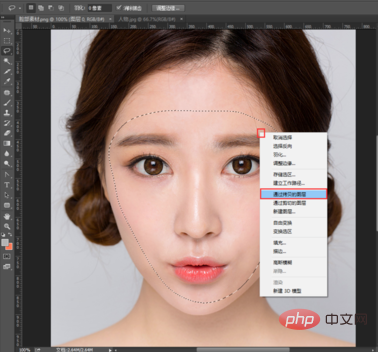
4. Right-click [By Copying Layer] in the selection (shortcut Ctrl J), The circled character's face will be copied to a new layer [Layer 1]
5. Click the [Face Material] label under the ruler with the mouse. Don’t let go, drag down the face material document, click on the face layer [Layer 1] just cut out on the right side, don’t let go of the mouse, drag layer 1 directly to the [Character] document
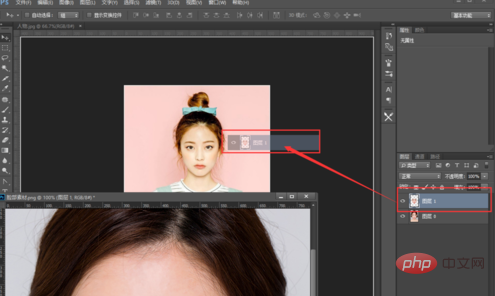
#6. After dragging is completed, you can see that the face layer of the person we just cut out has been added to the document. Then we press the shortcut key [Ctrl T] to bring up the transformation layer, hold down the Shift key with the left hand, move the mouse to a corner of the transformation control with the right hand, and slowly move towards the middle of the character's face to zoom
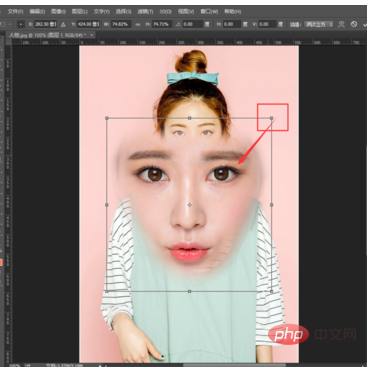
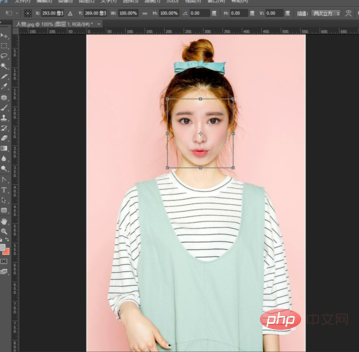
7. After zooming to the appropriate size, move the person’s face to the face of the background character. After zooming and moving to the appropriate location and size, hit the Enter key. We can see that the character's face has basically been changed. But there is still a small problem, that is, the background character's face color is yellowish, and the face color we replaced is reddish, so the color of the character's face above needs to be adjusted
8. Select the character’s face album [Layer 1] with the mouse, click on the top to select [Image]-[Adjustment]-[Optional Color]. In the optional color window, select the color [Red], and adjust the [Magenta] value below to -23, so that it is closer to the facial color of the background character, but still redder. (This step is to remove a little redness from the face, so the magenta value is reduced)
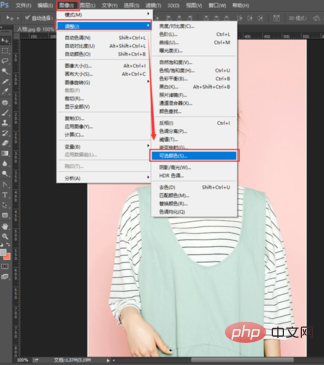
9. Let’s continue to adjust the color and change [Color] to [White] ], continue to adjust the [Magenta] color value to -40. You can see that after the second reduction of red, it is very close to the facial skin of the background character. After adjustment, click [OK] in the upper right corner of the pop-up window to apply our Adjusted color
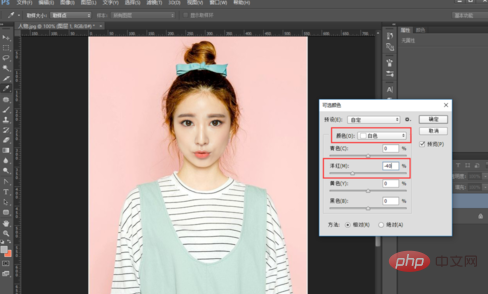
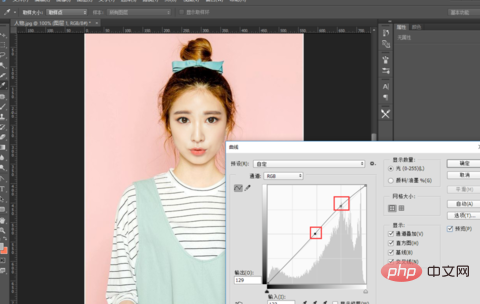
#10. We found that the character’s face is a bit dark, let’s adjust the brightness again. Click the top menu [Image] - [Adjustment] - [Curves] (or directly press the shortcut key Ctrl M), according to Figure 2 to highlight the highlights and lower the dark parts. The character's face will look very natural. Click [OK] on the right 】Apply the adjusted curve
Recommended tutorial: PS tutorial
The above is the detailed content of PS avatar changing tutorial detailed process. For more information, please follow other related articles on the PHP Chinese website!

Hot AI Tools

Undresser.AI Undress
AI-powered app for creating realistic nude photos

AI Clothes Remover
Online AI tool for removing clothes from photos.

Undress AI Tool
Undress images for free

Clothoff.io
AI clothes remover

AI Hentai Generator
Generate AI Hentai for free.

Hot Article

Hot Tools

Notepad++7.3.1
Easy-to-use and free code editor

SublimeText3 Chinese version
Chinese version, very easy to use

Zend Studio 13.0.1
Powerful PHP integrated development environment

Dreamweaver CS6
Visual web development tools

SublimeText3 Mac version
God-level code editing software (SublimeText3)

Hot Topics
 1371
1371
 52
52
 Tutorial on how to use Dewu
Mar 21, 2024 pm 01:40 PM
Dewu APP is currently a very popular brand shopping software, but most users do not know how to use the functions in Dewu APP. The most detailed usage tutorial guide is compiled below. Next is the Dewuduo that the editor brings to users. A summary of function usage tutorials. Interested users can come and take a look! Tutorial on how to use Dewu [2024-03-20] How to use Dewu installment purchase [2024-03-20] How to obtain Dewu coupons [2024-03-20] How to find Dewu manual customer service [2024-03-20] How to check the pickup code of Dewu [2024-03-20] Where to find Dewu purchase [2024-03-20] How to open Dewu VIP [2024-03-20] How to apply for return or exchange of Dewu
 In summer, you must try shooting a rainbow
Jul 21, 2024 pm 05:16 PM
After rain in summer, you can often see a beautiful and magical special weather scene - rainbow. This is also a rare scene that can be encountered in photography, and it is very photogenic. There are several conditions for a rainbow to appear: first, there are enough water droplets in the air, and second, the sun shines at a low angle. Therefore, it is easiest to see a rainbow in the afternoon after the rain has cleared up. However, the formation of a rainbow is greatly affected by weather, light and other conditions, so it generally only lasts for a short period of time, and the best viewing and shooting time is even shorter. So when you encounter a rainbow, how can you properly record it and photograph it with quality? 1. Look for rainbows. In addition to the conditions mentioned above, rainbows usually appear in the direction of sunlight, that is, if the sun shines from west to east, rainbows are more likely to appear in the east.
 Tutorial on how to turn off the payment sound on WeChat
Mar 26, 2024 am 08:30 AM
1. First open WeChat. 2. Click [+] in the upper right corner. 3. Click the QR code to collect payment. 4. Click the three small dots in the upper right corner. 5. Click to close the voice reminder for payment arrival.
 Introduction to the process of extracting line drawings in PS
Apr 01, 2024 pm 12:51 PM
1. Open the software and import a piece of material, as shown in the picture below. 2. Then ctrl+shift+u to remove color. 3. Then press ctrl+J to copy the layer. 4. Then reverse ctrl+I, and then set the layer blending mode to Color Dodge. 5. Click Filter--Others--Minimum. 6. In the pop-up dialog box, set the radius to 2 and click OK. 7. Finally, you can see the line draft extracted.
 What software is photoshopcs5? -photoshopcs5 usage tutorial
Mar 19, 2024 am 09:04 AM
PhotoshopCS is the abbreviation of Photoshop Creative Suite. It is a software produced by Adobe and is widely used in graphic design and image processing. As a novice learning PS, let me explain to you today what software photoshopcs5 is and how to use photoshopcs5. 1. What software is photoshop cs5? Adobe Photoshop CS5 Extended is ideal for professionals in film, video and multimedia fields, graphic and web designers who use 3D and animation, and professionals in engineering and scientific fields. Render a 3D image and merge it into a 2D composite image. Edit videos easily
 Experts teach you! The Correct Way to Cut Long Pictures on Huawei Mobile Phones
Mar 22, 2024 pm 12:21 PM
With the continuous development of smart phones, the functions of mobile phones have become more and more powerful, among which the function of taking long pictures has become one of the important functions used by many users in daily life. Long screenshots can help users save a long web page, conversation record or picture at one time for easy viewing and sharing. Among many mobile phone brands, Huawei mobile phones are also one of the brands highly respected by users, and their function of cropping long pictures is also highly praised. This article will introduce you to the correct method of taking long pictures on Huawei mobile phones, as well as some expert tips to help you make better use of Huawei mobile phones.
 Complete list of ps shortcut keys
Mar 11, 2024 pm 04:31 PM
1. Ctrl + N: Create a new document. 2. Ctrl + O: Open a file. 3. Ctrl + S: Save the current file. 4. Ctrl + Shift + S: Save as. 5. Ctrl + W: Close the current document. 6. Ctrl + Q: Exit Photoshop. 7. Ctrl + Z: Undo. 8. Ctrl + Y: Redo. 9. Ctrl + X: Cut the selected content. 10. Ctrl + C: Copy the selected content.
 PHP Tutorial: How to convert int type to string
Mar 27, 2024 pm 06:03 PM
PHP Tutorial: How to Convert Int Type to String In PHP, converting integer data to string is a common operation. This tutorial will introduce how to use PHP's built-in functions to convert the int type to a string, while providing specific code examples. Use cast: In PHP, you can use cast to convert integer data into a string. This method is very simple. You only need to add (string) before the integer data to convert it into a string. Below is a simple sample code


