 Operation and Maintenance
 Linux Operation and Maintenance
 Detailed explanation of linux vi command
Detailed explanation of linux vi command

Detailed explanation of linux vi command
Recommended: [Linux video tutorial]
vi editor It is the standard editor under all Unix and Linux systems. Its power is not inferior to any latest text editor. Here is an introduction to its usage and some instructions.
Since the vi editor is exactly the same for any version of Unix and Linux systems, you can learn more about it in any other place where vi is introduced. Vi is also the most basic text editor in Linux. After learning it, you will have no problem in the Linux world.

1. The basic concept of vi
Basically vi can be divided into three states, namely command mode (command mode), Insert mode(Insert mode) and bottom line mode(last line mode), the functions of each mode are distinguished as follows:
1 ) Command line mode command mode)
Control the movement of the screen cursor, the deletion of characters, words or lines, move and copy a section and enter Insert mode, or go to last line mode.
2) Insert mode
Only in Insert mode, text input can be done. Press the "ESC" key to return to the command line mode.
3) Bottom line mode (last line mode)
Save the file or exit vi, you can also set the editing environment, such as searching for strings, listing line numbers, etc.
However, generally when we use vi, we simplify vi into two modes, that is, the last line mode (last line mode) is also included in the command line mode (command mode).
2. Basic operations of vi
a) Enter vi
After entering vi and file name at the system prompt, enter vi full screen Editing screen:
$ vi myfile
But one thing to pay special attention to is that after you enter vi, you are in "command mode (command mode)", and you need to switch to "Insert mode (Insert mode)" before you can enter Word. People who use vi for the first time will want to use the up, down, left and right keys to move the cursor first. As a result, the computer keeps beeping, which makes them mad. So after entering vi, don't move around and switch to "Insert mode". !
b) Switch to Insert mode to edit the file
Click the letter "i" in "command mode" to enter "Insert mode", then you can start entering text.
c) Insert switching
You are currently in "Insert mode", you can only keep inputting text, if you find that you have entered the wrong word! If you want to use the cursor keys to move back and delete the word, you must first press the "ESC" key to go to "command mode (command mode)" and then delete the word.
d) Exit vi and save the file
In "command mode (command mode)", click the ":" colon key to enter "Last line mode", for example:
: w filename #(输入 「w filename」将文章以指定的文件名filename保存)
: wq #(输入「wq」,存盘并退出vi)
: q! #(输入q!, 不存盘强制退出vi)
3. Command mode function key
1). Press "
i" to switch to insert mode Insert mode "insert mode", after pressing "i" to enter insert mode, the input file starts from the current position of the cursor;
After pressing "a" to enter insert mode, the input file starts from the current position of the cursor. Start inputting text at the next position;
After pressing "o" to enter insert mode, a new line is inserted, and text is entered starting from the beginning of the line.
2). Switch from insert mode to command line mode
Press the "ESC" key.
3). To move the cursor
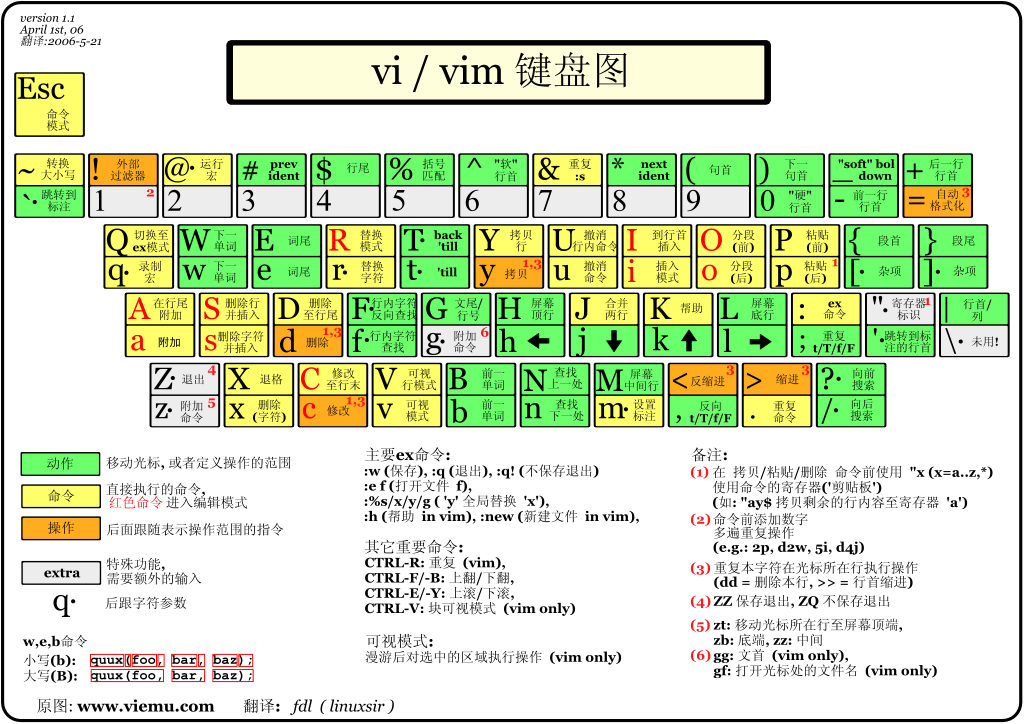
vi can directly use the cursor on the keyboard to move up, down, left, and right, but regular vi uses lowercase English letters "h", "j", and "k" , "l", respectively controls the cursor to move one space to the left, down, up, and right.
  按「ctrl」+「b」:屏幕往"后"移动一页。
  按「ctrl」+「f」:屏幕往"前"移动一页。
  按「ctrl」+「u」:屏幕往"后"移动半页。
  按「ctrl」+「d」:屏幕往"前"移动半页。
  按数字「0」:移到文章的开头。
  按「G」:移动到文章的最后。
  按「$」:移动到光标所在行的"行尾"。
  按「^」:移动到光标所在行的"行首"
  按「w」:光标跳到下个字的开头
  按「e」:光标跳到下个字的字尾
  按「b」:光标回到上个字的开头
  按「#l」:光标移到该行的第#个位置,如:5l,56l。
4). Delete the text
  「x」:每按一次,删除光标所在位置的"后面"一个字符。
  「#x」:例如,「6x」表示删除光标所在位置的"后面"6个字符。
  「X」:大写的X,每按一次,删除光标所在位置的"前面"一个字符。
  「#X」:例如,「20X」表示删除光标所在位置的"前面"20个字符。
  「dd」:删除光标所在行。
  「#dd」:从光标所在行开始删除#行
5). Copy
 「yw」:将光标所在之处到字尾的字符复制到缓冲区中。
  「#yw」:复制#个字到缓冲区
  「yy」:复制光标所在行到缓冲区。
  「#yy」:例如,「6yy」表示拷贝从光标所在的该行"往下数"6行文字。
  「p」:将缓冲区内的字符贴到光标所在位置。注意:所有与"y"有关的复制命令都必须与"p"配合才能完成复制与粘贴功能。
6). Replace
  「r」:替换光标所在处的字符。
  「R」:替换光标所到之处的字符,直到按下「ESC」键为止。
7). Restore the last time Operation
「u」:如果您误执行一个命令,可以马上按下「u」,回到上一个操作。按多次"u"可以执行多次回复。
8). Change
   「cw」:更改光标所在处的字到字尾处
  「c#w」:例如,「c3w」表示更改3个字
9). Jump to the specified line
  「ctrl」+「g」列出光标所在行的行号。
  「#G」:例如,「15G」,表示移动光标至文章的第15行行首。
4. Introduction to commands in Last line mode
Before using "last line mode", please remember to press the "ESC" key to confirm that you are in "command mode", and then press ":" Colon to enter "last line mode".
A) List line numbers
「set nu」:输入「set nu」后,会在文件中的每一行前面列出行号。
B) Jump to a certain line in the file
「#」:「#」号表示一个数字,在冒号后输入一个数字,再按回车键就会跳到该行了,如输入数字15,再回车,就会跳到文章的第15行。
C) Find characters
 「/关键字」:先按「/」键,再输入您想寻找的字符,如果第一次找的关键字不是您想要的,可以一直按「n」会往后寻找到您要的关键字为止。
 「?关键字」:先按「?」键,再输入您想寻找的字符,如果第一次找的关键字不是您想要的,可以一直按「n」会往前寻找到您要的关键字为止。
D) Save the file
「w」:在冒号输入字母「w」就可以将文件保存起来。
E) Leave vi
 「q」:按「q」就是退出,如果无法离开vi,可以在「q」后跟一个「!」强制离开vi。
 「qw」:一般建议离开时,搭配「w」一起使用,这样在退出的时候还可以保存文件。
5. vi command list
1. The following table lists the functions of some keys in command mode:
h  左移光标一个字符
l  右移光标一个字符
k  光标上移一行
j  光标下移一行
^  光标移动至行首
0  数字"0",光标移至文章的开头
G  光标移至文章的最后
$ 光标移动至行尾
Ctrl+f 向前翻屏
Ctrl+b 向后翻屏
Ctrl+d 向前翻半屏
Ctrl+u 向后翻半屏
i 在光标位置前插入字符
a 在光标所在位置的后一个字符开始增加
o 插入新的一行,从行首开始输入
ESC 从输入状态退至命令状态
x 删除光标后面的字符
#x 删除光标后的#个字符
X (大写X),删除光标前面的字符
#X 删除光标前面的#个字符
dd 删除光标所在的行
#dd 删除从光标所在行数的#行
yw 复制光标所在位置的一个字
#yw 复制光标所在位置的#个字
yy 复制光标所在位置的一行
#yy 复制从光标所在行数的#行
p 粘贴
u 取消操作
cw 更改光标所在位置的一个字
#cw 更改光标所在位置的#个字
2、下表列出行命令模式下的一些指令
w filename 储存正在编辑的文件为filename
wq filename 储存正在编辑的文件为filename,并退出vi
q! 放弃所有修改,退出vi
set nu 显示行号
/或? 查找,在/后输入要查找的内容
n 与/或?一起使用,如果查找的内容不是想要找的关键字,按n或向后(与/联用)或向前(与?联用)继续查找,直到找到为止。
对于第一次用vi,有几点注意要提醒一下:
1、 用vi打开文件后,是处于「命令行模式(command mode)」,您要切换到「插入模式(Insert mode)」才能够输入文字。切换方法:在「命令行模式(command mode)」下按一下字母「i」就可以进入「插入模式(Insert mode)」,这时候你就可以开始输入文字了。
2、编辑好后,需从插入模式切换为命令行模式才能对文件进行保存,切换方法:按「ESC」键。
3、保存并退出文件:在命令模式下输入:wq即可!(别忘了wq前面的:)
The above is the detailed content of Detailed explanation of linux vi command. For more information, please follow other related articles on the PHP Chinese website!

Hot AI Tools

Undresser.AI Undress
AI-powered app for creating realistic nude photos

AI Clothes Remover
Online AI tool for removing clothes from photos.

Undress AI Tool
Undress images for free

Clothoff.io
AI clothes remover

AI Hentai Generator
Generate AI Hentai for free.

Hot Article

Hot Tools

Notepad++7.3.1
Easy-to-use and free code editor

SublimeText3 Chinese version
Chinese version, very easy to use

Zend Studio 13.0.1
Powerful PHP integrated development environment

Dreamweaver CS6
Visual web development tools

SublimeText3 Mac version
God-level code editing software (SublimeText3)

Hot Topics
 Android TV Box gets unofficial Ubuntu 24.04 upgrade
Sep 05, 2024 am 06:33 AM
For many users, hacking an Android TV box sounds daunting. However, developer Murray R. Van Luyn faced the challenge of looking for suitable alternatives to the Raspberry Pi during the Broadcom chip shortage. His collaborative efforts with the Armbia
 deepseek web version entrance deepseek official website entrance
Feb 19, 2025 pm 04:54 PM
DeepSeek is a powerful intelligent search and analysis tool that provides two access methods: web version and official website. The web version is convenient and efficient, and can be used without installation; the official website provides comprehensive product information, download resources and support services. Whether individuals or corporate users, they can easily obtain and analyze massive data through DeepSeek to improve work efficiency, assist decision-making and promote innovation.
 How to install deepseek
Feb 19, 2025 pm 05:48 PM
There are many ways to install DeepSeek, including: compile from source (for experienced developers) using precompiled packages (for Windows users) using Docker containers (for most convenient, no need to worry about compatibility) No matter which method you choose, Please read the official documents carefully and prepare them fully to avoid unnecessary trouble.
 BitPie Bitpie wallet app download address
Sep 10, 2024 pm 12:10 PM
How to download BitPie Bitpie Wallet App? The steps are as follows: Search for "BitPie Bitpie Wallet" in the AppStore (Apple devices) or Google Play Store (Android devices). Click the "Get" or "Install" button to download the app. For the computer version, visit the official BitPie wallet website and download the corresponding software package.
 BITGet official website installation (2025 beginner's guide)
Feb 21, 2025 pm 08:42 PM
BITGet is a cryptocurrency exchange that provides a variety of trading services including spot trading, contract trading and derivatives. Founded in 2018, the exchange is headquartered in Singapore and is committed to providing users with a safe and reliable trading platform. BITGet offers a variety of trading pairs, including BTC/USDT, ETH/USDT and XRP/USDT. Additionally, the exchange has a reputation for security and liquidity and offers a variety of features such as premium order types, leveraged trading and 24/7 customer support.
 Zabbix 3.4 Source code compilation installation
Sep 04, 2024 am 07:32 AM
1. Installation environment (Hyper-V virtual machine): $hostnamectlStatichostname:localhost.localdomainIconname:computer-vmChassis:vmMachineID:renwoles1d8743989a40cb81db696400BootID:renwoles272f4aa59935dcdd0d456501Virtualization:microsoftOperatingSystem:CentOS Linux7(Core)CPEOSName:cpe:
 Ouyi okx installation package is directly included
Feb 21, 2025 pm 08:00 PM
Ouyi OKX, the world's leading digital asset exchange, has now launched an official installation package to provide a safe and convenient trading experience. The OKX installation package of Ouyi does not need to be accessed through a browser. It can directly install independent applications on the device, creating a stable and efficient trading platform for users. The installation process is simple and easy to understand. Users only need to download the latest version of the installation package and follow the prompts to complete the installation step by step.
 Get the gate.io installation package for free
Feb 21, 2025 pm 08:21 PM
Gate.io is a popular cryptocurrency exchange that users can use by downloading its installation package and installing it on their devices. The steps to obtain the installation package are as follows: Visit the official website of Gate.io, click "Download", select the corresponding operating system (Windows, Mac or Linux), and download the installation package to your computer. It is recommended to temporarily disable antivirus software or firewall during installation to ensure smooth installation. After completion, the user needs to create a Gate.io account to start using it.


