Steps to write api interface in yii2

yii2写api接口步骤
Yii2如何实现RESTful风格的API(推荐:《YII教程》 )
1、建立单独的应用程序
为了增加程序的可维护性,易操作性,我们选择新建一套应用程序,这也是为了和前台应用、后台应用区分开操作。
在WEB前端(frontend)和后端(backend)的同级目录,新建一个文件夹,命名api,其目录结构如下所示:
1 2 3 4 5 6 7 8 9 10 11 12 13 |
|
可以看出其目录结构基本上同backend没有其他差异,因为我们就是拷贝backend项目,只是做了部分优化。
友情提醒,该步骤完成以后,需要修改common\config\bootstrap.php文件,对新建的应用增加alias别名
1 |
|
2、为新建的api应用程序美化路由
首先保证你的web服务器开启rewrite规则,细节我们就不说了,不过这是前提。
接着配置api/config/main.php文件
1 2 3 4 5 6 7 8 9 |
|
开启nginx的rewrite,注意在你的配置文件中加入红色的文字:
1 2 3 4 5 6 7 8 9 10 11 12 13 14 15 16 17 18 19 20 21 22 23 24 25 26 27 28 29 30 31 32 33 34 35 36 37 38 39 40 41 42 |
|
最后只需要在应用入口同级增加.htaccess文件就好,我们以nginx为例
1 2 3 4 5 6 7 |
|
3、利用gii生成测试modules
用了便于演示说明,我们新建一张数据表goods表,并向其中插入几条数据。
1 2 3 4 5 6 7 8 9 10 11 |
|
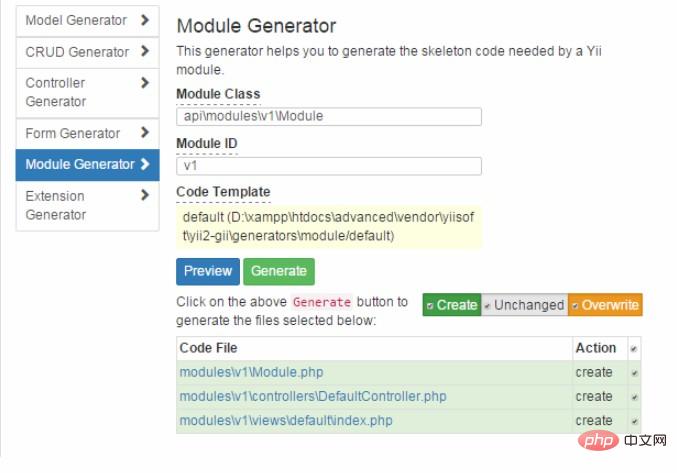
接着我们先利用gii生成modules后,再利用gii模块,按照下图中生成goods信息


现在,我们的api目录结构应该多个下面这几个目录
1 2 3 4 5 6 7 8 9 10 11 12 13 14 15 |
|
需要说明的是:在生成modules的步骤中,为了使我们的模块可以访问,不要忘记在main.php配置文件中添加下面的代码
1 2 3 4 5 6 7 8 |
|
4、重新配置控制器
为了实现restful风格的api,在yii2中,我们需要对控制器进行一下改写
1 2 3 4 5 6 7 |
|
5、为Goods配置Url规则
1 2 3 4 5 6 |
|
6、模拟请求操作
经过上面几个步骤,到此我们已经为goods成功创建了满足restful风格的api了。为了更好更方便的演示,我们借助工具postman进行模拟请求。
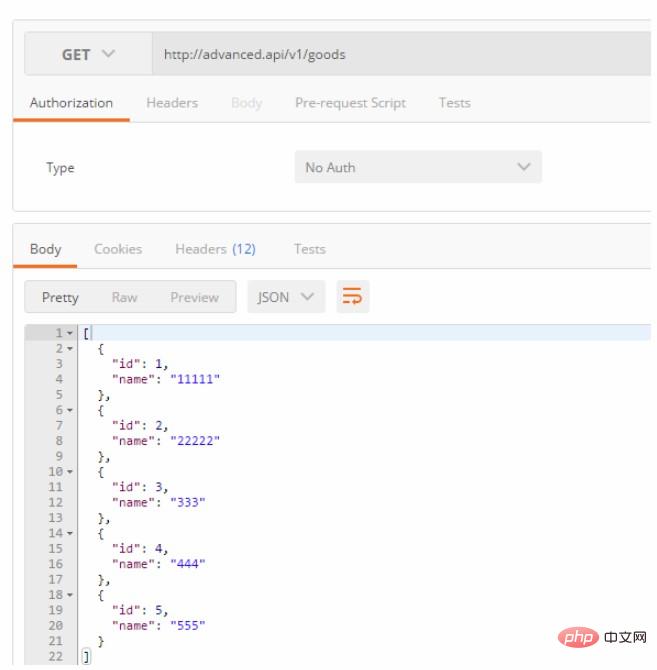
为了见证一下我们的操作,我们用postman请求一下GET /v1/goods看看结果如何:
接着我们先利用gii生成modules后,再利用gii模块,按照下图中生成goods信息

现在,我们的api目录结构应该多个下面这几个目录
从上面截图中可以清楚的看到,GET /v1/goods 已经能够很方便的获取我们表中的数据了。
当然,yii2还对该api封装了如下操作:
1 2 3 4 5 6 7 8 9 |
|
不信的话我们可以利用postman发送一个post请求到/v1/goods,我们会发现成功创建了一个新的商品。
需要提醒的是,操作中还请细心且注意:如果你的控制器末端不是复数(比如是blog非blogs)请保证请求的时候是复数!这是因为在RESTful架构中,网址中只能有名词而不能包含动词,名词又往往与数据表相对应,数据表呢又是一个“集合”,因此该名词往往是复数的形式。
7、关于授权认证
为什么需要授权认证?这在一般的操作中是需要的。比如说用户要设置自己的信息。
为了对yii2 restful授权认证说的更清楚,我们将会以两个两种不同的方法进行说明。
首先需要开启认证:
假设我们已经按照第3步创建了包含字段access-token的数据表user,而且利用gii上生成了相应的model和controller
配置main.php文件
1 2 3 4 5 6 7 |
|
为控制器配置authenticator行为指定认证方式
1 2 3 4 5 6 7 8 9 10 11 12 13 14 15 16 |
|
最后我们还需要在identityClass中实现findIdentityByAccessToken方法
1 2 3 4 |
|
如此一来,我们先通过postman模拟不带access-token请求看结果
1 2 3 4 5 6 7 |
|
提示401 我们没有权限访问!
我们在请求的链接上携带正确的access-token,认证通过后,控制器会再继续执行其他检查(频率限制、操作权限等),才可以返回正确的用户信息。
需要提醒的是:通过url的形式对access-token传递存在一定的风险,有可能会造成数据的泄漏!一般而言,access-token需要放到HTTP头中进行传递!除非客户端的请求是jsonp格式的!
关于授权认证,我们有一篇更详细的文章,包括一套完整案例、服务端返回的数据类型定义、自定义错误机制等。
8、速率限制
速率限制,该操作完全也是出于安全考虑,我们需要限制同一接口某时间段过多的请求。
速率限制默认不启用,用启用速率限制,yii\web\User::identityClass 应该实现yii\filters\RateLimitInterface,也就是说我们的common\models\User.php需要实现yii\filters\RateLimitInterface接口的三个方法,具体代码可参考:
1 2 3 4 5 6 7 8 9 10 11 12 13 14 15 16 17 18 19 20 21 22 |
|
需要注意的是,你仍然需要在数据表User中新增加两个字段
allowance:剩余的允许的请求数量
allowance_updated_at:相应的UNIX时间戳数
在我们启用了速率限制后,Yii 会自动使用 yii\filters\RateLimiter 为 yii\rest\Controller 配置一个行为过滤器来执行速率限制检查。
现在我们通过postman请求v1/users再看看结果,会发现在10秒内调用超过5次API接口,我们会得到状态为429太多请求的异常信息。
1 2 3 4 5 6 7 |
|
9、关于版本
为了兼容历史版本而且考虑向后兼容性,我们在一开始操作的时候就以URL的方式实现了版本话,这里就不再进行阐述了。
10、错误处理
Yii的REST框架的HTTP状态代码可参考如下就好,没啥好说的
200: OK。一切正常。
201: 响应 POST 请求时成功创建一个资源。Location header 包含的URL指向新创建的资源。
204: 该请求被成功处理,响应不包含正文内容 (类似 DELETE 请求)。
304: 资源没有被修改。可以使用缓存的版本。
400: 错误的请求。可能通过用户方面的多种原因引起的,例如在请求体内有无效的JSON 数据,无效的操作参数,等等。
401: 验证失败。
403: 已经经过身份验证的用户不允许访问指定的 API 末端。
404: 所请求的资源不存在。
405: 不被允许的方法。 请检查 Allow header 允许的HTTP方法。
415: 不支持的媒体类型。 所请求的内容类型或版本号是无效的。
422: 数据验证失败 (例如,响应一个 POST 请求)。 请检查响应体内详细的错误消息。
429: 请求过多。 由于限速请求被拒绝。
500: 内部服务器错误。 这可能是由于内部程序错误引起的。
The above is the detailed content of Steps to write api interface in yii2. For more information, please follow other related articles on the PHP Chinese website!

Hot AI Tools

Undresser.AI Undress
AI-powered app for creating realistic nude photos

AI Clothes Remover
Online AI tool for removing clothes from photos.

Undress AI Tool
Undress images for free

Clothoff.io
AI clothes remover

Video Face Swap
Swap faces in any video effortlessly with our completely free AI face swap tool!

Hot Article

Hot Tools

Notepad++7.3.1
Easy-to-use and free code editor

SublimeText3 Chinese version
Chinese version, very easy to use

Zend Studio 13.0.1
Powerful PHP integrated development environment

Dreamweaver CS6
Visual web development tools

SublimeText3 Mac version
God-level code editing software (SublimeText3)

Hot Topics
 1389
1389
 52
52
 Yii with Docker: Containerizing and Deploying Your Applications
Apr 02, 2025 pm 02:13 PM
The steps to containerize and deploy Yii applications using Docker include: 1. Create a Dockerfile and define the image building process; 2. Use DockerCompose to launch Yii applications and MySQL database; 3. Optimize image size and performance. This involves not only specific technical operations, but also understanding the working principles and best practices of Dockerfile to ensure efficient and reliable deployment.
 Yii Security Hardening: Protecting Your Applications from Vulnerabilities
Apr 03, 2025 am 12:18 AM
In the Yii framework, the application can be protected by the following steps: 1) Enable CSRF protection, 2) Implement input verification, and 3) Use output escape. These measures protect against CSRF, SQL injection and XSS attacks by embedding CSRF tokens, defining verification rules and automatic HTML escapes, ensuring the security of the application.
 The Current State of Yii: A Look at Its Popularity
Apr 13, 2025 am 12:19 AM
YiiremainspopularbutislessfavoredthanLaravel,withabout14kGitHubstars.ItexcelsinperformanceandActiveRecord,buthasasteeperlearningcurveandasmallerecosystem.It'sidealfordevelopersprioritizingefficiencyoveravastecosystem.
 Yii Interview Questions: Ace Your PHP Framework Interview
Apr 06, 2025 am 12:20 AM
When preparing for an interview with Yii framework, you need to know the following key knowledge points: 1. MVC architecture: Understand the collaborative work of models, views and controllers. 2. ActiveRecord: Master the use of ORM tools and simplify database operations. 3. Widgets and Helpers: Familiar with built-in components and helper functions, and quickly build the user interface. Mastering these core concepts and best practices will help you stand out in the interview.
 Yii Database Management: Advanced Active Record & Migrations
Apr 05, 2025 am 12:17 AM
Advanced ActiveRecord and migration tools in the Yii framework are the key to efficiently managing databases. 1) Advanced ActiveRecord supports complex queries and data operations, such as associated queries and batch updates. 2) The migration tool is used to manage database structure changes and ensure secure updates to the schema.
 Yii RESTful API Development: Best Practices & Authentication
Apr 09, 2025 am 12:13 AM
Developing a RESTful API in the Yii framework can be achieved through the following steps: Defining a controller: Use yii\rest\ActiveController to define a resource controller, such as UserController. Configure authentication: Ensure the security of the API by adding HTTPBearer authentication mechanism. Implement paging and sorting: Use yii\data\ActiveDataProvider to handle complex business logic. Error handling: Configure yii\web\ErrorHandler to customize error responses, such as handling when authentication fails. Performance optimization: Use Yii's caching mechanism to optimize frequently accessed resources and improve API performance.
 Yii: A Strong Framework for Web Development
Apr 15, 2025 am 12:09 AM
Yii is a high-performance PHP framework designed for fast development and efficient code generation. Its core features include: MVC architecture: Yii adopts MVC architecture to help developers separate application logic and make the code easier to maintain and expand. Componentization and code generation: Through componentization and code generation, Yii reduces the repetitive work of developers and improves development efficiency. Performance Optimization: Yii uses latency loading and caching technologies to ensure efficient operation under high loads and provides powerful ORM capabilities to simplify database operations.
 Yii 2.0 Deep Dive: Performance Tuning & Optimization
Apr 10, 2025 am 09:43 AM
Strategies to improve Yii2.0 application performance include: 1. Database query optimization, using QueryBuilder and ActiveRecord to select specific fields and limit result sets; 2. Caching strategy, rational use of data, query and page cache; 3. Code-level optimization, reducing object creation and using efficient algorithms. Through these methods, the performance of Yii2.0 applications can be significantly improved.


