How to modify the template in phpcms

1. Open the downloaded phpcms v9 content management system and place it in the code running environment
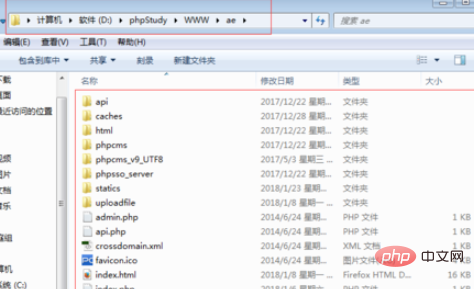
2. Find the phpcms folder, enter the folder, and then find the templates folder, which stores the front-end template code:
Location: D:\phpStudy\WWW\ae\phpcms\templates
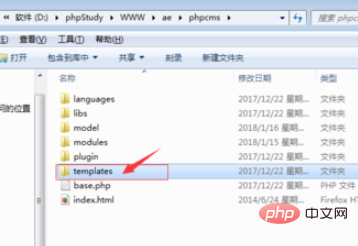
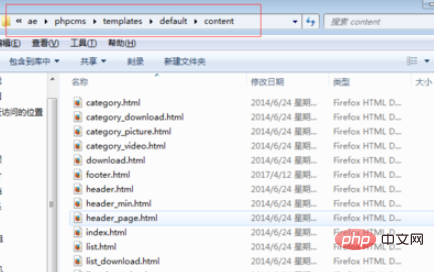
3. After opening the templates folder, then find the default template folder of the phpcms v9 content management system, and finally enter the content file of the front-end template code
File path: D :\phpStudy\WWW\ae\phpcms\templates\default\content
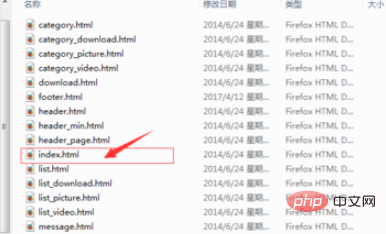
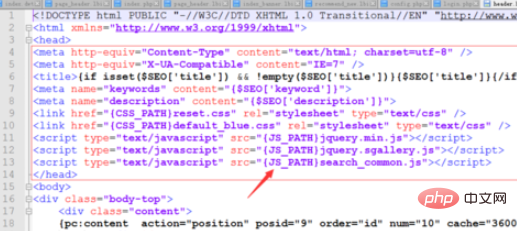
4. The index.html file is the template of the home page, replace it with other home page templates. It is not possible to directly change the front-end home page template, because if the js, css styles, and images picture paths are not loaded correctly, the page will not be displayed normally and will be messy
5. After changing the homepage template, remember to load the correct js, css styles, and images picture paths, so that you can perfectly realize the replacement of the homepage template
Recommended tutorial: phpcms tutorial
The above is the detailed content of How to modify the template in phpcms. For more information, please follow other related articles on the PHP Chinese website!

Hot AI Tools

Undresser.AI Undress
AI-powered app for creating realistic nude photos

AI Clothes Remover
Online AI tool for removing clothes from photos.

Undress AI Tool
Undress images for free

Clothoff.io
AI clothes remover

Video Face Swap
Swap faces in any video effortlessly with our completely free AI face swap tool!

Hot Article

Hot Tools

Notepad++7.3.1
Easy-to-use and free code editor

SublimeText3 Chinese version
Chinese version, very easy to use

Zend Studio 13.0.1
Powerful PHP integrated development environment

Dreamweaver CS6
Visual web development tools

SublimeText3 Mac version
God-level code editing software (SublimeText3)

Hot Topics
 1386
1386
 52
52
 How to change the personal name in the group on DingTalk_How to modify the personal name in the group on DingTalk
Mar 29, 2024 pm 08:41 PM
1. First open DingTalk. 2. Open the group chat and click the three dots in the upper right corner. 3. Find my nickname in this group. 4. Click to enter to modify and save.
 Can Douyin Blue V change its name? What are the steps to change the name of corporate Douyin Blue V account?
Mar 22, 2024 pm 12:51 PM
Douyin Blue V certification is the official certification of a company or brand on the Douyin platform, which helps enhance brand image and credibility. With the adjustment of corporate development strategy or the update of brand image, the company may want to change the name of Douyin Blue V certification. So, can Douyin Blue V change its name? The answer is yes. This article will introduce in detail the steps to modify the name of the enterprise Douyin Blue V account. 1. Can Douyin Blue V change its name? You can change the name of Douyin Blue V account. According to Douyin’s official regulations, corporate Blue V certified accounts can apply to change their account names after meeting certain conditions. Generally speaking, enterprises need to provide relevant supporting materials, such as business licenses, organization code certificates, etc., to prove the legality and necessity of changing the name. 2. What are the steps to modify the name of corporate Douyin Blue V account?
 How to modify the address location of published products on Xianyu
Mar 28, 2024 pm 03:36 PM
When publishing products on the Xianyu platform, users can customize the geographical location information of the product according to the actual situation, so that potential buyers can more accurately grasp the specific location of the product. Once the product is successfully put on the shelves, there is no need to worry if the seller's location changes. The Xianyu platform provides a flexible and convenient modification function. So when we want to modify the address of a published product, how do we modify it? This tutorial guide will provide you with a detailed step-by-step guide. I hope it can help. Everyone! How to modify the release product address in Xianyu? 1. Open Xianyu, click on what I published, select the product, and click Edit. 2. Click the positioning icon and select the address you want to set.
 How to add PPT mask
Mar 20, 2024 pm 12:28 PM
Regarding PPT masking, many people must be unfamiliar with it. Most people do not understand it thoroughly when making PPT, but just make it up to make what they like. Therefore, many people do not know what PPT masking means, nor do they understand it. I know what this mask does, and I don’t even know that it can make the picture less monotonous. Friends who want to learn, come and learn, and add some PPT masks to your PPT pictures. Make it less monotonous. So, how to add a PPT mask? Please read below. 1. First we open PPT, select a blank picture, then right-click [Set Background Format] and select a solid color. 2. Click [Insert], word art, enter the word 3. Click [Insert], click [Shape]
 Effects of C++ template specialization on function overloading and overriding
Apr 20, 2024 am 09:09 AM
C++ template specializations affect function overloading and rewriting: Function overloading: Specialized versions can provide different implementations of a specific type, thus affecting the functions the compiler chooses to call. Function overriding: The specialized version in the derived class will override the template function in the base class, affecting the behavior of the derived class object when calling the function.
 What framework is phpcms?
Apr 20, 2024 pm 10:51 PM
PHP CMS is a PHP-based open source content management system for managing website content. Its features include ease of use, powerful functionality, scalability, high security, and free open source. It can save time, improve website quality, enhance collaboration and reduce development costs, and is widely used in various websites such as news websites, blogs, corporate websites, e-commerce websites and community forums.
 Discuz registration must-read: How to change username and password
Mar 13, 2024 am 08:48 AM
Discuz registration must-read: How to change username and password, specific code examples are required Discuz is a very popular forum program, and many websites choose to use it to build their own online communities. When registering with Discuz, sometimes we need to change the username and password. This article will introduce in detail how to change the username and password in Discuz, and provide specific code examples for your reference. Modifying the user name Modifying the user name in Discuz requires database operations. First, we need
 How to change the automatic screen lock time on an Apple phone. Introduction to how to adjust the screen lock time on an Apple phone.
Mar 23, 2024 am 08:01 AM
1. First, click Settings on the screen. 2. Then click [Display and Brightness]. 3. Then click [Auto Lock]. 4. Then set the time that needs to be automatically locked. 5. After the setting is completed, click the return button to complete the setting.


