DedeCMS's special feature of dream weaving
A website usually launches some targeted thematic content at different periods. The function of the theme is actually to retrieve the content of the site according to specific needs and integrate these different forms of content. We can take a look at this. Some large portals, such as Sina and Sohu, have their own special channels.

A topic can contain content from several different columns or different content models such as: articles, pictures, audios, videos, etc. Different topics You need to have your own page style that matches the environment at that time. For example, on New Year's Day and New Year, you need red-themed thematic templates, and in spring and summer, you need green-themed thematic templates. (Recommended learning: dedecms tutorial)
A good topic can easily allow website members to understand the relevant information more comprehensively to enhance attention to the website. Below we introduce how to use it Use the topic function of DedeCMS to create a topic.
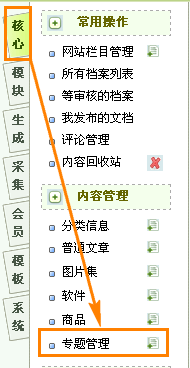
We log in to the backend as a super administrator and manage the topic in the [Core]-[Topic Management] of the system.

Because the common management here is similar to document management, some common operations such as adding, deleting, updating, and recommending will not be described here. This tutorial mainly introduces how to Create your own topic page by combining topics with template files.
To make a topic page, you need to prepare two things: content and template. Of course, if you do not have a template file designed by yourself, the system comes with a set of topic page styles by default, which can be used in the background [Core ]-[Content Model Management], click on the topic type template and you will see the following content:
文档模板:/templets/default/article_spec.htm [修改]
列表模板:/templets/default/list_spec.htm [修改]
频道封面模板:/templets/default/index_spec.htm [修改]
Users can make global unified modifications to these default template files by themselves, but generally they are done when adding topics. Specify it in the "Topic Template" of the general parameters.
Of course, there are some topics that do not need to use content that has been published in the content management system. Such topics can be completed directly using static pages and do not require tags to be called, but they want to be displayed in the topic list. In order to solve this problem, it is recommended that users make the topic page a template file without tags when making the topic page, and then specify the template when adding the topic.
Next, we will introduce how the special functions of Dreamweaver are divided.
As you can see, admin5's topics are generated using a unified topic template. This type of topic only requires the website administrator to choose to organize the topic content of the website, and then publish it to present this type of topic. Website topics. The chinaz topic uses an independent template file, which makes the topic more distinctive and the reading effect more obvious.
DedeCMS comes with a template file for the topic page that can meet most people’s requirements for the topic. Let’s introduce how to use the default template file to create a topic.
Log in to the system backend as a super administrator, enter the topic management page, and click [Add Topic] to enter the topic addition page.
Add the topic name, responsible editor, topic description, keywords, and main category of the topic to the general parameters, and then enter the "Topic Document" tab to select the content of the relevant topic node.
Before adding, let’s understand a concept: nodes.
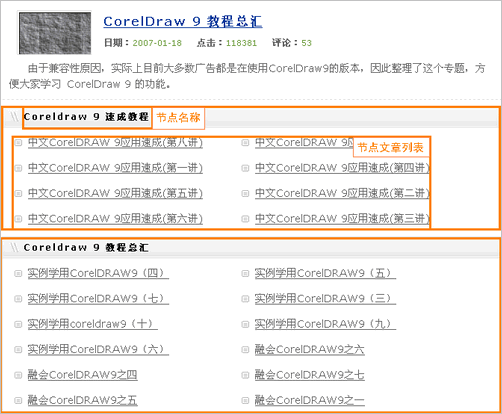
The so-called node is a combination of the same classified content in a topic. As shown in the figure below, there are two nodes: Coreldraw 9 Quick Tutorial and Coreldraw 9 Tutorial Summary. Each node selects some articles in the system. .

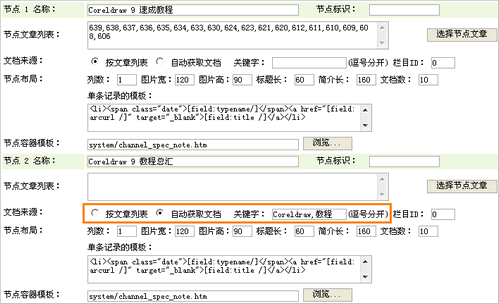
Adding the above two nodes can be added in two ways in the system settings. The first is to specify the article list and "select node articles" in a single node. This method more accurately specifies the content of the topic node, and is the first choice when the node content is small.
The second method is to automatically obtain documents. In this method, you only need to enter the "keyword" of the node to automatically search for the content of articles containing keywords and add them to the content list.

In this way, we have completed the addition of the topic content and published a topic in this form. The style of the topic page is the system default system style. Next we Let’s introduce how to use the topic template tag to create a special topic page.
To create a special template page on the homepage, you need to understand some basic concepts of the Dreamweaver template engine. You need to know what a template engine is and the use of some Dreamweaver template tags. If you can use arclist tags here, you can basically You can create your own theme template.
There are two template files involved in the topic:
/templets/default/article_spec.htm 专题模板文件,这个模板决定你的网站专题页面的样式,是制作模板页面必备的文件
/templets/system/channel_spec_note.htm系统底层的专题节点模板,在制作节点的时候需要对其进行一定的修改
这两个文件是决定你专题样式的模板重要文件,当然这里还有一个底册模板(innertext),这个底层模板在每个节点处都可以单独指定。
这里还需要用户知道的一个专题节点的模板标签:{dede:field.note noteid='识别ID'/},这个标签是用来生成专题页面的文档列表的。
设计专题页面模板
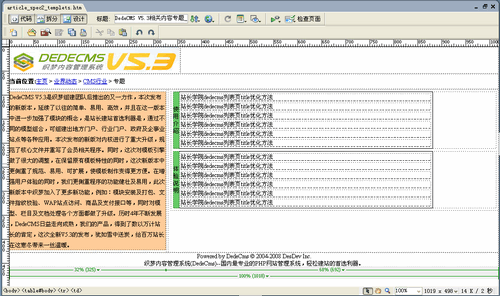
我们首先用网页制作相关工具来设计一个专题页面的模板文件,当然我们这里因为是做一个示例,重点是讲解如何从页面到模板文件这个过程,所以模板文件的样子比较简单,如果是专业的美工人员,可以设计出各式各样专业的模板文件。
我这里只是在网页制作工具中使用Dreamweaver制作出一个专题模板的样子,专题主要分为2个部分,专题内容简介以及节点文章,当然这里专题的内容简介我已经固化在了专题模板文件中,用户也可以使用模板标签{dede:field name='description'/},然后在后台添加专题简介中完成。

加入专题页模板标签
从上面的内容我们知道,织梦的模板需要在页面中加入织梦模板标签后才能完成制作,接下来我们来加入模板标签。在加标签之前,我们先将上面设计出来的模板文件保存为:
/templets/default/article_spec2_templets.htm,保存完成以后我们可以修改这个页面,加入标签,使其变成专题页面的模板。
首先我们加入常用标签:{dede:field.title/}_{dede:global.cfg_webname/}
这个标签是加入在模板文件
当然,在seo方面可以在
和之间加入以下代码<meta name="keywords" content="{dede:field.keywords/}" />
<meta name="description" content="{dede:field.description function='html2text(@me)'/}" />这个代码就是将你在添加专题时候设置的关键字以及专题说明添加进页面。
接下来最重要的就是专题节点部分的添加了,因为节点部分主要是列表,所以涉及到一个底层模板(innertext)的概念,底层模板在织梦的标签语法简介中已经有相关说明。
因为我们从模板文件中可以找出单挑记录循环的内容为:
<tr>
<td>站长学院<a href="#" target="_blank">dedecms列表页title优化方法</a></td>
</tr>
所以我们根据arclist的相关标记可以得到底层模板(innertext):
<tr>
<td>[field:typename/]<a href="[field:arcurl /]" target="_blank">[field:title /]</a></td>
</tr>
这个底层模板我们在添加节点的时候可以进行指定

接下来我们在节点部分加入节点标签{dede:field.note noteid='标识'/},因为我们这里有2个节点名称,标识ID分别为: use(使用介绍)、exp (体验说明),所以我们替换模板页面中循环部分:
<table width="100%" style="max-width:90%" border="0" cellpadding="0" cellspacing="0">
<tr>
<td width="2%" bgcolor="#66CC66">使用介绍</td>
<td width="98%" align="left"><table width="80%" border="0" cellpadding="0" cellspacing="3" id="nlist">
{dede:field.note noteid='use'/}
</table></td>
</tr>
</table>这样一来,我们的专题模板就制作完成了,我们将其另存文件名为:
/templets/default/article_spec2.htm,这个文件就是我们的专题模板文件。
修改节点容器模板
在我们上面设计的模板中,有2个节点,因为我们其中有一部分内容已经固化在模板中,所以如果直接发布内容,会出现多出了节点标题的情况,一个节点生成为页面的时候,DedeCMS会读取他的节点容器模板,所以我们需要对节点容器模板进行一些修改,我们打开/templets/system/channel_spec_note.htm这是默认的节点容器模板。
                     <dl class="tbox">
                            <dt><strong>~notename~</strong></dt>
                            <dd>
                                   <ul class="d1 ico3">
                           ~spec_arclist~
                                   </ul>
                            </dd>
</dl>这里需要介绍2个标记:~notename~和~spec_arclist~
~notename~ 节点的名称,在系统解析时候会在节点中将这个标签解析为当前设置的名称
~spec_arclist~ 节点内容列表,系统读取底层模板文件,并解析成节点设置的内容同这个标记进行替换
这个节点容器解析后的内容再同{dede:field.note noteid='标识'/}标记进行替换,完成模板的解析,所以我们在这里需要对其进行一些修改,因为前面设计时候的节点名称已经固化在模板文件中,所以这里不涉及到这部分的内容。我们只要将冗余部分的代码去除,直接使之变为:
~spec_arclist~
如果不想影响到其他模板文件的使用我们将其另存为:
/templets/system/channel_spec_note_dedecms.htm
我们在添加专题时候可以独立设置为:

至此我们完成了专题页面模板文件的制作,接下来做的只需要像上面所说的一样,直接选取相应的内容添加节点发布即可。
The above is the detailed content of DedeCMS's special feature of dream weaving. For more information, please follow other related articles on the PHP Chinese website!

Hot AI Tools

Undresser.AI Undress
AI-powered app for creating realistic nude photos

AI Clothes Remover
Online AI tool for removing clothes from photos.

Undress AI Tool
Undress images for free

Clothoff.io
AI clothes remover

AI Hentai Generator
Generate AI Hentai for free.

Hot Article

Hot Tools

Notepad++7.3.1
Easy-to-use and free code editor

SublimeText3 Chinese version
Chinese version, very easy to use

Zend Studio 13.0.1
Powerful PHP integrated development environment

Dreamweaver CS6
Visual web development tools

SublimeText3 Mac version
God-level code editing software (SublimeText3)

Hot Topics
 Where is the imperial cms resource network template?
Apr 17, 2024 am 10:00 AM
Empire CMS template download location: Official template download: https://www.phome.net/template/ Third-party template website: https://www.dedecms.com/diy/https://www.0978.com.cn /https://www.jiaocheng.com/Installation method: Download template Unzip template Upload template Select template
 How to use dedecms
Apr 16, 2024 pm 12:15 PM
Dedecms is an open source Chinese CMS system that provides content management, template system and security protection. The specific usage includes the following steps: 1. Install Dedecms. 2. Configure the database. 3. Log in to the management interface. 4. Create content. 5. Set up the template. 6. Manage users. 7. Maintain the system.
 Accurate and reliable dedecms conversion tool evaluation report
Mar 12, 2024 pm 07:03 PM
Accurate and reliable dedecms conversion tool evaluation report With the rapid development of the Internet era, website construction has become one of the necessary tools for many companies and individuals. In website construction, using a content management system (CMS) can manage website content and functions more conveniently and efficiently. Among them, dedecms, as a well-known CMS system, is widely used in various website construction projects. However, sometimes we are faced with the need to convert the dedecms website to other formats, in which case we need to use a conversion tool
 How to upload local videos to dedecms
Apr 16, 2024 pm 12:39 PM
How to upload local videos using Dedecms? Prepare the video file in a format that is supported by Dedecms. Log in to the Dedecms management backend and create a new video category. Upload video files on the video management page, fill in the relevant information and select the video category. To embed a video while editing an article, enter the file name of the uploaded video and adjust its dimensions.
 How dedecms implements template replacement
Apr 16, 2024 pm 12:12 PM
Template replacement can be implemented in Dedecms through the following steps: modify the global.cfg file and set the required language pack. Modify the taglib.inc.php hook file and add support for language suffix template files. Create a new template file with a language suffix and modify the required content. Clear Dedecms cache.
 A simple way to learn dedecms encoding conversion function
Mar 14, 2024 pm 02:09 PM
Learning dedecms encoding conversion function is not complicated. Simple code examples can help you quickly master this skill. In dedecms, the encoding conversion function is usually used to deal with problems such as Chinese garbled characters and special characters to ensure the normal operation of the system and the accuracy of data. The following will introduce in detail how to use the encoding conversion function of dedecms, allowing you to easily cope with various encoding-related needs. 1.UTF-8 to GBK In dedecms, if you need to convert UTF-8 encoded string to G
 What loopholes does dedecms have?
Aug 03, 2023 pm 03:56 PM
DedeCMS is an open source content management system that has some potential vulnerabilities and security risks: 1. SQL injection vulnerability. Attackers can perform unauthorized operations or obtain sensitive data by constructing malicious SQL query statements; 2. File Upload vulnerability, attackers can upload files containing malicious code to the server to execute arbitrary code or obtain server permissions; 3. Sensitive information leakage; 4. Unauthenticated vulnerability exploitation.
 What website can dedecms do?
Apr 16, 2024 pm 12:24 PM
Dedecms is an open source CMS that can be used to create various types of websites, including: news websites, blogs, e-commerce websites, forums and community websites, educational websites, portals, other types of websites (such as corporate websites, personal websites, photo album websites, video sharing website)


