Chapter 1 File Upload
1.1 Client Upload Settings
File upload has become a common function in B/S programs . The purpose is that customers can upload files to the specified directory on the server (Server) through the browser (Browser).
Common websites on the Internet that support file upload:
Various network disks
Avatar
Online photo album
Real-name authentication
Email attachment
To put it simply, Web development requires users to pass files to the server, which all fall into the upload category of PHP. The server can only accept copies unless it does not perform this function. Just like 10086 customer service, as long as you call, it will accept it. If it doesn't accept it, it can only mean that the server is busy.
Basic knowledge of file upload in PHP:
1) Client form setting
2) The server operates and processes the uploaded file
Must be set form form items:
<html>
    <head><title>文件上传</title></head>
    <body>
        <form action="./upload.php"  method="post" enctype="multipart/form-data"><!--必须要写-->
            <!--typle写file类型,name必须要写,名字随便-->
            选择文件:<input type="file" name="myfile">
            <input type="submit" value="上传文件">
        </form>
    </body>
</html>Pay attention to several characteristic attributes:
1. The file must be uploaded in the post method, and the get method cannot be used.
2. The form must write enctype="multipart/form-data".
3. The name must be written in the input form.
1.2 Processing uploads through PHP on the server side
The reception and processing of uploaded files are handled through PHP scripts. Specifically, the following three aspects of information are required:
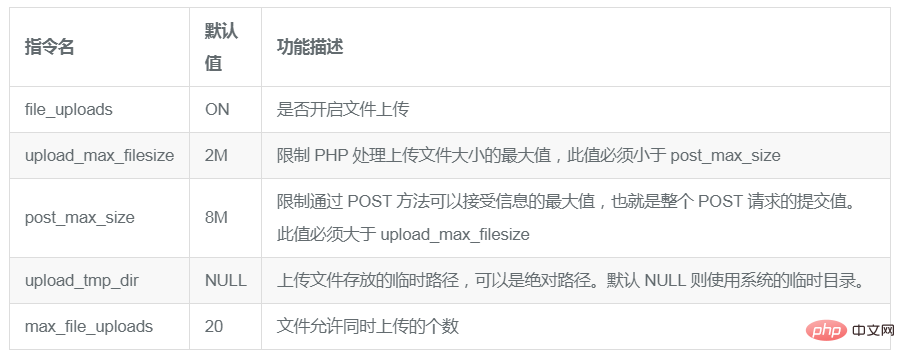
1 ) Set the instructions in the PH configuration file: used to finely adjust the file upload function of PHP.
2) $FILES multi-dimensional array: used to store various information related to uploaded files. Other data is still obtained using $_POST.
3) PHP file upload processing function: used for subsequent processing of uploaded files.
1) Options related to file upload in the PHP configuration file.

2) $_FILES multi-dimensional array.
Super global array $_FILES
1. The value in $_FILES["myfile"]["name"] is: the name of the file in the client file system.
2. The value in $FILES["myfile"]["type"] is: the type of file passed by the client.
3. The value in $_FILES["myfile"]["size"] is: the size of the file in bytes.
4. The value in $_FILES["myfile"]["tmp_name"] is: the temporary full path stored on the server after the file is uploaded.
5. The value in $_FILES["myfile"]["error"] is: the error code of file upload - a function added after PHP 4.2.
About error error code for file upload:
UPLOAD_ERR_OK
The value is 0, no error occurs, and the file upload is successful.
UPLOAD_ERR_INI_SIZE
The value is 1, and the uploaded file exceeds the limit of the upload_max_filesize option in php.ini.
UPLOAD_ERR_FORM_SIZE
The value is 2, and the size of the uploaded file exceeds the value specified by the MAX_FILE_SIZE option in the HTML form.
UPLOAD_ERR_PARTIAL
The value is 3, and only part of the file is uploaded.
UPLOAD_ERR_NO_FILE
The value is 4 and no file was uploaded.
UPLOAD_ERR_NO_TMP_DIR
The value is 6 and the temporary folder cannot be found. Introduced in PHP 4.3.10 and PHP 5.0.3.
UPLOAD_ERR_CANT_WRITE
The value is 7, file writing failed. Introduced in PHP 5.1.0.
Note: The above values become PHP constants after PHP 4.3.0.
Common data format (MIME)

##3) PHP file upload processing function
The successfully uploaded file will be placed in the temporary directory on the server side, and the file name is a randomly generated temporary file name. Note: This file will be automatically deleted after the program is executed. Can be operated like a local file before deleting. File upload processing function:is_uploaded_file - Determine whether the file is uploaded through HTTP POST. Format: bool is_uploaded_file (string $filename)move_uploaded_file — Move the uploaded file to a new location. Format: bool move_uploaded_file (string $filename, string $destination)Note: If the destination file already exists, it will be overwritten. Parameter description: temporary directory of files, the location directory to be moved toCase:1) Set the front-end upload interface
<!DOCTYPE html>
<html>
<head>
    <meta charset="UTF-8">
    <title>Document</title>
</head>
<body>
    <form action="doup.php" method="post" enctype="multipart/form-data">
        <input type="file" name="pic">
        <input type="submit" value="上传">
    </form>
</body>
</html> //专业搬运工具
//move_uploaded_file()
//参数1: 文件临时目录 参数2: 要移动到的位置
//is_uploaded_file() 判断文件是否是http post提交过来的
//参数1: 文件临时目录
//1.我们保存的路径按照时间来创建
//var_dump($_GET);
//1.1保存的路径
$dir='./biran/'.date('Y/m/d/');
//echo $dir;exit;
//1.2 判断文件上传的路径是否存在 如果不存在就创建
if(!file_exists($dir)){
mkdir($dir,777,true);
}
//2.要有个好的文件名 唯一的文件名
//2.1获取文件的后缀名
//2.jpg jpg
$suffix = pathinfo($_FILES['pic']['name'],PATHINFO_EXTENSION);
//echo $suffix;
//2.2重新起名
$filename = date('Ymd').uniqid().mt_rand(0,9999).'.'.$suffix;
//echo $filename;
//开始搬运
//判断是否是http post 传递的文件
if(!is_uploaded_file($_FILES['pic']['tmp_name'])){
//不是http post上传文件
echo '别整没用的!!';exit;
}
//开始真正的搬运
if(move_uploaded_file($_FILES['pic']['tmp_name'],$dir.$filename)){
echo '11111111111';
}else{
echo '22222222222';
} function upload(){
//1.判断文件上传错误
//2.判断你文件上传的类型是否是你想要的类型
//3.起名字
//4.判断保存路径是否存在
//5.判断是否是http post方式上传
//6.移动图片
//7.返回移动成功的图片名
}<?php
/*
文件上传函数
@param string $name 文件上传文件域的name值
@param string $dir 文件保存路径
@param array $allow 文件允许上传的类型
return string $filename 文件名 如果失败 返回false
*/
function upload($name,$dir='./upload/',$allow=array('jpg','gif','jpeg','png')){
//echo $name;exit;
//var_dump($_FILES);exit;
//1.判断文件上传错误
if($_FILES[$name]['error']>0){
//echo '上传错误';
switch($_FILES[$name]['error']){
case 1:
echo '上传的文件超过了 php.ini 中upload_max_filesize 选项限制的值.';
break;
case 2:
echo '上传文件的大小超过了 HTML 表单中 MAX_FILE_SIZE 选项指定的值';
break;
case 3:
echo '文件只有部分被上传.';
break;
case 4:
echo '没有文件被上传.';
break;
case 6:
echo '找不到临时文件夹.';
break;
case 7:
echo '文件写入失败.';
break;
}
return false;
}
//2.判断你文件上传的类型是否是你想要的类型
//2.1允许上传的类型
//2.2 获取后缀名
$suffix = pathinfo($_FILES[$name]['name'],PATHINFO_EXTENSION);
//echo $suffix;exit;
//2.3 判断是否是我们允许上传的类型
//var_dump(in_array($suffix,$allow));exit;
if(!in_array($suffix,$allow)){
//不允许上传的类型
echo '大哥你的上传类型不符合';
return false;
}
//3.起名字
$filename = date('Ymd').uniqid().mt_rand(0,9999).'.'.$suffix;
//echo $filename;exit;
//4.判断保存路径是否存在
//4.1 得到保存路径
//4.2 处理保存路径和后面的斜杠
$save_path = rtrim($dir,'/');
$save_path .='/';
//4.3 保存路径中的时间文件夹处理
$save_path .=date('Y/m/d/');
//4.4 判断保存的路径是否存在
if(!file_exists($save_path)){
mkdir($save_path,777,true);
}
//4.5 拼接一个完整的保存路径
$path = $save_path.$filename;
//echo $path;exit;
//5.判断是否是httppost方式上传
if(!is_uploaded_file($_FILES[$name]['tmp_name'])){
echo '滚蛋!';
return false;
}
//6.移动图片
if(!move_uploaded_file($_FILES[$name]['tmp_name'],$path)){
echo '移动失败';
return false;
}
//7.返回移动成功的图片名
return $filename;
}<?php
include './function.php';
//var_dump($_FILES);exit;
echo upload('file','./leiding',array('jpg','png'));Chapter 2 Multiple file upload
2.1 Multiple file upload with different namesWhen multiple files need to be uploaded , there are two implementation solutions: 1) Use different form elements.<input type="file" name="file_a"> <input type="file" name="file_b"> <input type="file" name="file_c">
<input type="file" name="file[]">
<input type="file" name="file[]">
<input type="file" name="file[]">
  <!-- 因为他们三个浏览器不认识这样的类型 -->
    <a href="./downlist/1.rar">1.rar</a>
    <a href="./downlist/1.exe">1.exe</a>
<a href="./downlist/1.avi">1.avi</a>2) 对于浏览器不识别的,可以利用 readfile 函数。
<!-- 浏览器认识这样的类型,就会被解析 -->
<a href="./action.php?name=1.html">1.html</a>
<a href="./action.php?name=1.php">1.php</a>
<a href="./action.php?name=1.txt">1.txt</a>
<a href="./action.php?name=1.jpg">1.jpg</a>
//接收一下name值.
$name = $_GET['name'];
//实现下载功能
//强制浏览器弹出另存为对话框
header('content-Disposition:attachment;filename="'.$name.'"');
//此时只是下载了一个空文件,需要利用readfile读一遍所有的内容.便可下载.
$path = './downlist/'.$name;
readfile($path);The above is the detailed content of How to upload files and download in PHP. For more information, please follow other related articles on the PHP Chinese website!