

Using VSCODE to debug PHP7 source code under WINDOWS

I was involved in PHP extension development some time ago and had debugging requirements for PHP source code. However, most of the tutorials on the Internet are debugging tutorials under LINUX. There are very few tutorials on WINDOWS systems and the process is only roughly explained. So I decided to try to establish a debugging environment under WINDOWS. After all, the principles are the same :).

1. Preparation
The following is the configuration on my development machine, which can be consistent with mine to reduce additional errors due to tool versions The probability of problems.
1.Visual Code source code editing and debugging tool (VS usually brings all the things needed for development under WIN, after all, the universe family bucket...)
The red marked area must be installed3.PHP7 source code (you can also choose to pull it from github)
You can choose a packaged version of the source code
My development machine is 64-bit. Because I am compiling PHP7, I chose the 64-bit deps-7.1-vc14-x64 (extended dependency library package) and created php-sdk-binary-tools. folder, unzip php-sdk-binary-tools-xxx.zip to this folder, create the deps-vc14-x64 folder, and also unzip deps-7.1-vc14-x64.7z to this folder.  At the same time, add the bin path in php-sdk-binary-tools to the WINDOWS system variable PATH. deps-7.1-vc14-x64 is not used in this article for the time being, but you can also download it first, because the libraries and header files that compile some of the extensions that come with it are included in it. When you want to compile the extensions that come with it, you can Use it :).

After running, enter the PHP7 source code directory
 1. Execute buildconf.bat to generate WIN configure file (configure.js)
2. You can run configure.bat --help to view the supported compilation parameters
3. Execute configure.bat --disable-all --enable- cli --enable-debug (in order to demonstrate simple compilation, you can add parameters by yourself)
3. Use VSCODE to debug
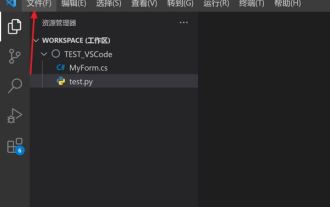
The debugging methods can be divided into two types, one is additional process debugging, and the other is running startup debugging. Both methods will be introduced. Let’s first introduce running startup debugging.First create a php source code file for testing. I created it in x64/Debug_TS in the source code directory.
Then select the menu Debug->Open Configuration and select C (Windows)
 Finally modify the configuration file as follows


 You will then see the breakpoint hit.
 The attached process debugging configuration is also similar. We click the menu option Debug->Open Configuration, and select Add Configuration. Select C/C (Windows) Attach
 We first use PHP -S to start a built-in server (this php must be the php.exe file you compiled and generated) to facilitate the demonstration of additional process debugging. The location I started is the test we created before. The directory where the php file is located.
 The access effect is as follows:

#The way to start debugging is the same, select (Windows) Attach in the debugging panel of VSCODE to run.

#Then select the PHP process in the pop-up process list and start entering the debugging state.
 We use the array_push function in test.php. This time we go to the implementation breakpoint of this function, open ext/standard/array.c, locate line 2540, and set a breakpoint.
 Then visit http://127.0.0.1:8080/test.php in the browser to trigger the breakpoint.
 4. Finally
The debugging method in this article can also be used as a debugging method for extended development. Of course, the same configuration idea also applies to Universe IDE Visual Studio , my idea of configuring VSCODE to debug PHP source code under WINDOWS is also applicable to other platforms (Mac/Linux...). If you are interested in debugging PHP source code in Visual Studio, it is better to use this article as an idea and try to think about it yourself~
The above is the detailed content of Using VSCODE to debug PHP7 source code under WINDOWS. For more information, please follow other related articles on the PHP Chinese website!

Hot AI Tools

Undresser.AI Undress
AI-powered app for creating realistic nude photos

AI Clothes Remover
Online AI tool for removing clothes from photos.

Undress AI Tool
Undress images for free

Clothoff.io
AI clothes remover

AI Hentai Generator
Generate AI Hentai for free.

Hot Article
Hot Tools

Notepad++7.3.1
Easy-to-use and free code editor

SublimeText3 Chinese version
Chinese version, very easy to use

Zend Studio 13.0.1
Powerful PHP integrated development environment

Dreamweaver CS6
Visual web development tools

SublimeText3 Mac version
God-level code editing software (SublimeText3)
Hot Topics
 1378
1378
 52
52

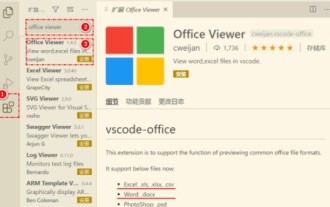 How to view word documents in vscode How to view word documents in vscode
May 09, 2024 am 09:37 AM
How to view word documents in vscode How to view word documents in vscode
May 09, 2024 am 09:37 AM
First, open the vscode software on the computer, click the [Extension] icon on the left, as shown in ① in the figure. Then, enter [officeviewer] in the search box of the extension interface, as shown in ② in the figure. Then, from the search Select [officeviewer] to install in the results, as shown in ③ in the figure. Finally, open the file, such as docx, pdf, etc., as shown below
 How to enable background updates in vscode How to enable background updates in vscode
May 09, 2024 am 09:52 AM
How to enable background updates in vscode How to enable background updates in vscode
May 09, 2024 am 09:52 AM
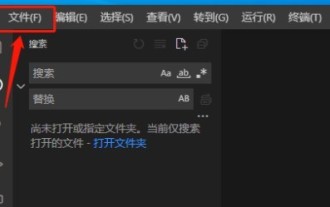
1. First, after opening the interface, click the file menu in the upper left corner. 2. Then, click the settings button in the preferences column. 3. Then, in the settings page that jumps, find the update section. 4. Finally, click the mouse to check and enable it. Download and install the new VSCode version button in the background on Windows and restart the program.
 How to add files to vscode workspace How to add files to vscode workspace
May 09, 2024 am 09:43 AM
How to add files to vscode workspace How to add files to vscode workspace
May 09, 2024 am 09:43 AM
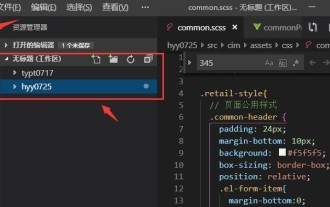
1. First, open the vscode software, click the explorer icon, and find the workspace window 2. Then, click the file menu in the upper left corner and find the add folder to workspace option 3. Finally, find the folder location in the local disk , click the add button
 How to disable wsl configuration file in vscode How to disable wsl configuration file in vscode
May 09, 2024 am 10:30 AM
How to disable wsl configuration file in vscode How to disable wsl configuration file in vscode
May 09, 2024 am 10:30 AM
1. First, open the settings option in the settings menu. 2. Then, find the terminal column in the commonly used page. 3. Finally, uncheck the usewslprofiles button on the right side of the column.
 How to set animation smooth insertion in VScode VScode tutorial to set animation smooth insertion
May 09, 2024 am 09:49 AM
How to set animation smooth insertion in VScode VScode tutorial to set animation smooth insertion
May 09, 2024 am 09:49 AM
1. First, after opening the interface, click the workspace interface 2. Then, in the open editing panel, click the File menu 3. Then, click the Settings button under the Preferences column 4. Finally, click the mouse to check the CursorSmoothCaretAnimation button and save Just set it
 How to open workspace trust permissions in Vscode Vscode method to open workspace trust permissions
May 09, 2024 am 10:34 AM
How to open workspace trust permissions in Vscode Vscode method to open workspace trust permissions
May 09, 2024 am 10:34 AM
1. First, after opening the editing window, click the configuration icon in the lower left corner 2. Then, click the Manage Workspace Trust button in the submenu that opens 3. Then, find the page in the editing window 4. Finally, according to your office Just check the relevant instructions if required
 How to open animation in Vscode Introduction to the method of opening animation in Vscode
May 09, 2024 am 10:28 AM
How to open animation in Vscode Introduction to the method of opening animation in Vscode
May 09, 2024 am 10:28 AM
1. First, click to open the settings option in the More menu. 2. Then, find the terminal column under the Features section. 3. Finally, on the right side of the column, click the enableanimation button with the mouse and save the settings.
 How to set the file icon theme in vscode_How to set the file icon theme in vscode
May 09, 2024 am 10:00 AM
How to set the file icon theme in vscode_How to set the file icon theme in vscode
May 09, 2024 am 10:00 AM
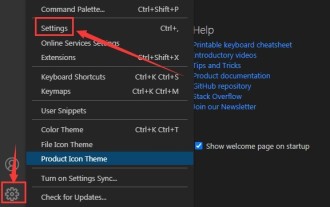
1. After opening the interface, click the extension button in the lower left corner 2. Search for the vscode-icons plug-in in the extension store and install it 3. Then click the preferences button in the file menu in the upper left corner to find the file icon theme option 4. Find the just installed Just set the plug-in
