How to boot linux from USB disk
Preparation work:
A 32G U disk (as the system disk), an 8G U disk (as the installation disk), an ubuntu ISO file, and An UltraISO software.
Method:
First download the ISO file of ubuntu
Then make the ubuntu installation disk, that is, install the Ubuntu startup disk
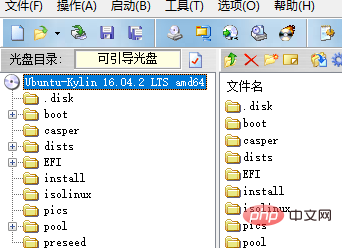
1. Open the UltraISO software (as an administrator), then select "File" -> "Open" and select the ubuntu ISO file you just downloaded
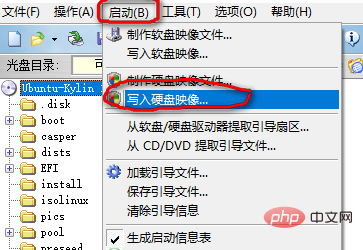
2. Select "Start" -> "Write Hard Disk Image", a dialog box will pop up
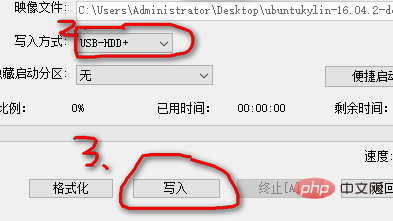
3. In the pop-up dialog In the box, a. "Hard drive": select the 8G USB flash drive. b. "Writing method": USB-HDD, c. Click Write to
Then install the Ubuntu system on the U disk
1) Plug two USB flash drives, 8G and 32G, into the computer and restart the computer. Enter the BIOS according to your computer brand. Some choose F2, F12, etc. differently.
2) Which "BOOT" option to choose. Change the first startup item to: the name of the 8G USB flash drive (select). My USB flash drive is from Kingston, so the first few words starting with "KING...".
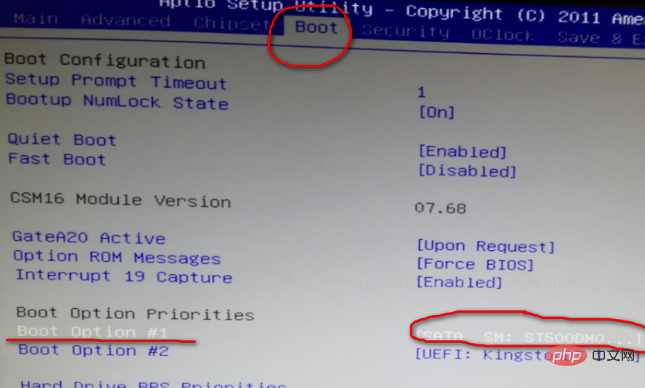
3) Save and exit. Select the "SAVE" option. Below There is a "Save and Exit" and an "Exit without saving". Select "Save and Exit". It will automatically restart and enter the Ubuntu installation interface.

4 ), 4 options will appear, choose the second option, because the first option is for you to experience (starting with Try). The second one means installation immediately (starting with Install).
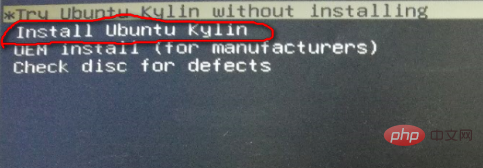
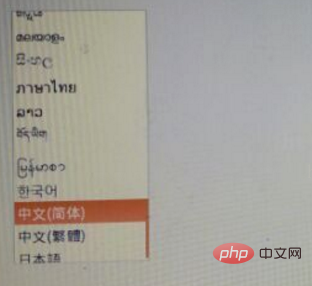
5) Then select the language:
#6) Set up wireless: used to install software, otherwise you have to install it yourself (also possible) . You can use your mobile phone to open a hotspot. Usually it is more than 100 M.
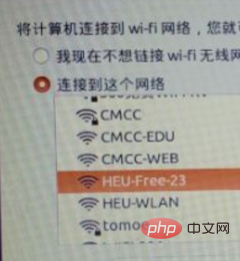
7) Select the first check box and install the corresponding software:
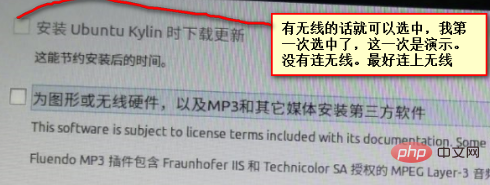
8) Click Continue, and a dialog box will appear. There may not be one, if so, select "Exit".
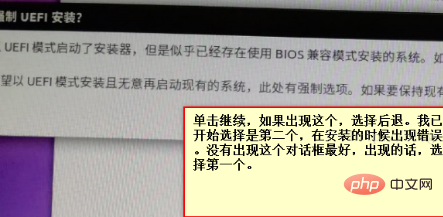
9) Select the "Custom Installation" option. If you select the first one, the startup items of the local computer will be modified. A USB disk must be inserted for each startup, and cannot be inserted into other computers for startup. Click Continue and you will enter the partition. Interface
10) Enter the size of the primary partition (don’t divide it all, divide it into 20G capacity, 20480M), select the primary partition, select the default EXT4 log file system when selecting options, and select the first "mount point" , that is, "/".
11) After selecting idle, click the number, select the logical partition, enter the capacity as 200M, select the default EXT4 log file system, and select /boot for the "mount point".
12) After selecting idle, click the number, select the logical partition, enter the capacity as 4096M, and select the swap space.
13) After selecting idle, click the number, select the logical partition, and enter The capacity is the remaining (no need to enter), select the default EXT4 log file system, and select /usr.
14) for the "mount point". An important point: select the "Device for installing the bootloader". For your U disk, just select /dev/sdc. The default is dev/sda. Do not select this, otherwise the data will be lost. Then click Install. A dialog box will pop up showing the contents of the format. See Check if there is your /dev/sda (it must not be there). Generally, the format /dev/sdc appears, which is of course. It should be the one you want to install on.
15) Select the time zone (usually SHANGHAI ).
16)Select the language.
17)Enter the login name and secret.
18)It is the installation. After the installation is complete, restart the machine.
19) After restarting, select which 32G U disk the startup item is. Or unplug the 8G USB flash drive.
Finish!
Recommended tutorial: linux tutorial
The above is the detailed content of How to boot linux from USB disk. For more information, please follow other related articles on the PHP Chinese website!

Hot AI Tools

Undresser.AI Undress
AI-powered app for creating realistic nude photos

AI Clothes Remover
Online AI tool for removing clothes from photos.

Undress AI Tool
Undress images for free

Clothoff.io
AI clothes remover

AI Hentai Generator
Generate AI Hentai for free.

Hot Article

Hot Tools

Notepad++7.3.1
Easy-to-use and free code editor

SublimeText3 Chinese version
Chinese version, very easy to use

Zend Studio 13.0.1
Powerful PHP integrated development environment

Dreamweaver CS6
Visual web development tools

SublimeText3 Mac version
God-level code editing software (SublimeText3)

Hot Topics
 deepseek web version entrance deepseek official website entrance
Feb 19, 2025 pm 04:54 PM
DeepSeek is a powerful intelligent search and analysis tool that provides two access methods: web version and official website. The web version is convenient and efficient, and can be used without installation; the official website provides comprehensive product information, download resources and support services. Whether individuals or corporate users, they can easily obtain and analyze massive data through DeepSeek to improve work efficiency, assist decision-making and promote innovation.
 How to install deepseek
Feb 19, 2025 pm 05:48 PM
There are many ways to install DeepSeek, including: compile from source (for experienced developers) using precompiled packages (for Windows users) using Docker containers (for most convenient, no need to worry about compatibility) No matter which method you choose, Please read the official documents carefully and prepare them fully to avoid unnecessary trouble.
 BITGet official website installation (2025 beginner's guide)
Feb 21, 2025 pm 08:42 PM
BITGet is a cryptocurrency exchange that provides a variety of trading services including spot trading, contract trading and derivatives. Founded in 2018, the exchange is headquartered in Singapore and is committed to providing users with a safe and reliable trading platform. BITGet offers a variety of trading pairs, including BTC/USDT, ETH/USDT and XRP/USDT. Additionally, the exchange has a reputation for security and liquidity and offers a variety of features such as premium order types, leveraged trading and 24/7 customer support.
 Ouyi okx installation package is directly included
Feb 21, 2025 pm 08:00 PM
Ouyi OKX, the world's leading digital asset exchange, has now launched an official installation package to provide a safe and convenient trading experience. The OKX installation package of Ouyi does not need to be accessed through a browser. It can directly install independent applications on the device, creating a stable and efficient trading platform for users. The installation process is simple and easy to understand. Users only need to download the latest version of the installation package and follow the prompts to complete the installation step by step.
 Get the gate.io installation package for free
Feb 21, 2025 pm 08:21 PM
Gate.io is a popular cryptocurrency exchange that users can use by downloading its installation package and installing it on their devices. The steps to obtain the installation package are as follows: Visit the official website of Gate.io, click "Download", select the corresponding operating system (Windows, Mac or Linux), and download the installation package to your computer. It is recommended to temporarily disable antivirus software or firewall during installation to ensure smooth installation. After completion, the user needs to create a Gate.io account to start using it.
 Ouyi Exchange Download Official Portal
Feb 21, 2025 pm 07:51 PM
Ouyi, also known as OKX, is a world-leading cryptocurrency trading platform. The article provides a download portal for Ouyi's official installation package, which facilitates users to install Ouyi client on different devices. This installation package supports Windows, Mac, Android and iOS systems. Users can choose the corresponding version to download according to their device type. After the installation is completed, users can register or log in to the Ouyi account, start trading cryptocurrencies and enjoy other services provided by the platform.
 gate.io official website registration installation package link
Feb 21, 2025 pm 08:15 PM
Gate.io is a highly acclaimed cryptocurrency trading platform known for its extensive token selection, low transaction fees and a user-friendly interface. With its advanced security features and excellent customer service, Gate.io provides traders with a reliable and convenient cryptocurrency trading environment. If you want to join Gate.io, please click the link provided to download the official registration installation package to start your cryptocurrency trading journey.
 How to Install phpMyAdmin with Nginx on Ubuntu?
Feb 07, 2025 am 11:12 AM
This tutorial guides you through installing and configuring Nginx and phpMyAdmin on an Ubuntu system, potentially alongside an existing Apache server. We'll cover setting up Nginx, resolving potential port conflicts with Apache, installing MariaDB (


