

Build mysql master-slave service on cnetos7

This article mainly introduces how to build the master-slave server of mysql on centos. If you haven't built it before, you can check my previous blog, which has detailed installation centos and installation on centos## Description of #mysql.

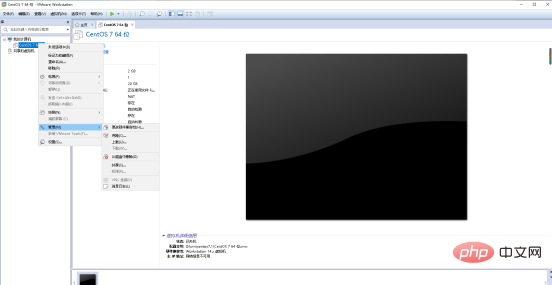
1. Install the slave virtual machine:
1 ,Right click—>Manage—>Clone
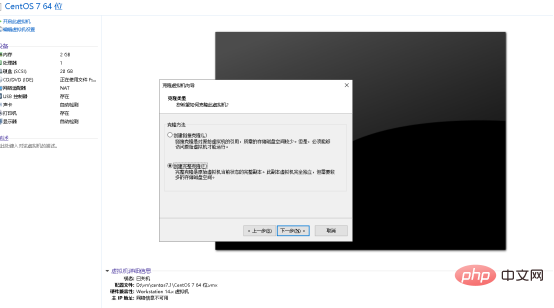
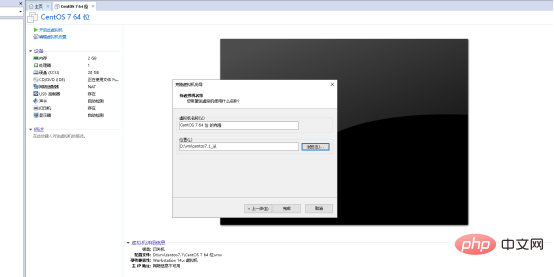
Modify the location of the virtual machine, the default is C Under the plate.
Due to the two cloned servers, ip is the same, so you need to modify the slave service virtual machineip;
vi /etc/sysconfig/network-scripts/ifcfg-ens33
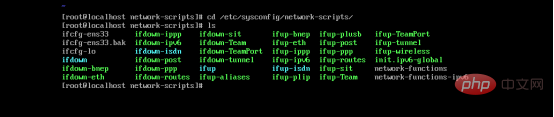
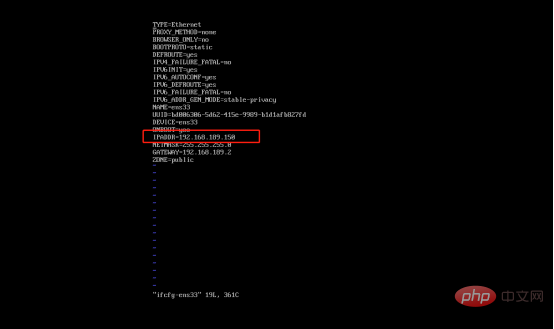
Find In the red line below, change the ip address. I changed 150 to 151:
systemctl restart network
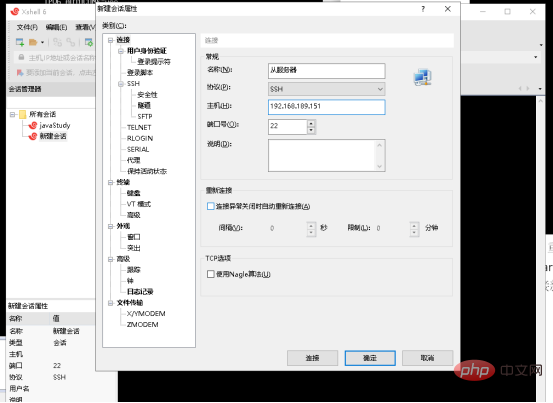
Use xShell to connect to the newly configured virtual machine
2. Configure the mysql main service:
No matter which project, 80% are all based on reading. Therefore, it is generally required that the configuration of the slave library is higher than that of the main library.
For the configuration of the main library, the main thing is to enable the binlog log.
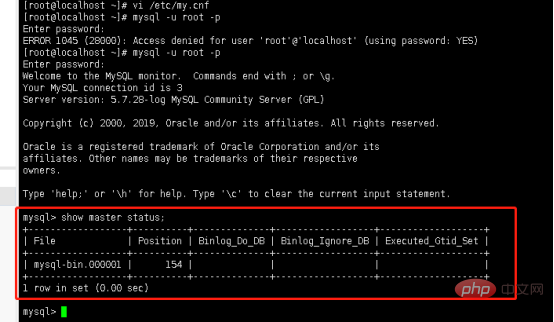
1. Enter mysql to view the status:
show master status;
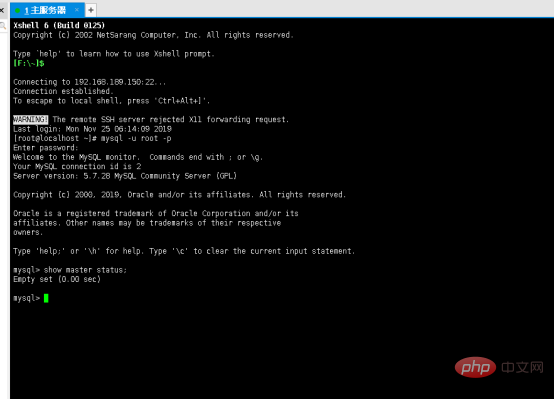
you can see , the execution result is empty, so you need to open the binlog log;
2,Find the configuration file of mysql:
vi /etc/my.cnf
Add binloglog in the configuration file
log-bin= mysql-bin
Server-id = 1
service mysql restart
Entermysql When you execute the command just now and you can see this information, it proves that the binloglog is opened successfully
对于主从复制,在本质上就是通过与从数据库复制与主数据库的binlog日志文件,通过重做实现的同步; 但是一定要注意尽量保证主从服务器上安装了相同的版本的数据库,设定主从的服务器ip地址为192.168.189.150从服务器的ip地址是192.168.189.151。
然后再主服务器上设置一个复制使用的账号,并授予replication slave权限。
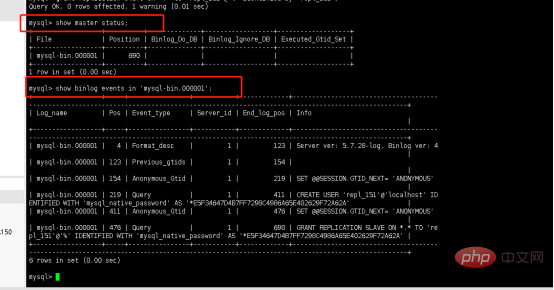
5、创建一个复制用的账号:
create user 'username'@'localhost' identified by 'password';
我这里设置的账号和密码都是repl_151

6、创建成功,还没有权限,所以下一步我们需要提供一个复制的权限
grant replication slave on *.* to 'repl_151'@'%' identified by 'repl_151';
到这里我们主库就配置完成了;可以使用show master status来查看binlog日志是否发生了变化。也可以使用show binlog events in ‘mysql-bin.000001’;来查看刚刚我们所作的操作。
三.配置从库:
对从库的操作主要就是配置同步日志文件(中继日志)。
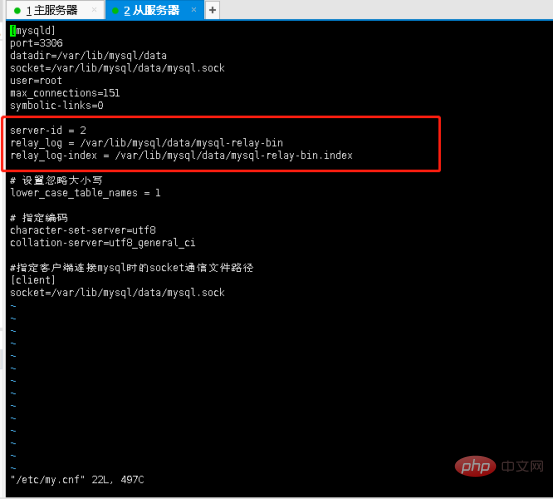
1、打开配置文件:vi /etc/my.cnf
需要设置服务的id,已经中继日志需要放到哪个地方,以及定义中继日志的索引文件(可不写);
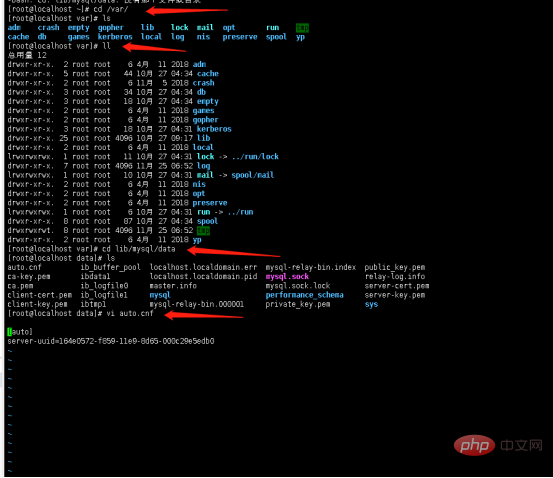
2、由于是克隆,所以会导致服务的uuid是相同的,执行这几行命令,将auto.cnf中的uuid清空;
3、下来要指定主库和从库的信息
change master to
    master_host="192.168.189.150",
    master_port=3306,
    master_user="repl_151",
    master_password="repl_151",
    master_log_file="mysql-bin.000001",
    master_log_pos=0;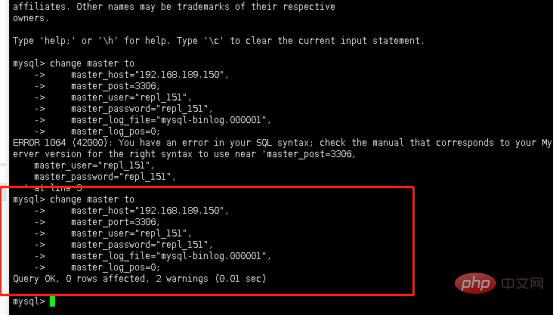
4、启动 start slave;
5、当看到两个红线框起来的地方都是yes的时候,表示已经配置成功了;

到这里在centos7上配置mysql主从服务就已经完成。
推荐学习:MySQL教程
The above is the detailed content of Build mysql master-slave service on cnetos7. For more information, please follow other related articles on the PHP Chinese website!

Hot AI Tools

Undresser.AI Undress
AI-powered app for creating realistic nude photos

AI Clothes Remover
Online AI tool for removing clothes from photos.

Undress AI Tool
Undress images for free

Clothoff.io
AI clothes remover

AI Hentai Generator
Generate AI Hentai for free.

Hot Article
Hot Tools

Notepad++7.3.1
Easy-to-use and free code editor

SublimeText3 Chinese version
Chinese version, very easy to use

Zend Studio 13.0.1
Powerful PHP integrated development environment

Dreamweaver CS6
Visual web development tools

SublimeText3 Mac version
God-level code editing software (SublimeText3)
Hot Topics
 1378
1378
 52
52

 MySQL: The Ease of Data Management for Beginners
Apr 09, 2025 am 12:07 AM
MySQL: The Ease of Data Management for Beginners
Apr 09, 2025 am 12:07 AM
MySQL is suitable for beginners because it is simple to install, powerful and easy to manage data. 1. Simple installation and configuration, suitable for a variety of operating systems. 2. Support basic operations such as creating databases and tables, inserting, querying, updating and deleting data. 3. Provide advanced functions such as JOIN operations and subqueries. 4. Performance can be improved through indexing, query optimization and table partitioning. 5. Support backup, recovery and security measures to ensure data security and consistency.
 MySQL: Simple Concepts for Easy Learning
Apr 10, 2025 am 09:29 AM
MySQL: Simple Concepts for Easy Learning
Apr 10, 2025 am 09:29 AM
MySQL is an open source relational database management system. 1) Create database and tables: Use the CREATEDATABASE and CREATETABLE commands. 2) Basic operations: INSERT, UPDATE, DELETE and SELECT. 3) Advanced operations: JOIN, subquery and transaction processing. 4) Debugging skills: Check syntax, data type and permissions. 5) Optimization suggestions: Use indexes, avoid SELECT* and use transactions.
 How to open phpmyadmin
Apr 10, 2025 pm 10:51 PM
How to open phpmyadmin
Apr 10, 2025 pm 10:51 PM
You can open phpMyAdmin through the following steps: 1. Log in to the website control panel; 2. Find and click the phpMyAdmin icon; 3. Enter MySQL credentials; 4. Click "Login".
 How to create navicat premium
Apr 09, 2025 am 07:09 AM
How to create navicat premium
Apr 09, 2025 am 07:09 AM
Create a database using Navicat Premium: Connect to the database server and enter the connection parameters. Right-click on the server and select Create Database. Enter the name of the new database and the specified character set and collation. Connect to the new database and create the table in the Object Browser. Right-click on the table and select Insert Data to insert the data.
 MySQL and SQL: Essential Skills for Developers
Apr 10, 2025 am 09:30 AM
MySQL and SQL: Essential Skills for Developers
Apr 10, 2025 am 09:30 AM
MySQL and SQL are essential skills for developers. 1.MySQL is an open source relational database management system, and SQL is the standard language used to manage and operate databases. 2.MySQL supports multiple storage engines through efficient data storage and retrieval functions, and SQL completes complex data operations through simple statements. 3. Examples of usage include basic queries and advanced queries, such as filtering and sorting by condition. 4. Common errors include syntax errors and performance issues, which can be optimized by checking SQL statements and using EXPLAIN commands. 5. Performance optimization techniques include using indexes, avoiding full table scanning, optimizing JOIN operations and improving code readability.
 How to create a new connection to mysql in navicat
Apr 09, 2025 am 07:21 AM
How to create a new connection to mysql in navicat
Apr 09, 2025 am 07:21 AM
You can create a new MySQL connection in Navicat by following the steps: Open the application and select New Connection (Ctrl N). Select "MySQL" as the connection type. Enter the hostname/IP address, port, username, and password. (Optional) Configure advanced options. Save the connection and enter the connection name.
 How to recover data after SQL deletes rows
Apr 09, 2025 pm 12:21 PM
How to recover data after SQL deletes rows
Apr 09, 2025 pm 12:21 PM
Recovering deleted rows directly from the database is usually impossible unless there is a backup or transaction rollback mechanism. Key point: Transaction rollback: Execute ROLLBACK before the transaction is committed to recover data. Backup: Regular backup of the database can be used to quickly restore data. Database snapshot: You can create a read-only copy of the database and restore the data after the data is deleted accidentally. Use DELETE statement with caution: Check the conditions carefully to avoid accidentally deleting data. Use the WHERE clause: explicitly specify the data to be deleted. Use the test environment: Test before performing a DELETE operation.
 How to use single threaded redis
Apr 10, 2025 pm 07:12 PM
How to use single threaded redis
Apr 10, 2025 pm 07:12 PM
Redis uses a single threaded architecture to provide high performance, simplicity, and consistency. It utilizes I/O multiplexing, event loops, non-blocking I/O, and shared memory to improve concurrency, but with limitations of concurrency limitations, single point of failure, and unsuitable for write-intensive workloads.
