

How to create table in layui

The table module is another thoughtful work of layui. It is newly launched in the layui 2.0 version and is one of the core components of layui. It is used to perform a series of functions and dynamic data operations on tables, covering almost all needs involved in daily business. Recommended: layui usage tutorial
Supports fixed headers, fixed rows, fixed column left/column right, supports dragging to change column width, supports sorting, supports multi-level headers, and supports units Custom templates for grids, supporting table overloading (such as search, conditional filtering, etc.), support for check boxes, paging, cell editing, and other functions.
HTML:
<div class="row" id="divParams">
        <div class="panel col-md-12">
            <br />
            <div class="demoTable">
                关键字:
                <div class="layui-inline">
                    <input name="id" class="layui-input" id="keyword" placeholder="请输入查询关键字">
                </div>
                时间段:
                <div class="layui-inline">
                    <input class="layui-input" id="timearea" placeholder="请选择查询时间段" type="text">
                </div>
                <button class="layui-btn" data-type="reload" οnclick="initTable();">搜索</button>
            </div>
            <table class="layui-table" id="demo" lay-filter="demo"></table>
        </div>
    </div>
    <script id="dateTpl" type="text/html">
        {{#  var fn = function(){
        return moment(d.ApplyDate).format("YYYY-MM-DD");
         }; if(true){ }}
        {{ fn() }}
        {{#  } }}

    </script>
    <script type="text/html" id="barDemo">
        <a class="layui-btn layui-btn-mini" lay-event="detail"> 查看</a>
        <a class="layui-btn layui-btn-mini" lay-event="edit"> 编辑</a>
        <a class="layui-btn layui-btn-danger layui-btn-mini" lay-event="del"> 删除</a>
</script>JavaScript:
<script>
$(document).ready(function () {
initTable();
});
layui.use('laydate', function () {
var laydate = layui.laydate;
//时间选择器
laydate.render({
elem: '#timearea'
, range: true
});
});
function initTable() {
var timeArea = $("#timearea").val();
var startTime = "";
var endTime = "";
if (timeArea) {
startTime = timeArea.split(" - ")[0];//开始时间
endTime = timeArea.split(" - ")[1];//结束时间
}
layui.use('table', function () {
var table = layui.table;
//执行渲染
table.render({
id: 'demo',
elem: '#demo' //指定原始表格元素选择器(推荐id选择器)
, height: 315 //容器高度
, cols: [[{ checkbox: true }
, { field: 'DepartmentName', title: '单位名称', width: 180, sort: true }
, { field: 'ISName', title: '信息系统名称', width: 200, sort: true }
, { field: 'CloudType', title: '上云类别', width: 130, sort: true }
, { field: 'ContactPerson', title: '联络人', width: 130, sort: true }
, { field: 'ContactPhoneNumber', title: '联络人手机', width: 130 }
, { field: 'ApplyDate', title: '申请日期', width: 150, sort: true, templet: '#dateTpl' }
, { field: 'CloudState', title: '操作', width: 160, fixed: 'right', toolbar: '#barDemo' }
]],
url: '/Order/GetTableData/',
where: { KeyWords: $("#keyword").val(), StartTime: startTime, EndTime: endTime },
method: 'post',
limits: [10, 20, 30, 50, 100]
, limit: 10, //默认采用10
loading: true,
page: true
});
//监听工具条
table.on('tool(demo)', function (obj) {
var data = obj.data;
if (obj.event === 'detail') {
layer.msg('ID:' + data.applyid + ' 的查看操作');
} else if (obj.event === 'del') {
layer.confirm('真的删除行么', function (index) {
obj.del();
layer.close(index);
});
} else if (obj.event === 'edit') {
layer.alert('编辑行:<br>' + JSON.stringify(data))
}
});
});
}
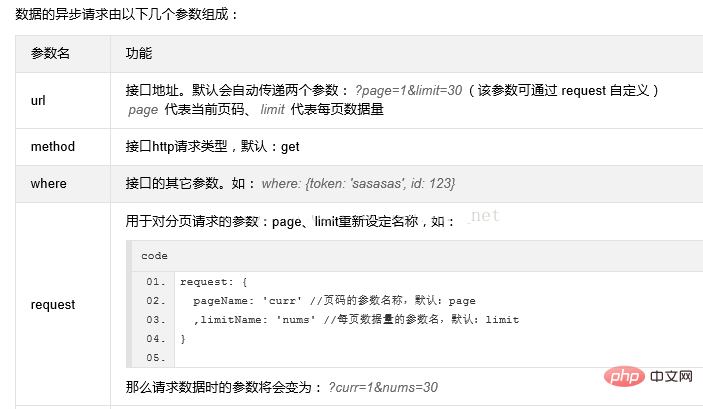
</script>Let’s first look at the parameters required for asynchronous request data described in the API:
The default parameters are page and limit. You can modify the parameter name as needed. The two parameters are our traditional page number and page size.
where is other additional parameters. You can choose whether to pass the value according to the needs of the front page.
Here I modified the default value (in the table.js file) and changed the original page and limit to Start and Length:
The following is the background Action logic:
public ActionResult GetTableData(string Start, string Length, string KeyWords, string StartTime,string EndTime)
        {
            if (string.IsNullOrWhiteSpace(Start) || string.IsNullOrWhiteSpace(Length))
            {
                return Json(new { Success = false, Message = "" }, JsonRequestBehavior.AllowGet);
            }
            var demoList = orderdal.getDemoData(Start, Length, KeyWords, StartTime, EndTime);
            return Json(demoList, JsonRequestBehavior.AllowGet);
}Here we add three parameters in addition to the default two parameters, which correspond to the front-end search box. The time period is quite special and is the time box that comes with layui, as shown below:

When printed out in the front desk, we can see the following format:

So it needs to be converted to facilitate background filtering:

Then paste the code for the return data format:
  public LayTableResult<V_MoveUnionDeployCloudBase> getDemoData(string Start, string Length, string KeyWords, string StartTime, string EndTime)
        {
            ....==.
            LayTableResult<V_MoveUnionDeployCloudBase> result = new LayTableResult<V_MoveUnionDeployCloudBase>()
            {
                code = seleResult.Any() ? 0 : 1,
                count = resultCount,//总条数
                data = seleResult,
                msg = ""
            };

            return result;
}The LayTableResult here is a class defined by yourself according to the needs of the page, as follows (T is the table you want to return ):
 public class LayTableResult<T>
    {
        public int code { get; set; }
        public string msg { get; set; }
        public int count { get; set; }
        public List<T> data { get; set; }

    }
At this point, all the logic has been written. One thing that needs to be emphasized is that when you perform conditional filtering, you should add an attribute to the search button, as follows:

Then the operation column is bound in the external html:

If you need to customize the column, use the LayUI framework The built-in template syntax, the following picture is a time format conversion of the application date column:

Rendering:

The above is the detailed content of How to create table in layui. For more information, please follow other related articles on the PHP Chinese website!

Hot AI Tools

Undresser.AI Undress
AI-powered app for creating realistic nude photos

AI Clothes Remover
Online AI tool for removing clothes from photos.

Undress AI Tool
Undress images for free

Clothoff.io
AI clothes remover

Video Face Swap
Swap faces in any video effortlessly with our completely free AI face swap tool!

Hot Article
Hot Tools

Notepad++7.3.1
Easy-to-use and free code editor

SublimeText3 Chinese version
Chinese version, very easy to use

Zend Studio 13.0.1
Powerful PHP integrated development environment

Dreamweaver CS6
Visual web development tools

SublimeText3 Mac version
God-level code editing software (SublimeText3)
Hot Topics
 1386
1386
 52
52

 How to set up jump on layui login page
Apr 04, 2024 am 03:12 AM
How to set up jump on layui login page
Apr 04, 2024 am 03:12 AM
Layui login page jump setting steps: Add jump code: Add judgment in the login form submit button click event, and jump to the specified page through window.location.href after successful login. Modify the form configuration: add a hidden input field to the form element of lay-filter="login", with the name "redirect" and the value being the target page address.
 How to get form data in layui
Apr 04, 2024 am 03:39 AM
How to get form data in layui
Apr 04, 2024 am 03:39 AM
layui provides a variety of methods for obtaining form data, including directly obtaining all field data of the form, obtaining the value of a single form element, using the formAPI.getVal() method to obtain the specified field value, serializing the form data and using it as an AJAX request parameter, and listening Form submission event gets data.
 How layui implements self-adaptation
Apr 26, 2024 am 03:00 AM
How layui implements self-adaptation
Apr 26, 2024 am 03:00 AM
Adaptive layout can be achieved by using the responsive layout function of the layui framework. The steps include: referencing the layui framework. Define an adaptive layout container and set the layui-container class. Use responsive breakpoints (xs/sm/md/lg) to hide elements under specific breakpoints. Specify element width using the grid system (layui-col-). Create spacing via offset (layui-offset-). Use responsive utilities (layui-invisible/show/block/inline) to control the visibility of elements and how they appear.
 How to transfer data in layui
Apr 26, 2024 am 03:39 AM
How to transfer data in layui
Apr 26, 2024 am 03:39 AM
The method of using layui to transmit data is as follows: Use Ajax: Create the request object, set the request parameters (URL, method, data), and process the response. Use built-in methods: Simplify data transfer using built-in methods such as $.post, $.get, $.postJSON, or $.getJSON.
 What is the difference between layui and vue?
Apr 04, 2024 am 03:54 AM
What is the difference between layui and vue?
Apr 04, 2024 am 03:54 AM
The difference between layui and Vue is mainly reflected in functions and concerns. Layui focuses on rapid development of UI elements and provides prefabricated components to simplify page construction; Vue is a full-stack framework that focuses on data binding, component development and state management, and is more suitable for building complex applications. Layui is easy to learn and suitable for quickly building pages; Vue has a steep learning curve but helps build scalable and easy-to-maintain applications. Depending on the project needs and developer skill level, the appropriate framework can be selected.
 What does layui mean?
Apr 04, 2024 am 04:33 AM
What does layui mean?
Apr 04, 2024 am 04:33 AM
layui is a front-end UI framework that provides a wealth of UI components, tools and functions to help developers quickly build modern, responsive and interactive web applications. Its features include: flexible and lightweight, modular design, rich components, Powerful tools and easy customization. It is widely used in the development of various web applications, including management systems, e-commerce platforms, content management systems, social networks and mobile applications.
 What language is layui framework?
Apr 04, 2024 am 04:39 AM
What language is layui framework?
Apr 04, 2024 am 04:39 AM
The layui framework is a JavaScript-based front-end framework that provides a set of easy-to-use UI components and tools to help developers quickly build responsive web applications. Its features include: modular, lightweight, responsive, and has complete documentation and community support. layui is widely used in the development of management backend systems, e-commerce websites, and mobile applications. The advantages are quick start-up, improved efficiency, and easy maintenance. The disadvantages are poor customization and slow technology updates.
 How to run layui
Apr 04, 2024 am 03:42 AM
How to run layui
Apr 04, 2024 am 03:42 AM
To run layui, perform the following steps: 1. Import layui script; 2. Initialize layui; 3. Use layui components; 4. Import layui styles (optional); 5. Ensure script compatibility and pay attention to other considerations. With these steps, you can build web applications using the power of layui.
