 Web Front-end
 Layui Tutorial
 Detailed explanation of .net mvc+layui for uploading pictures and texts
Detailed explanation of .net mvc+layui for uploading pictures and texts

图片上传和展示是互联网应用中比较常见的一个功能,本文图片上传功能前端用到的图片上传控件是layui ,数据库是用的 sql server ,code first开发模式。
一、创建表
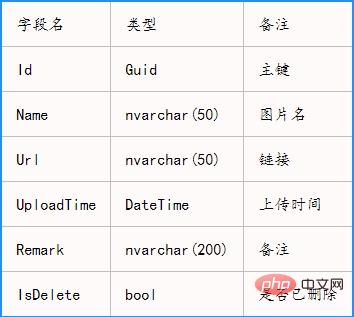
因为图片上传之后需要保存路径等信息,所以,得先建一个Image表,表的设计为如下:
下面看实体类和上下文的代码:
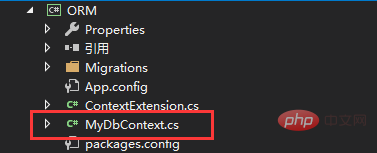
1.新建实体类Image.cs
如图:
代码如下:
Image.cs
using System;
using System.Collections.Generic;
using System.ComponentModel.DataAnnotations;
using System.ComponentModel.DataAnnotations.Schema;
using System.Linq;
using System.Text;
using System.Threading.Tasks;

namespace Modules
{
    [Table("Info_Image")]
    public class Image
    {
        public Image() {
            IsDelete = false;
        }
        /// <summary>
        /// 主键id
        /// </summary>
        public Guid Id { get; set; }

        /// <summary>
        /// 图片名
        /// </summary>
        [Required]
        [MaxLength(50)]
        public string Name { get; set; }

        /// <summary>
        /// 图片保存链接
        /// </summary>
        [Required]
        [MaxLength(50)]
        public string Url { get; set; }

        /// <summary>
        /// 上传时间
        /// </summary>
        public DateTime UploadTime { get; set; }

        /// <summary>
        /// 备注
        /// </summary>
        [MaxLength(200)]
        public string Remark { get; set; }

        /// <summary>
        /// 是否删除
        /// </summary>
        public bool IsDelete { get; set; }
    }
}2.将实体类添加到上下文:
如图:

代码:
MyDbContext.cs
public DbSet<Image> Images { get; set; }如果你和我一样是code first开发模式的话,那让程序跑一遍,这个数据表就应该在你的数据库里生成了,哈哈,这只是一个建表的过程,只要表能建好,什么模式都好,哈哈。
二、前端代码
1.新建控制器ImageUploadController.cs,然后创建一个视图Index.cshtml:
这里会用到layui的图片上传,关于这部分的代码使用,可以自行去layui官网查看:https://www.layui.com/demo/upload.html;
以下是页面图片,以及代码:
这是还没编写后台上传图片代码时的页面图片:
以下是前端代码:
@{
Layout = "../Shared/_TopLayout.cshtml";
}
<!DOCTYPE html>
<html>
<head>
<meta name="viewport" content="width=device-width" />
<title>Index</title>
</head>
<body>
<div id="picUpload">
<div >
<label >图片标题</label>
<div style="width: 554px; position: relative;">
<input type="text" name="ImageTitle" lay-verify="required" placeholder="图片标题" autocomplete="off" id="ITitle">
</div>
</div>
<div >
<label >备注</label>
<div style="width: 554px; position: relative;">
<textarea placeholder="请输入内容" name="Remark"></textarea>
</div>
</div>
<div >
<div >
<label >上传图片</label>
<button type="button" id="test1">上传图片</button>
<div >
<label >图片展示</label>
<img class="layui-upload-img lazy" src="/static/imghw/default1.png" data-src="https://img.php.cn/upload/image/588/933/834/1574919198816266.jpg" id="demo1" style="max-width:90%" alt="Detailed explanation of .net mvc+layui for uploading pictures and texts" >
<p id="demoText"></p>
</div>
</div>
</div>
</div>
</body>
</html>
<script type="text/javascript">
layui.use('upload', function () {
var $ = layui.jquery;
var upload = layui.upload;
//普通图片上传
var uploadInst = upload.render({
elem: '#test1',
url: '@Url.Action("Upload","ImageUpload")', //上传地址,后台的某个控制器
before: function (obj) {
obj.preview(function (index, file, result) {
$('#demo1').attr('src', result);
});
}, //长传之前执行的代码,将需要上传的图片显示在页面上
done: function (res) {
if (res.Result) {
}
}, //上传成功后的回传数据,后台代码未编写,此处尚为写任何内容,将在后面的内容中补上
error: function () {
//演示失败状态,并实现重传
var demoText = $('#demoText');
demoText.html('<span style="color: #FF5722;">上传失败</span> <a >重试</a>');
demoText.find('.demo-reload').on('click', function () {
uploadInst.upload();
});
}
});
});
</script>三、后台代码及前端代码完善
接下来在上面代码所示的后台链接()中编写图片上传代码:
下面先贴出代码,然后再讲解上传思路:
ImageUploadController.cs
/// <summary>
 /// 上传图片
 /// </summary>
 /// <returns></returns>
 public ActionResult Upload()
 {
     try
     {
         HttpFileCollectionBase files = Request.Files;
         HttpPostedFileBase file = files[0];
         //获取文件名后缀
         string extName = Path.GetExtension(file.FileName).ToLower();
         //获取保存目录的物理路径
         if (System.IO.Directory.Exists(Server.MapPath("/Images/")) == false)//如果不存在就创建images文件夹
         {
             System.IO.Directory.CreateDirectory(Server.MapPath("/Images/"));
         }
         string path = Server.MapPath("/Images/"); //path为某个文件夹的绝对路径,不要直接保存到数据库
     //    string path = "F:\\TgeoSmart\\Image\\";
         //生成新文件的名称,guid保证某一时刻内图片名唯一(文件不会被覆盖)
         string fileNewName = Guid.NewGuid().ToString();
         string ImageUrl = path + fileNewName + extName;
         //SaveAs将文件保存到指定文件夹中
         file.SaveAs(ImageUrl);
         //此路径为相对路径,只有把相对路径保存到数据库中图片才能正确显示(不加~为相对路径)
         string url = "\\Images\\" + fileNewName + extName;
         return Json(new
         {
             Result = true,
             Data = url
         });
     }
     catch (Exception exception)
     {
         return Json(new
         {
             Result = false,
             exception.Message
         });
     }
}上面一段代码里有详细的注释信息,这里需要注意的是,我们保存图片的路径的问题。
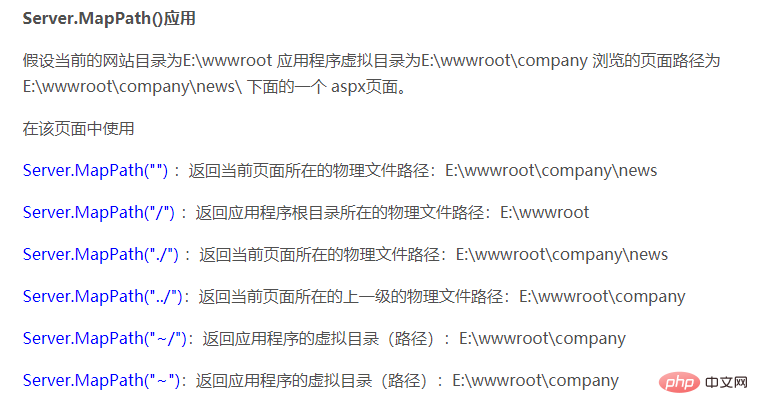
Server.MapPath()函数获取的是某个文件夹的绝对路径,关于这个函数的一些用法我百度一份截图贴在这里:

Server.MapPath()获取的是图片的绝对路径,而实际调用图片时,考虑到网站安全性问题,浏览器并不允许我们的页面使用绝对路径去获取图片资源,因此,在数据库中保存的路径只能是相对路径,也就是代码中这一句的作用:
上面代码中,我并没有直接保存imageUrl到数据库中,另外生成一个相对路径保存图片,原因就是这个。
下面给出完整的前端代码,包括图片上传的改进和所有信息的保存:
@{
Layout = "../Shared/_TopLayout.cshtml";
}
<!DOCTYPE html>
<html>
<head>
<meta name="viewport" content="width=device-width" />
<title>Index</title>
</head>
<body>
<div id="picUpload">
<!--新增代码,添加信息保存按钮-->
<div class="layui-form-item sel-fixed-right">
<div class="layui-input-block">
<input type="button" class="layui-btn layui-btn-small layui-btn-normal" value="保存" onclick="saveInfo()" />
</div>
</div>
<div class="layui-form-item">
<label class="layui-form-label required">图片标题</label>
<div class="layui-input-block" style="width: 554px; position: relative;">
<input type="text" name="ImageTitle" lay-verify="required" placeholder="图片标题" autocomplete="off" class="layui-input" id="iTitle">
</div>
</div>
<div class="layui-form-item">
<label class="layui-form-label">备注</label>
<div class="layui-input-block" style="width: 554px; position: relative;">
<textarea placeholder="请输入内容" class="layui-textarea" name="Remark" id="iRemark"></textarea>
</div>
</div>
<div class="layui-form-item">
<div class="layui-upload">
<label class="layui-form-label">上传图片</label>
<button type="button" class="layui-btn" id="test1">上传图片</button>
<div class="layui-upload-list">
<label class="layui-form-label">图片上传前展示</label>
<img class="layui-upload-img" id="demo1" style="max-width:90%" alt="Detailed explanation of .net mvc+layui for uploading pictures and texts" >
<p id="demoText"></p>
</div>
<!--新增代码,上传后图片显示 -- >
<div class="layui-upload-list">
<label class="layui-form-label">图片上传后展示</label>
<img class="layui-upload-img" id="demo2" style="max-width:90%" alt="Detailed explanation of .net mvc+layui for uploading pictures and texts" >
</div>
</div>
</div>
</div>
</body>
</html>
<script type="text/javascript">
var imageUrl;//新增代码,保存上传图片后回传的图片路径
layui.use('upload', function () {
var $ = layui.jquery;
var upload = layui.upload;
//普通图片上传
var uploadInst = upload.render({
elem: '#test1',
url: '@Url.Action("Upload","ImageUpload")',
before: function (obj) {
obj.preview(function (index, file, result) {
$('#demo1').attr('src', result);
});
},
done: function (res) {
if (res.Result) {
//新增代码,将回传的图片保存路径进行保存并将图片绑定到上传后图片展示处
imageUrl = res.Data;
$("#demo2").attr("src", imageUrl);
}
},
error: function () {
//演示失败状态,并实现重传
var demoText = $('#demoText');
demoText.html('<span style="color: #FF5722;">上传失败</span> <a class="layui-btn layui-btn-xs demo-reload">重试</a>');
demoText.find('.demo-reload').on('click', function () {
uploadInst.upload();
});
}
});
});
//新增代码,将完整的信息传到后台保存
var saveInfo = function () {
$.ajax({
type: 'post',
url: '@Url.Action("Save", "ImageUpload")',
dataType: 'json',
data: {
title: $("#iTitle").val(),
remark: $("#iRemark").val(),
url:imageUrl
},
success: function (res) {
if (res.Result) {
alert("保存成功");
}
}
});
}
</script>然后,补齐后端信息保存的代码:
public ActionResult Save(string title,string remark,string url)
 {
     try
     {
         var imageInfo = new ImageInfo() {
             Id = Guid.NewGuid(),
             Name = title,
             Url = url,
             Remark = remark,
             UploadTime = DateTime.Now.ToLocalTime()
         };
         context.ImageInfos.Add(imageInfo);
         context.SaveChanges();
         return Json(new{
             Result = true
         });

     } catch (Exception exception)
     {
         return Json(new {
             Result = true,
             exception.Message
         });
     }
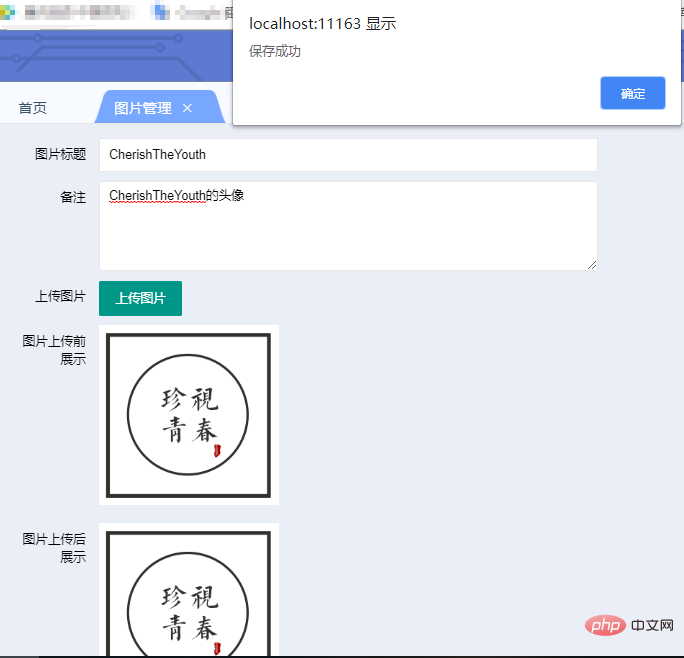
}下面展示一下页面:
然后看一下数据库里的信息:
 再看一下我们对应的图片保存的位置:
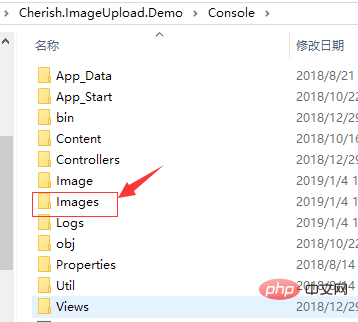
更多layui知识请关注layui使用教程栏目。
The above is the detailed content of Detailed explanation of .net mvc+layui for uploading pictures and texts. For more information, please follow other related articles on the PHP Chinese website!

Hot AI Tools

Undresser.AI Undress
AI-powered app for creating realistic nude photos

AI Clothes Remover
Online AI tool for removing clothes from photos.

Undress AI Tool
Undress images for free

Clothoff.io
AI clothes remover

Video Face Swap
Swap faces in any video effortlessly with our completely free AI face swap tool!

Hot Article

Hot Tools

Notepad++7.3.1
Easy-to-use and free code editor

SublimeText3 Chinese version
Chinese version, very easy to use

Zend Studio 13.0.1
Powerful PHP integrated development environment

Dreamweaver CS6
Visual web development tools

SublimeText3 Mac version
God-level code editing software (SublimeText3)

Hot Topics
 1386
1386
 52
52
 How to set up jump on layui login page
Apr 04, 2024 am 03:12 AM
Layui login page jump setting steps: Add jump code: Add judgment in the login form submit button click event, and jump to the specified page through window.location.href after successful login. Modify the form configuration: add a hidden input field to the form element of lay-filter="login", with the name "redirect" and the value being the target page address.
 How to get form data in layui
Apr 04, 2024 am 03:39 AM
layui provides a variety of methods for obtaining form data, including directly obtaining all field data of the form, obtaining the value of a single form element, using the formAPI.getVal() method to obtain the specified field value, serializing the form data and using it as an AJAX request parameter, and listening Form submission event gets data.
 How to transfer data in layui
Apr 26, 2024 am 03:39 AM
The method of using layui to transmit data is as follows: Use Ajax: Create the request object, set the request parameters (URL, method, data), and process the response. Use built-in methods: Simplify data transfer using built-in methods such as $.post, $.get, $.postJSON, or $.getJSON.
 How layui implements self-adaptation
Apr 26, 2024 am 03:00 AM
Adaptive layout can be achieved by using the responsive layout function of the layui framework. The steps include: referencing the layui framework. Define an adaptive layout container and set the layui-container class. Use responsive breakpoints (xs/sm/md/lg) to hide elements under specific breakpoints. Specify element width using the grid system (layui-col-). Create spacing via offset (layui-offset-). Use responsive utilities (layui-invisible/show/block/inline) to control the visibility of elements and how they appear.
 What is the difference between layui and vue?
Apr 04, 2024 am 03:54 AM
The difference between layui and Vue is mainly reflected in functions and concerns. Layui focuses on rapid development of UI elements and provides prefabricated components to simplify page construction; Vue is a full-stack framework that focuses on data binding, component development and state management, and is more suitable for building complex applications. Layui is easy to learn and suitable for quickly building pages; Vue has a steep learning curve but helps build scalable and easy-to-maintain applications. Depending on the project needs and developer skill level, the appropriate framework can be selected.
 How to run layui
Apr 04, 2024 am 03:42 AM
To run layui, perform the following steps: 1. Import layui script; 2. Initialize layui; 3. Use layui components; 4. Import layui styles (optional); 5. Ensure script compatibility and pay attention to other considerations. With these steps, you can build web applications using the power of layui.
 What language is layui framework?
Apr 04, 2024 am 04:39 AM
The layui framework is a JavaScript-based front-end framework that provides a set of easy-to-use UI components and tools to help developers quickly build responsive web applications. Its features include: modular, lightweight, responsive, and has complete documentation and community support. layui is widely used in the development of management backend systems, e-commerce websites, and mobile applications. The advantages are quick start-up, improved efficiency, and easy maintenance. The disadvantages are poor customization and slow technology updates.
 What does layui mean?
Apr 04, 2024 am 04:33 AM
layui is a front-end UI framework that provides a wealth of UI components, tools and functions to help developers quickly build modern, responsive and interactive web applications. Its features include: flexible and lightweight, modular design, rich components, Powerful tools and easy customization. It is widely used in the development of various web applications, including management systems, e-commerce platforms, content management systems, social networks and mobile applications.


