

Introduction to redis distributed cluster construction

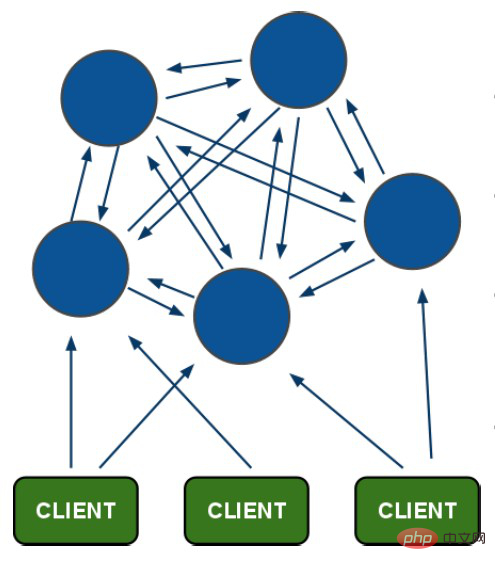
Redis cluster architecture diagram
The blue color in the above picture is the redis cluster node.
Use the ping command between nodes to test whether the connection is normal. There is no primary distinction between nodes. When you connect to any node for operation, it may be forwarded to other nodes.
1. Redis fault tolerance mechanism
Nodes will send ping commands to each other regularly to test the health status of the nodes. When the nodes receive the ping command, they will Returns a pong string.
Voting mechanism: If a node A sends a ping to node B and does not receive a pong return, other nodes will be notified to send ping to B again. If more than half of the nodes in the cluster cannot receive the pong from node B. Then it is considered that node B is down. Generally, a backup node is provided for each node. If it fails, it will be switched to the backup node.
2. Redis cluster storage principle
Redis will perform a hash operation on each stored key and generate a hash value of [0-16384] (first
crc algorithm then takes the remainder of 16384).
In the case of a cluster, the interval [0-16384] is split and placed in different redis.
3. Redis persistence
Snapshotting: regularly save the data in Redis memory to the hard disk
AOF: save all commands The operation is saved to the AOF. The synchronization frequency of AOP is very high. Even if the data is lost, the granularity is very small, but it will have an impact on performance.
2. Cluster environment construction
##redis cluster management tool redis-trib.rb Relying on the ruby environment, you first need to install the ruby environmentInstall ruby
yum install ruby
yum install rubygems
gem install /usr/local/redis-3.0.0.gem
3. Create a Redis cluster
On one server, you can use different port numbers To represent different redis servers. The Redis cluster requires at least three servers, and each server requires a backup server, so at least 6 servers are required. The port planning is as follows: Master server: 192.168.100.66 :7001 :7002 :7003Slave server: 192.168.100.66 :7004 :7005 :7006In /usr/ local Create a folder to store the server programmkdir 7001 7002 7003 7004 7005 7006If you want redis to support the cluster, you need to modify the cluster-enabled yes# of the redis.config configuration file. ##In this example, we use ports to distinguish different redis services, so we also need to modify the port of redis.config to the corresponding port.
After modifying the configuration file, copy the bin of the redis installation directory to each directory above. middle.
Enter 7001/bin/ 7002/bin respectively....
Start the service ./redis-server ./redis.conf
View the redis process: ps - aux|grep redis The following figure shows that the startup is successful
 Create the cluster:
Change the redis-3.0.0/src/redis of the previously decompressed folder -trib.rb is copied to the redis-cluster directory
Run
./redis-trib.rb create --replicas 1 192.168.100.66:7001 192.168.100.66:7002 192.168.100.66:7003 192.168.100.66:7004 192.168.100.66:7005 192.168.100.66:7006
If the execution reports the following error:
[ERR] Node XXXXXX is not empty. Either the node already knows other nodes (check with CLUSTER NODES) or contains some key in database 0
The solution is to delete the generated configuration file nodes.conf, if If it fails, it means that the node created now includes the node information of the old cluster. You need to delete the persistence file of redis and then restart redis, such as: appendonly.aof, dump.rdb
If successful, enter the following:
Query cluster information:
Instructions:
./redis-cli -c - h 192.168.101.3 -p 7001, where -c indicates connecting to redis in cluster mode, -h specifies the ip address, and -p specifies the port number
cluster nodes Query cluster node information
cluster info Query cluster status information
Step one: Connect to the cluster
./ redis-trib.rb reshard 192.168.101.3:7001 (connect to any available node in the cluster)
Step 2: Enter the number of slots to be allocated
Enter 500 to allocate 500 slots
Step 3: Enter the node id of the receiving slot
这里准备给7007分配槽,通过cluster nodes查看7007结点id为15b809eadae88955e36bcdbb8144f61bbbaf38fb
输入:15b809eadae88955e36bcdbb8144f61bbbaf38fb
第四步:输入源结点id
这里输入all
第五步:输入yes开始移动槽到目标结点id
添加从节点
集群创建成功后可以向集群中添加节点,下面是添加一个slave从节点。
添加7008从结点,将7008作为7007的从结点。
./redis-trib.rb add-node --slave --master-id 主节点id 添加节点的ip和端口 集群中已存在节点ip和端口
执行如下命令:
./redis-trib.rb add-node --slave --master-id cad9f7413ec6842c971dbcc2c48b4ca959eb5db4 192.168.101.3:7008 192.168.101.3:7001
cad9f7413ec6842c971dbcc2c48b4ca959eb5db4 是7007结点的id,可通过cluster nodes查看。

注意:如果原来该结点在集群中的配置信息已经生成cluster-config-file指定的配置文件中(如果cluster-config-file没有指定则默认为nodes.conf),这时可能会报错:
[ERR] Node XXXXXX is not empty. Either the node already knows other nodes (check with CLUSTER NODES) or contains some key in database 0
解决方法是删除生成的配置文件nodes.conf,删除后再执行./redis-trib.rb add-node指令
查看集群中的结点,刚添加的7008为7007的从节点:

删除结点:
./redis-trib.rb del-node 127.0.0.1:7005 4b45eb75c8b428fbd77ab979b85080146a9bc017
删除已经占有hash槽的结点会失败,报错如下:
[ERR] Node 127.0.0.1:7005 is not empty! Reshard data away and try again.
需要将该结点占用的hash槽分配出去(参考hash槽重新分配章节)。
测试:
Maven:
<dependencies>
    <dependency>
        <groupId>redis.clients</groupId>
        <artifactId>jedis</artifactId>
        <version>2.7.0</version>
    </dependency>
    <!-- https://mvnrepository.com/artifact/junit/junit -->
    <dependency>
        <groupId>junit</groupId>
        <artifactId>junit</artifactId>
        <version>4.12</version>
        <scope>test</scope>
    </dependency>
    <!-- https://mvnrepository.com/artifact/org.springframework/spring-test -->
    <dependency>
        <groupId>org.springframework</groupId>
        <artifactId>spring-test</artifactId>
        <version>4.3.10.RELEASE</version>
        <scope>test</scope>
    </dependency>
</dependencies>普通测试:
@Test
public void redisClusterTest1(){
    JedisPoolConfig config=new JedisPoolConfig();
    config.setMaxTotal(30);
    config.setMaxIdle(2);

    Set<HostAndPort> jedisNode=new HashSet<HostAndPort>();
    jedisNode.add(new HostAndPort("192.168.100.66",7001));
    jedisNode.add(new HostAndPort("192.168.100.66",7002));
    jedisNode.add(new HostAndPort("192.168.100.66",7003));
    jedisNode.add(new HostAndPort("192.168.100.66",7004));
    jedisNode.add(new HostAndPort("192.168.100.66",7005));
    jedisNode.add(new HostAndPort("192.168.100.66",7006));

    JedisCluster jc=new JedisCluster(jedisNode,config);
    jc.set("name","老王");
    String value=jc.get("name");
    System.out.println(value);
}Spring测试:
配置文件:
<?xml version="1.0" encoding="UTF-8"?>
<beans xmlns="http://www.springframework.org/schema/beans"
       xmlns:xsi="http://www.w3.org/2001/XMLSchema-instance"
       xsi:schemaLocation="http://www.springframework.org/schema/beans http://www.springframework.org/schema/beans/spring-beans.xsd">
    <!-- 连接池配置 -->
    <bean id="jedisPoolConfig" class="redis.clients.jedis.JedisPoolConfig">
        <!-- 最大连接数 -->
        <property name="maxTotal" value="30" />
        <!-- 最大空闲连接数 -->
        <property name="maxIdle" value="10" />
        <!-- 每次释放连接的最大数目 -->
        <property name="numTestsPerEvictionRun" value="1024" />
        <!-- 释放连接的扫描间隔(毫秒) -->
        <property name="timeBetweenEvictionRunsMillis" value="30000" />
        <!-- 连接最小空闲时间 -->
        <property name="minEvictableIdleTimeMillis" value="1800000" />
        <!-- 连接空闲多久后释放, 当空闲时间>该值 且 空闲连接>最大空闲连接数 时直接释放 -->
        <property name="softMinEvictableIdleTimeMillis" value="10000" />
        <!-- 获取连接时的最大等待毫秒数,小于零:阻塞不确定的时间,默认-1 -->
        <property name="maxWaitMillis" value="1500" />
        <!-- 在获取连接的时候检查有效性, 默认false -->
        <property name="testOnBorrow" value="true" />
        <!-- 在空闲时检查有效性, 默认false -->
        <property name="testWhileIdle" value="true" />
        <!-- 连接耗尽时是否阻塞, false报异常,ture阻塞直到超时, 默认true -->
        <property name="blockWhenExhausted" value="false" />
    </bean>
    <!-- redis集群 -->
    <bean id="jedisCluster" class="redis.clients.jedis.JedisCluster">
        <constructor-arg index="0">
            <set>
                <bean class="redis.clients.jedis.HostAndPort">
                    <constructor-arg index="0" value="192.168.100.66"></constructor-arg>
                    <constructor-arg index="1" value="7001"></constructor-arg>
                </bean>
                <bean class="redis.clients.jedis.HostAndPort">
                    <constructor-arg index="0" value="192.168.100.66"></constructor-arg>
                    <constructor-arg index="1" value="7002"></constructor-arg>
                </bean>
                <bean class="redis.clients.jedis.HostAndPort">
                    <constructor-arg index="0" value="192.168.100.66"></constructor-arg>
                    <constructor-arg index="1" value="7003"></constructor-arg>
                </bean>
                <bean class="redis.clients.jedis.HostAndPort">
                    <constructor-arg index="0" value="192.168.100.66"></constructor-arg>
                    <constructor-arg index="1" value="7004"></constructor-arg>
                </bean>
                <bean class="redis.clients.jedis.HostAndPort">
                    <constructor-arg index="0" value="192.168.100.66"></constructor-arg>
                    <constructor-arg index="1" value="7005"></constructor-arg>
                </bean>
                <bean class="redis.clients.jedis.HostAndPort">
                    <constructor-arg index="0" value="192.168.100.66"></constructor-arg>
                    <constructor-arg index="1" value="7006"></constructor-arg>
                </bean>
            </set>
        </constructor-arg>
        <constructor-arg index="1" ref="jedisPoolConfig"></constructor-arg>
    </bean>
</beans>测试类:
@RunWith(SpringJUnit4ClassRunner.class)
@ContextConfiguration({"classpath:spring-config.xml"})
public class RedisClusterTest {
    @Autowired
    private JedisCluster jedisCluster;
    @Test
    public void redisClusterTest2(){
        jedisCluster.set("username","小明啦啦");
        String name=jedisCluster.get("username");
        System.out.println(name);
    }
}更多redis知识请关注redis数据库教程栏目。
The above is the detailed content of Introduction to redis distributed cluster construction. For more information, please follow other related articles on the PHP Chinese website!

Hot AI Tools

Undresser.AI Undress
AI-powered app for creating realistic nude photos

AI Clothes Remover
Online AI tool for removing clothes from photos.

Undress AI Tool
Undress images for free

Clothoff.io
AI clothes remover

AI Hentai Generator
Generate AI Hentai for free.

Hot Article
Hot Tools

Notepad++7.3.1
Easy-to-use and free code editor

SublimeText3 Chinese version
Chinese version, very easy to use

Zend Studio 13.0.1
Powerful PHP integrated development environment

Dreamweaver CS6
Visual web development tools

SublimeText3 Mac version
God-level code editing software (SublimeText3)
Hot Topics


 Solution to 0x80242008 error when installing Windows 11 10.0.22000.100
May 08, 2024 pm 03:50 PM
Solution to 0x80242008 error when installing Windows 11 10.0.22000.100
May 08, 2024 pm 03:50 PM
1. Start the [Start] menu, enter [cmd], right-click [Command Prompt], and select Run as [Administrator]. 2. Enter the following commands in sequence (copy and paste carefully): SCconfigwuauservstart=auto, press Enter SCconfigbitsstart=auto, press Enter SCconfigcryptsvcstart=auto, press Enter SCconfigtrustedinstallerstart=auto, press Enter SCconfigwuauservtype=share, press Enter netstopwuauserv , press enter netstopcryptS
 Analyze PHP function bottlenecks and improve execution efficiency
Apr 23, 2024 pm 03:42 PM
Analyze PHP function bottlenecks and improve execution efficiency
Apr 23, 2024 pm 03:42 PM
PHP function bottlenecks lead to low performance, which can be solved through the following steps: locate the bottleneck function and use performance analysis tools. Caching results to reduce recalculations. Process tasks in parallel to improve execution efficiency. Optimize string concatenation, use built-in functions instead. Use built-in functions instead of custom functions.
 Golang API caching strategy and optimization
May 07, 2024 pm 02:12 PM
Golang API caching strategy and optimization
May 07, 2024 pm 02:12 PM
The caching strategy in GolangAPI can improve performance and reduce server load. Commonly used strategies are: LRU, LFU, FIFO and TTL. Optimization techniques include selecting appropriate cache storage, hierarchical caching, invalidation management, and monitoring and tuning. In the practical case, the LRU cache is used to optimize the API for obtaining user information from the database. The data can be quickly retrieved from the cache. Otherwise, the cache can be updated after obtaining it from the database.
 Caching mechanism and application practice in PHP development
May 09, 2024 pm 01:30 PM
Caching mechanism and application practice in PHP development
May 09, 2024 pm 01:30 PM
In PHP development, the caching mechanism improves performance by temporarily storing frequently accessed data in memory or disk, thereby reducing the number of database accesses. Cache types mainly include memory, file and database cache. Caching can be implemented in PHP using built-in functions or third-party libraries, such as cache_get() and Memcache. Common practical applications include caching database query results to optimize query performance and caching page output to speed up rendering. The caching mechanism effectively improves website response speed, enhances user experience and reduces server load.
 How to use Redis cache in PHP array pagination?
May 01, 2024 am 10:48 AM
How to use Redis cache in PHP array pagination?
May 01, 2024 am 10:48 AM
Using Redis cache can greatly optimize the performance of PHP array paging. This can be achieved through the following steps: Install the Redis client. Connect to the Redis server. Create cache data and store each page of data into a Redis hash with the key "page:{page_number}". Get data from cache and avoid expensive operations on large arrays.
 How to upgrade Win11 English 21996 to Simplified Chinese 22000_How to upgrade Win11 English 21996 to Simplified Chinese 22000
May 08, 2024 pm 05:10 PM
How to upgrade Win11 English 21996 to Simplified Chinese 22000_How to upgrade Win11 English 21996 to Simplified Chinese 22000
May 08, 2024 pm 05:10 PM
First you need to set the system language to Simplified Chinese display and restart. Of course, if you have changed the display language to Simplified Chinese before, you can just skip this step. Next, start operating the registry, regedit.exe, directly navigate to HKEY_LOCAL_MACHINESYSTEMCurrentControlSetControlNlsLanguage in the left navigation bar or the upper address bar, and then modify the InstallLanguage key value and Default key value to 0804 (if you want to change it to English en-us, you need First set the system display language to en-us, restart the system and then change everything to 0409) You must restart the system at this point.
 Can navicat connect to redis?
Apr 23, 2024 pm 05:12 PM
Can navicat connect to redis?
Apr 23, 2024 pm 05:12 PM
Yes, Navicat can connect to Redis, which allows users to manage keys, view values, execute commands, monitor activity, and diagnose problems. To connect to Redis, select the "Redis" connection type in Navicat and enter the server details.
 How to find the update file downloaded by Win11_Share the location of the update file downloaded by Win11
May 08, 2024 am 10:34 AM
How to find the update file downloaded by Win11_Share the location of the update file downloaded by Win11
May 08, 2024 am 10:34 AM
1. First, double-click the [This PC] icon on the desktop to open it. 2. Then double-click the left mouse button to enter [C drive]. System files will generally be automatically stored in C drive. 3. Then find the [windows] folder in the C drive and double-click to enter. 4. After entering the [windows] folder, find the [SoftwareDistribution] folder. 5. After entering, find the [download] folder, which contains all win11 download and update files. 6. If we want to delete these files, just delete them directly in this folder.
