Home > CMS Tutorial > DEDECMS > body text

How to implement code highlighting in DedeCms 5.7

藏色散人
Release: 2019-12-26 09:49:48
Original
2132 people have browsed it

How to implement code highlighting in DedeCms 5.7

How to implement code highlighting in DedeCms 5.7?

Whether building a blog website or a CMS-type website, many of them require code highlighting. Dreamweaver CMS is one of the more excellent CMS website building systems in China. It does not have a lot of plug-ins like WordPress. It is available. I am using the latest dedeCMS 5.7. I have searched for information on the Internet for a long time. Most of them write articles about the integration of CKEditor and SyntaxHighlighter. However, dedecms has integrated ckeditor, and generally only targets ckeditor for config.js. Modifications are different.

Recommended study: 梦Weavercms

So I can only think about and modify it myself. Now I will write down the method for the reference of webmaster friends:

1. First go to the official website of SyntaxHighlighter to download, URL: http://alexgorbatchev.com/SyntaxHighlighter/download/. It is recommended to download version 2.1. Version 3.0 does not seem to support automatic line wrapping. The version 2.1.382 is used here. Unzip the downloaded file in the syntaxHighlight folder and remove the useless files, leaving only the scripts and styles folders.

2. Create a new dialogs folder and create a file named syntaxhighlight.js in it. Because the code is too large, it is not suitable to post it. Please download syntaxhighlight.js directly

If you want to modify it For the style of the code area, please modify the style in the

tag in the following code.

The code is as follows:

onOk : function() { 
var i = this.getParentEditor(); 
var h = i.getSelection(); 
var g = h.getStartElement(); 
var l = g && g.getAscendant("pre", true); 
var j = f(); 
this.commitContent(j); 
var k = e(j); 
var m = CKEDITOR.dom.element 
.createFromHtml(&#39;<table style="border:1px solid #EAED9C;width:660px;"><tr><td><pre class="&#39; + k + &#39;">&#39; 
+ c(j.code) +"
Copy after login
"); if (l) { m.insertBefore(l); l.remove() } else { i.insertElement(m) } },

3. Then create a new images folder to store a syntaxhighlight.gif image file. The image file is displayed on the editor toolbar. You can use 16*16 pixels. Picture

4. Create a new lang folder, which is a language pack. There are two files in it, one is Chinese cn.js and the other is English en.js. The code content is as follows:

en.js The code is as follows:

The code is as follows:

CKEDITOR.plugins.setLang(&#39;syntaxhighlight&#39;, &#39;en&#39;, 
{ 
syntaxhighlight: 
{ 
title: &#39;Add or update a code snippet&#39;, 
sourceTab: &#39;Source code&#39;, 
langLbl: &#39;Select language&#39;, 
advancedTab: &#39;Advanced&#39;, 
hideGutter: &#39;Hide gutter&#39;, 
hideGutterLbl: &#39;Hide gutter & line numbers.&#39;, 
hideControls: &#39;Hide controls&#39;, 
hideControlsLbl: &#39;Hide code controls at the top of the code block.&#39;, 
collapse: &#39;Collapse&#39;, 
collapseLbl: &#39;Collapse the code block by default. (controls need to be turned on)&#39;, 
showColumns: &#39;Show columns&#39;, 
showColumnsLbl: &#39;Show row columns in the first line.&#39;, 
lineWrap: &#39;Disable line wrapping&#39;, 
lineWrapLbl: &#39;Switch off line wrapping.&#39;, 
lineCount: &#39;Default line count&#39;, 
highlight: &#39;Highlight lines&#39;, 
highlightLbl: &#39;Enter a comma seperated lines of lines you want to highlight, eg <em>3,10,15</em>.&#39; 
} 
});
Copy after login

cn.js code is as follows:

The code is as follows:

CKEDITOR.plugins.setLang(&#39;syntaxhighlight&#39;, &#39;cn&#39;, 
{ 
syntaxhighlight: 
{ 
title: &#39;添加或更新代码&#39;, 
sourceTab: &#39;代码&#39;, 
langLbl: &#39;选择语言&#39;, 
advancedTab: &#39;高级&#39;, 
hideGutter: &#39;隐藏分割线&#39;, 
hideGutterLbl: &#39;隐藏分割线和行号&#39;, 
hideControls: &#39;隐藏工具栏&#39;, 
hideControlsLbl: &#39;隐藏浮动工具栏&#39;, 
collapse: &#39;代码折叠&#39;, 
collapseLbl: &#39;默认折叠代码块 (需要启用工具栏)&#39;, 
lineWrap: &#39;自动换行&#39;, 
lineWrapLbl: &#39;关闭自动换行&#39;, 
autoLinks: &#39;自动链接&#39;, 
autoLinksLbl: &#39;不自动转换超链接&#39;, 
lineCount: &#39;起始行号&#39;, 
highlight: &#39;高亮行号&#39;, 
highlightLbl: &#39;输入以逗号分隔的行号, 如 <em>3,10,15</em>.&#39; 
} 
});
Copy after login

5. Create a new plugin.js file. The file is a necessary file for the ckeditor plug-in, which contains some configurations for the plug-in. The code is as follows:

The code is as follows:

CKEDITOR.plugins.add("syntaxhighlight", { 
requires : [ "dialog" ], 
lang : [ "cn" ], 
init : function(a) { 
var b = "syntaxhighlight"; 
var c = a.addCommand(b, new CKEDITOR.dialogCommand(b)); 
c.modes = { 
wysiwyg : 1, 
source : 1 
}; 
c.canUndo = false; 
a.ui.addButton("Code", { 
label : a.lang.syntaxhighlight.title, 
command : b, 
icon : this.path + "images/syntaxhighlight.gif" 
}); 
CKEDITOR.dialog.add(b, this.path + "dialogs/syntaxhighlight.js") 
} 
});
Copy after login

6. Since dedecms 5.7 integrates a dedepage plug-in, it is used Add the ckeditor custom plug-in. In the /include/ckeditor/dedepage folder, open the plugin.js file and add at the end:

requires: ['syntaxhighlight'], where syntaxhighlight is the file of the code highlighting plug-in. Folder name, the code after adding is as follows:

[code] 
// Register a plugin named "dedepage". 
(function() 
{ 
CKEDITOR.plugins.add( &#39;dedepage&#39;, 
{ 
init : function( editor ) 
{ 
// Register the command. 
editor.addCommand( &#39;dedepage&#39;,{ 
exec : function( editor ) 
{ 
// Create the element that represents a print break. 
// alert(&#39;dedepageCmd!&#39;); 
editor.insertHtml("
"); 
} 
}); 
// alert(&#39;dedepage!&#39;); 
// Register the toolbar button. 
editor.ui.addButton( &#39;MyPage&#39;, 
{ 
label : &#39;插入分页符&#39;, 
command : &#39;dedepage&#39;, 
icon: &#39;images/dedepage.gif&#39; 
}); 
// alert(editor.name); 
}, 
requires : [ &#39;fakeobjects&#39; ], 
requires : [&#39;syntaxhighlight&#39;] 
}); 
})(); 
[/code]
Copy after login

7. Modify the /include/ckeditor/ckeditor.inc.php file, add the element Code in the last line of the $toolbar['Basic'] array, after modification The code is as follows:

The code is as follows:

$toolbar[&#39;Basic&#39;] = array( 
array( &#39;Source&#39;,&#39;-&#39;,&#39;Templates&#39;), 
array( &#39;Cut&#39;,&#39;Copy&#39;,&#39;Paste&#39;,&#39;PasteText&#39;,&#39;PasteFromWord&#39;,&#39;-&#39;,&#39;Print&#39;), 
array( &#39;Undo&#39;,&#39;Redo&#39;,&#39;-&#39;,&#39;Find&#39;,&#39;Replace&#39;,&#39;-&#39;,&#39;SelectAll&#39;,&#39;RemoveFormat&#39;), 
array( &#39;ShowBlocks&#39;),array(&#39;Image&#39;,&#39;Flash&#39;),array(&#39;Maximize&#39;),&#39;/&#39;, 
array( &#39;Bold&#39;,&#39;Italic&#39;,&#39;Underline&#39;,&#39;Strike&#39;,&#39;-&#39;), 
array( &#39;NumberedList&#39;,&#39;BulletedList&#39;,&#39;-&#39;,&#39;Outdent&#39;,&#39;Indent&#39;,&#39;Blockquote&#39;), 
array( &#39;JustifyLeft&#39;,&#39;JustifyCenter&#39;,&#39;JustifyRight&#39;,&#39;JustifyBlock&#39;), 
array( &#39;Table&#39;,&#39;HorizontalRule&#39;,&#39;Smiley&#39;,&#39;SpecialChar&#39;), 
array( &#39;Link&#39;,&#39;Unlink&#39;,&#39;Anchor&#39;),&#39;/&#39;, 
array( &#39;Styles&#39;,&#39;Format&#39;,&#39;Font&#39;,&#39;FontSize&#39;), 
array( &#39;TextColor&#39;, &#39;BGColor&#39;, &#39;MyPage&#39;,&#39;Code&#39;) 
);
Copy after login

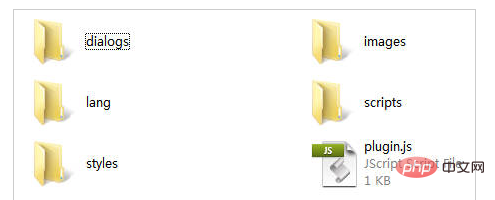
At this point, the editor modification has been completed. The modified syntaxhighlight folder file directory structure is as follows:

How to implement code highlighting in DedeCms 5.7

Upload the syntaxhighlight folder to the /include/ckeditor/plugins/ folder, open the backend, add an article to try, and see if the button as shown in the picture appears on the last line of the editor:

How to implement code highlighting in DedeCms 5.7

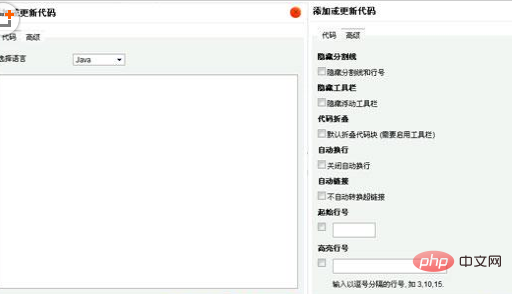
Click the button to pop up the dialog box shown below to enter the code, and you can switch to the advanced options to configure the code highlighting:

How to implement code highlighting in DedeCms 5.7

8. But these alone are not enough. You also need to introduce highlighted brush JS files and CSS files into the article template file /templets/default/article_article.htm file, because a lot of JS needs to be introduced. , so it is recommended to place the imported code before the tag, wait for the previous web page to load, and then load and display it.

The code is as follows:

<script type="text/javascript" src="/include/ckeditor/plugins/syntaxhighlight/scripts/shCore.js"> </script> 
<script type="text/javascript" src="/include/ckeditor/plugins/syntaxhighlight/scripts/shBrushJava.js"></script> 
<script type="text/javascript" src="/include/ckeditor/plugins/syntaxhighlight/scripts/shBrushJScript.js"></script> 
<script type="text/javascript" src="/include/ckeditor/plugins/syntaxhighlight/scripts/shBrushPhp.js"></script> 
<script type="text/javascript" src="/include/ckeditor/plugins/syntaxhighlight/scripts/shBrushScala.js"></script> 
<script type="text/javascript" src="/include/ckeditor/plugins/syntaxhighlight/scripts/shBrushSql.js"></script> 
<script type="text/javascript" src="/include/ckeditor/plugins/syntaxhighlight/scripts/shBrushVb.js"></script> 
<script type="text/javascript" src="/include/ckeditor/plugins/syntaxhighlight/scripts/shBrushXml.js"></script> 
<script type="text/javascript" src="/include/ckeditor/plugins/syntaxhighlight/scripts/shBrushBash.js"></script> 
<script type="text/javascript" src="/include/ckeditor/plugins/syntaxhighlight/scripts/shBrushCpp.js"></script> 
<script type="text/javascript" src="/include/ckeditor/plugins/syntaxhighlight/scripts/shBrushCSharp.js"></script> 
<script type="text/javascript" src="/include/ckeditor/plugins/syntaxhighlight/cripts/shBrushCss.js"></script> 
<script type="text/javascript" src="/include/ckeditor/plugins/syntaxhighlight/scripts/shBrushDelphi.js"></script> 
<script type="text/javascript" src="/include/ckeditor/plugins/syntaxhighlight/scripts/shBrushDiff.js"></script> 
<script type="text/javascript" src="/include/ckeditor/plugins/syntaxhighlight/scripts/shBrushGroovy.js"></script> 
<script type="text/javascript" src="/include/ckeditor/plugins/syntaxhighlight/scripts/shBrushPlain.js"></script> 
<script type="text/javascript" src="/include/ckeditor/plugins/syntaxhighlight/scripts/shBrushPython.js"></script> 
<script type="text/javascript" src="/include/ckeditor/plugins/syntaxhighlight/scripts/shBrushRuby.js"></script> 
<link type="text/css" rel="stylesheet" href="/include/ckeditor/plugins/syntaxhighlight/styles/shCore.css"/> 
<link type="text/css" rel="stylesheet" href="/include/ckeditor/plugins/syntaxhighlight/styles/shThemeDefault.css"/> 
<script type="text/javascript"> 
SyntaxHighlighter.config.clipboardSwf = &#39;/include/ckeditor/plugins/syntaxhighlight/scripts/clipboard.swf&#39;; 
SyntaxHighlighter.all(); 
</script>
Copy after login

The final published and generated article page rendering is as follows:

How to implement code highlighting in DedeCms 5.7

Of course, this integration also has some shortcomings. A large number of JS files may be introduced into the html page, which may be slow to load. In addition, the scalability is not strong. I will also optimize the plug-in from time to time, and I hope all netizens can provide opinions.

The above is the detailed content of How to implement code highlighting in DedeCms 5.7. For more information, please follow other related articles on the PHP Chinese website!

Related labels:
source:php.cn
Statement of this Website
The content of this article is voluntarily contributed by netizens, and the copyright belongs to the original author. This site does not assume corresponding legal responsibility. If you find any content suspected of plagiarism or infringement, please contact admin@php.cn
Popular Tutorials
More>
Latest Downloads
More>
Web Effects
Website Source Code
Website Materials
Front End Template