ps design text three-dimensional effect

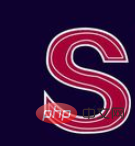
First create a new file and set the size as desired. Fill the background color with a darker color to make the text stand out better. Then enter the theme text and fill it with the appropriate color.

Then select the text layer and right-click to change the text into a shape. Then duplicate a layer, remove the fill color, and use a white stroke color as the stroke color. The value depends on the text size.

(Recommended learning: ps video tutorial)
Create a new layer, and then use the pen tool to follow the inner edge of the text draw. Set the fill color to None, the stroke to white, and the stroke to not be too thick. Then create a new layer and create another edge effect for the text. Use the Pen Tool to adjust the parts you're not satisfied with to make the edges smoother.

Then select the text layer and copy one layer to perform free changes. Set the height and width values in the property bar to 99.9. Then click OK. Then we group these layers, set the color to None, and merge the layers

Hold down the CTRL key to bring up the selection of this layer. Then we create a new layer, use the brush tool, set it to white, change the brush hardness to 0, enlarge the size a little, and lightly paint on the edge of the text. This will have a highlight effect

Then we select the brush tool, change the color to a dark color close to black, and lightly apply a few strokes on the lower edge of the text. Create a shadow effect and then cancel the selection.

In this way, the three-dimensional effect of the text is created. We'll put it this time below the text layer, with the text layer on top, so we don't let the highlights and shadows affect our text.

Related article tutorial sharing: ps tutorial
The above is the detailed content of ps design text three-dimensional effect. For more information, please follow other related articles on the PHP Chinese website!

Hot AI Tools

Undresser.AI Undress
AI-powered app for creating realistic nude photos

AI Clothes Remover
Online AI tool for removing clothes from photos.

Undress AI Tool
Undress images for free

Clothoff.io
AI clothes remover

Video Face Swap
Swap faces in any video effortlessly with our completely free AI face swap tool!

Hot Article

Hot Tools

Notepad++7.3.1
Easy-to-use and free code editor

SublimeText3 Chinese version
Chinese version, very easy to use

Zend Studio 13.0.1
Powerful PHP integrated development environment

Dreamweaver CS6
Visual web development tools

SublimeText3 Mac version
God-level code editing software (SublimeText3)

Hot Topics
 1386
1386
 52
52
 How to make round pictures and text in ppt
Mar 26, 2024 am 10:23 AM
First, draw a circle in PPT, then insert a text box and enter text content. Finally, set the fill and outline of the text box to None to complete the production of circular pictures and text.
 How to add dots to text in word?
Mar 19, 2024 pm 08:04 PM
When we create Word documents on a daily basis, we sometimes need to add dots under certain words in the document, especially when there are test questions. To highlight this part of the content, the editor will share with you the tips on how to add dots to text in Word. I hope it can help you. 1. Open a blank word document. 2. For example, add dots under the words "How to add dots to text". 3. We first select the words "How to add dots to text" with the left mouse button. Note that if you want to add dots to that word in the future, you must first use the left button of the mouse to select which word. Today we are adding dots to these words, so we have chosen several words. Select these words, right-click, and click Font in the pop-up function box. 4. Then something like this will appear
 Starting at 649 yuan, Kubi Cube Xiaoku Tablet 2 Lite is here: 11-inch eye-protecting large screen + 8000mAh large battery
Mar 05, 2024 pm 05:34 PM
According to news on March 4, Kubi Rubik's Cube will launch the "Xiaoku Tablet 2Lite" tablet computer on March 5, with an initial price of 649 yuan. It is reported that the new tablet is equipped with Unisoc’s T606 processor, which uses a 12nm process and consists of two 1.6GHz ArmCortex-A75 CPUs and six ArmCortex-A55 processors. The screen uses a 10.95-inch IPS eye-protection screen with a resolution of 1280x800 and a brightness as high as 350 nits. In terms of imaging, Xiaoku Tablet 2Lite has a 13-megapixel main camera on the rear and a 5-megapixel selfie lens on the front. It also supports 4G Internet access/calls, Bluetooth 5.0, and Wi-Fi5. In addition, the official claimed that this tablet&l
 ZTE 5G portable Wi-Fi U50S goes on sale for NT$899 at first launch: top speed 500Mbps
Apr 26, 2024 pm 03:46 PM
According to news on April 26, ZTE’s 5G portable Wi-Fi U50S is now officially on sale, starting at 899 yuan. In terms of appearance design, ZTE U50S Portable Wi-Fi is simple and stylish, easy to hold and pack. Its size is 159/73/18mm and is easy to carry, allowing you to enjoy 5G high-speed network anytime and anywhere, achieving an unimpeded mobile office and entertainment experience. ZTE 5G portable Wi-Fi U50S supports the advanced Wi-Fi 6 protocol with a peak rate of up to 1800Mbps. It relies on the Snapdragon X55 high-performance 5G platform to provide users with an extremely fast network experience. Not only does it support the 5G dual-mode SA+NSA network environment and Sub-6GHz frequency band, the measured network speed can even reach an astonishing 500Mbps, which is easily satisfactory.
 Retro trend! HMD and Heineken jointly launch flip phone: transparent shell design
Apr 17, 2024 pm 06:50 PM
According to news on April 17, HMD teamed up with the well-known beer brand Heineken and the creative company Bodega to launch a unique flip phone - The Boring Phone. This phone is not only full of innovation in design, but also returns to nature in terms of functionality, aiming to lead people back to real interpersonal interactions and enjoy the pure time of drinking with friends. Boring mobile phone adopts a unique transparent flip design, showing a simple yet elegant aesthetic. It is equipped with a 2.8-inch QVGA display inside and a 1.77-inch display outside, providing users with a basic visual interaction experience. In terms of photography, although it is only equipped with a 30-megapixel camera, it is enough to handle simple daily tasks.
 Introduction to the process of extracting line drawings in PS
Apr 01, 2024 pm 12:51 PM
1. Open the software and import a piece of material, as shown in the picture below. 2. Then ctrl+shift+u to remove color. 3. Then press ctrl+J to copy the layer. 4. Then reverse ctrl+I, and then set the layer blending mode to Color Dodge. 5. Click Filter--Others--Minimum. 6. In the pop-up dialog box, set the radius to 2 and click OK. 7. Finally, you can see the line draft extracted.
 Honor Magic V3 debuts AI defocus eye protection technology: effectively alleviates the development of myopia
Jul 18, 2024 am 09:27 AM
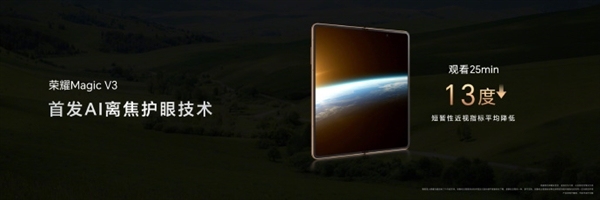
According to news on July 12, the Honor Magic V3 series was officially released today, equipped with the new Honor Vision Soothing Oasis eye protection screen. While the screen itself has high specifications and high quality, it also pioneered the introduction of AI active eye protection technology. It is reported that the traditional way to alleviate myopia is "myopia glasses". The power of myopia glasses is evenly distributed to ensure that the central area of sight is imaged on the retina, but the peripheral area is imaged behind the retina. The retina senses that the image is behind, promoting the eye axis direction. grow later, thereby deepening the degree. At present, one of the main ways to alleviate the development of myopia is the "defocus lens". The central area has a normal power, and the peripheral area is adjusted through optical design partitions, so that the image in the peripheral area falls in front of the retina.
 Teclast M50 Mini tablet is here: 8.7-inch IPS screen, 5000mAh battery
Apr 04, 2024 am 08:31 AM
According to news on April 3, Taipower’s upcoming M50 Mini tablet computer is a device with rich functions and powerful performance. This new 8-inch small tablet is equipped with an 8.7-inch IPS screen, providing users with an excellent visual experience. Its metal body design is not only beautiful but also enhances the durability of the device. In terms of performance, the M50Mini is equipped with the Unisoc T606 eight-core processor, which has two A75 cores and six A55 cores, ensuring a smooth and efficient running experience. At the same time, the tablet is also equipped with a 6GB+128GB storage solution and supports 8GB memory expansion, which meets users’ needs for storage and multi-tasking. In terms of battery life, M50Mini is equipped with a 5000mAh battery and supports Ty


