

What is WINPE


What is WINPE?
WINPE stands for Windows Preinstall Environment, which is "Windows Preinstallation Environment". It is a minimal Win32 subsystem with limited services, based on Windows XP Professional and above kernels running in protected mode. It includes the minimum functionality required to run Windows Installer and scripts, connect to network shares, automate basic processes, and perform hardware verification.
Windows PE contains the PE kernels of Windows XP, Windows Server 2003, Windows Vista, Windows 7, Windows 8, Windows 8.1, and Windows 10.
Features:
Windows PE is a simplified version of Windows or Windows Server, placed on a CD or DVD that can be directly activated. The characteristic is that when activated The Windows graphical interface (GUI) appears.
The original intention of WinPE was just to facilitate enterprises to create customized Windows systems, so it is not available on the market and cannot be sold.
With the approval of Microsoft, other software companies can attach their own software to WinPE to run related programs when the computer is activated. These software are usually system maintenance. When the computer does not operate normally, the relevant system maintenance software can be used to repair the computer. Maintenance software includes Norton Ghost and so on.
The installation program of Windows NT 6.x is also based on the Windows PE kernel.
WinPE is mostly used by OEM manufacturers. For example, just like a brand-name package computer that you just bought, you don’t need to install the operating system completely from scratch, but start from the completion of the installation. Simply put, the purpose of Windows PE is to use it on a large number of computer installations (computers of the same specifications) to achieve fast and consistent installation.
With some simple or basic operations, you can make Windows PE more secure.
If you want to know more related content, please pay attention to the windows tutorial column on the php Chinese website!
The above is the detailed content of What is WINPE. For more information, please follow other related articles on the PHP Chinese website!

Hot AI Tools

Undresser.AI Undress
AI-powered app for creating realistic nude photos

AI Clothes Remover
Online AI tool for removing clothes from photos.

Undress AI Tool
Undress images for free

Clothoff.io
AI clothes remover

AI Hentai Generator
Generate AI Hentai for free.

Hot Article
Hot Tools

Notepad++7.3.1
Easy-to-use and free code editor

SublimeText3 Chinese version
Chinese version, very easy to use

Zend Studio 13.0.1
Powerful PHP integrated development environment

Dreamweaver CS6
Visual web development tools

SublimeText3 Mac version
God-level code editing software (SublimeText3)
Hot Topics
 1385
1385
 52
52

 Detailed explanation of WinPE installation depth of Linux and PE installation depth of Linux system
Feb 09, 2024 pm 05:33 PM
Detailed explanation of WinPE installation depth of Linux and PE installation depth of Linux system
Feb 09, 2024 pm 05:33 PM
Deepin Linux is an operating system based on the open source Linux kernel. It is stable, safe, and easy to use. This article will introduce how to install Deepin Linux using WinPE and PE systems. WinPE installs Deepin Linux. WinPE is a lightweight Windows pre-installation environment that can be used for system maintenance and repair. Using WinPE to install Deepin Linux requires the following steps: 1. Download the ISO image file of Deepin Linux and extract it to a FAT32 format. USB flash drive or mobile hard disk. 2. Download and create a WinPE bootable USB disk or CD. 3. Insert the prepared WinPE boot USB disk or CD into the computer, restart the computer and enter WinPE
 Nothing happens when the winpe tool starts
Feb 13, 2024 pm 11:21 PM
Nothing happens when the winpe tool starts
Feb 13, 2024 pm 11:21 PM
As soon as the computer is turned on, it is prompted to repair the system, but it cannot be repaired. What should I do? First, try pressing the F8 key or pressing the Fn and F8 keys simultaneously to start the computer. Select the last correct configuration to enter the system. If this doesn't work, consider other solutions. When I started my computer today, I encountered a system repair prompt. I followed the prompts step by step to fix it, but it didn't work. So I tried to enter safe mode again and considered using 360 Security Guard to repair the system. However, I found that I could not enter safe mode and still could only enter the automatic repair interface. I tried again and used the repair system startup tool in the PE environment to repair it, but it still didn't work. Although I didn't want to reinstall the system, I still searched online to find out
 Local registry pointing tool under winpe
Feb 09, 2024 pm 03:20 PM
Local registry pointing tool under winpe
Feb 09, 2024 pm 03:20 PM
Most software basically records its name and installation path information in the registry. The location where this information is recorded in the registry is: HKEY_LOCAL_MACHINE\SOFTWARE\Microsoft\Windows\CurrentVersion\AppPaths. Therefore, as long as we can access this location in the registry, we can obtain the name and installation path information of certain software. This blog post uses C# to access the registry to obtain the software installation path and display it. 1 Description of the main screen of the sample program The main screen of the sample program is shown in the figure below. Enter the name of the executable program in the text box on the screen and click the "Get Path" button. Next, the next part of the screen
 How to start win10pe system
Dec 26, 2023 pm 05:27 PM
How to start win10pe system
Dec 26, 2023 pm 05:27 PM
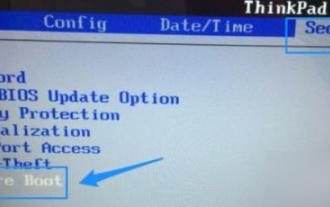
Many friends who use the win10 system will be exposed to the pe system, but many do not know how to enter the system. Today I will bring you the method of entering the win10pe system. If you want to know, come and take a look. How to enter the win10pe system: 1. First turn on the computer and then press the F12 and DEL keys continuously to try to enter the bios interface. 2. After entering, use the direction keys to select "security", then select "secureboot" and press Enter to enter. 3. Next select "secureboot" and press Enter to open the option. 4. After opening, select "disabled" and press Enter to confirm. 5. After turning off the secureboot function, select the "star" at the top
 How to enter win7pe system
Jul 16, 2023 pm 06:49 PM
How to enter win7pe system
Jul 16, 2023 pm 06:49 PM
How to enter win7pe system? After a problem occurs on the win7 computer, you need to enter the pe system to solve it, but does everyone know how to enter it? Today I will introduce to you the detailed entry method of win7pe system. If necessary, let's take a look at how to enter the win7pe system. How to enter the win7pe system: 1. Download and install the Chinese cabbage pe boot disk creation tool, identify the U disk and click OK. 2. After waiting for a while, you will be prompted to complete the production, click OK. 3. Then press F12 to bring up the dialog box, select the USBkey option, and press Enter. 4. At this point, you will enter the startup boot interface, select 02 to run the Chinese cabbage win8pex86 streamlined version.
 Apple winpe install win7
Feb 11, 2024 pm 06:39 PM
Apple winpe install win7
Feb 11, 2024 pm 06:39 PM
I like using Apple Mac computers, but after I started using them, I found that I was not used to Apple's operating system, and I am still used to using Windows systems. We can install Windows systems on Apple Mac computers, enjoy the Apple appearance, and operate Windows systems. Here I will introduce to you how to install dual systems, which is to install the Windows system without affecting the built-in Apple system. After installation, the Windows system will automatically run on boot. Before starting the operation, we need to do some preparations. First, make sure you have prepared a 64-bit pure version of win7 ghsot system image. Secondly, you also need a bootable USB disk with a PE system created. If you don’t have these yet, you can download wi online
 Graphical demonstration of winpewin7 system installation tutorial
Jul 18, 2023 pm 06:41 PM
Graphical demonstration of winpewin7 system installation tutorial
Jul 18, 2023 pm 06:41 PM
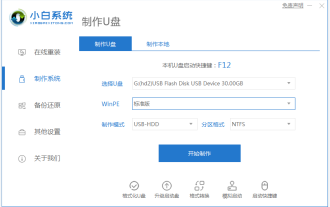
When the win7 system has a blue screen, black screen, system crash, etc. and cannot enter the system, we can use a USB flash drive to make a winpe boot disk and reinstall the system to repair it. So how to install win7 system on USB flash drive? The editor below will teach you the installation tutorial of winpewin7 system. The specific installation steps are as follows: 1. We first find an available computer, download and install Xiaobai's one-click system reinstallation tool on the computer and open it, insert a blank USB disk of more than 8g, select the USB disk reinstallation system mode and click start Make. (Note that important data in the USB flash drive must be backed up first) 2. Select the win7 operating system that needs to be installed and click to start production. 3. The software starts to automatically download system images, drivers and other files, and waits for the USB boot disk to be produced.
 How to use the Win10PE installation tool: How to install the Win10 operating system
Dec 28, 2023 pm 03:44 PM
How to use the Win10PE installation tool: How to install the Win10 operating system
Dec 28, 2023 pm 03:44 PM
Many users do not know how to use the U-boot win10pe installation tool. This tool can help users install the win10pe system safely and stably for use. As long as they can make a boot U disk and use the U disk to enter the system, they can install it. How to install win10 using the u-start win10pe installation tool: The first step is preparation: 1. First prepare the USB boot disk 2. Then download the image file of the win10 system and copy it to the USB boot disk. The second step is to start the installation. 1. When ready, insert the U disk into the computer. On the desktop, insert the U disk into the interface behind the host box. Restart the computer. When the startup screen appears, press the U disk startup shortcut key to enter. Ustart interface. 2. Enter the tool interface and select your current impression file path.
