 Operation and Maintenance
 Windows Operation and Maintenance
 How to set up shared folders in WinXP system
How to set up shared folders in WinXP system
1. First select the document you want to share. The size of the document will not affect whether the file can be shared. Of course, the file size will affect the length of time it takes to share the file. In the example, a newly created file is used. to demonstrate.

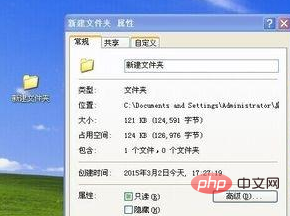
2. Then right-click the file and select the Properties menu in the pop-up menu bar. Click the Properties menu to pop up the Properties menu bar, as shown in the figure
(Recommended learning: html introductory tutorial)
3. Select the share menu in the properties menu bar, and a shared content prompt will pop up
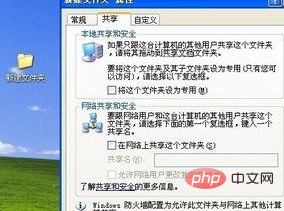
4. Sharing is divided into local sharing and network sharing.
To choose network sharing, network sharing is a type of local area network or wide area network sharing, while local sharing is related to local area network sharing. shared with different users on the machine.
Fill in the share name in the network share share name. The share name is a way for the computer to identify shared files.
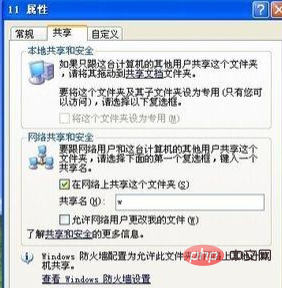
5. Enter the share name and click whether to share the file. After confirmation, a small hand holding the file will appear as shown in the file icon, indicating that the file has been shared successfully. In "Share Documents" You can find the document that was successfully shared this time

Related tutorial recommendations: windows tutorial
The above is the detailed content of How to set up shared folders in WinXP system. For more information, please follow other related articles on the PHP Chinese website!

Hot AI Tools

Undresser.AI Undress
AI-powered app for creating realistic nude photos

AI Clothes Remover
Online AI tool for removing clothes from photos.

Undress AI Tool
Undress images for free

Clothoff.io
AI clothes remover

AI Hentai Generator
Generate AI Hentai for free.

Hot Article

Hot Tools

Notepad++7.3.1
Easy-to-use and free code editor

SublimeText3 Chinese version
Chinese version, very easy to use

Zend Studio 13.0.1
Powerful PHP integrated development environment

Dreamweaver CS6
Visual web development tools

SublimeText3 Mac version
God-level code editing software (SublimeText3)

Hot Topics
 How do I share a OneDrive file or folder with others?
May 08, 2023 pm 06:42 PM
Microsoft OneDrive allows users to store files and folders on the cloud and access them from anywhere. If you allow them to use the OneDrive app, you can also give them permission to access your files. This allows people to easily exchange files or folders. You can also change the file's access rights, such as whether they can edit it or just view it, and add a password as well as an expiration date. So even if you forget to stop accessing some files, the access rights will automatically expire after the specified date. In this article, we will teach you how to share files or folders with others in OneDrive using two different methods. How to share files or folders with people in OneDrive
 How to set Ubuntu 20.04 to automatically mount shared folders at startup in VirtualBox?
Dec 29, 2023 pm 11:47 PM
Today we will take a look at how to automatically mount the VirtualBox shared folder on startup after installing Ubuntu 20.04 on the VirtualBox virtual machine? Please see the introduction below for details. Install Ubuntu20.04LTS, install the built-in enhancements of VirtualBox, and shut down the virtual machine. In the main interface of VirtualBox, Ubuntu20.04 corresponds to the virtual machine. Select "Settings", locate "Shared Folder" in the settings, and click the Add button on the right, as shown in the figure: In the pop-up dialog box, set what needs to be shared in Windows. File location, other options will be "Fixed Mount"
 7 Ways to Access Shared Folders on Windows 11 (And 6 Fixes if You Can't)
May 15, 2023 pm 06:28 PM
Sharing folders and accessing folders are two parts of the process. If the folder has been shared over a network, the recipient still needs to access it from his/her system. There are many ways to do this, and there are many built-in traps to maintain security. 6 Ways to Access Shared Folders on Windows 11 Here are seven ways to access shared folders on Windows 11, listed in ascending order of difficulty. Method 1: Accessing the shared folder through File Explorer (Network side pane) is the easiest way. All you need to do is: Press Win+E to open File Explorer. Click Network in the side panel. Double-click the computer name of the shared folder. If prompted, use the account that shared the folder
 How to fix OneDrive shortcuts can't be moved error in Windows 11 or 10?
Apr 24, 2023 pm 05:22 PM
Sometimes you may want to share a OneDrive folder with other people, and for this you have to add a shortcut to the file, using the "Add shortcut to my files" option in the OneDrive app. The app will then create a shortcut in the root of the OneDrive of the person you want to share with. While moving folders from one directory to another is a fairly common and normal process, sometimes you may encounter the error message - "We are currently unable to move shortcuts and move shortcuts back to their original location." Per Error messages appear as pop-ups whenever you try to move files or folders to or within the OneDrive app. In fact, you
 Set password for shared folder in win10 home version
Jan 31, 2024 am 09:03 AM
To protect the security of our shared folders, we can set a password. For those who are not familiar with the operation method, you only need to right-click on the folder, select Properties, and then set the password. The operation is very convenient. Set a password for a shared folder in Win10 Home Edition: 1. First, right-click on the folder that needs to be encrypted, and then click "Properties". 2. Then, select the "Share" option on the upper interface. 3. Then you can find the password protection option below and click "Network and Sharing Center". 4. Select "All Networks". 5. Finally, check the password protected option and click "Apply" to take effect.
 How to map a drive in Windows 11
May 18, 2023 pm 12:54 PM
Click to enter: ChatGPT tool plug-in navigation guide If you often need to connect to remote folders or drives shared on the network, mapping the drive or folder location on your Windows 11 PC will save you a lot of time. Additionally, the entire experience of using a mapped network drive feels the same as using any other drive plugged into your PC. If all this sounds perfect to you, let’s take a quick look at how to map a network drive on Windows 11. First, configure Windows for network drives by clicking the Start button and entering Control Panel. Click the search result or Open button. Once in the Control Panel, click on "Network and Internet." Click "Network and Sharing Center." click
 Steps to solve the problem that WIN10 shared folder cannot be opened and prompts that the network path cannot be found
Mar 27, 2024 pm 03:31 PM
1. Open the start menu, write [firewall] in the search bar, and select the legend option to enter. 2. Open the [Turn Windows Firewall on or off] option in the left menu. 3. Turn off all firewalls on home and public networks. 4. Expand the start menu and open Run, write [services.msc] in the run window and press Enter. 5. Finally, find the [TCP/iPnetBiosHelper] option in the service list and double-click it. Change the startup type to [Automatic] and start this service.
 How to set up shared folders on windows 11?
Jan 30, 2024 pm 04:09 PM
After upgrading their computers to Win11, many users found that the previously set shared folders were closed, and they did not know how to reset and start them in the new system. In order to help users solve this problem, the editor of this website has specially compiled the latest shared folder setting steps and shared the operation methods with you in today's Win11 tutorial. If you need to reset a shared folder, follow the steps below. How to set up a shared folder in win11 For security reasons, it is recommended to set up a special sharing account. Right-click the computer icon to open settings. 3. Open the Create New User window, set a username and password yourself, and cancel the need to change the password the next time the user logs in. Select Advanced Sharing Options and check Share this folder


