

How to access between containers in docker

We all know that docker containers are isolated from each other and cannot access each other, but what should we do if there are some dependent services. The following describes three methods to solve the problem of container mutual access.
Method 1, virtual ip access
When installing docker, docker will create an internal bridge network docker0 by default. Each container created is assigned a virtual network card, and the containers can access each other based on ip. .
[root@33fcf82ab4dd /]# [root@CentOS ~]# ifconfig
......
docker0: flags=4163<UP,BROADCAST,RUNNING,MULTICAST>  mtu 1500
        inet 172.17.0.1  netmask 255.255.0.0  broadcast 0.0.0.0
        inet6 fe80::42:35ff:feac:66d8  prefixlen 64  scopeid 0x20<link>
        ether 02:42:35:ac:66:d8  txqueuelen 0  (Ethernet)
        RX packets 4018  bytes 266467 (260.2 KiB)
        RX errors 0  dropped 0  overruns 0  frame 0
        TX packets 4226  bytes 33935667 (32.3 MiB)
        TX errors 0  dropped 0 overruns 0  carrier 0  collisions 0
......Method 2, link
Add parameter link when running the container
Run the first container
docker run -it --name centos-1 docker.io/centos:latest
Run the second container
[root@CentOS ~]# docker run -it --name centos-2 --link centos-1:centos-1 docker.io/centos:latest
--link: The first centos-1 in the parameter is the container name, and the second centos-1 is the defined container alias (use the alias to access the container). For ease of use, generally the alias defaults to the container name.
The test results are as follows:
[root@e0841aa13c5b /]# ping centos-1
PING centos-1 (172.17.0.7) 56(84) bytes of data.
bytes from centos-1 (172.17.0.7): icmp_seq=1 ttl=64 time=0.210 ms
bytes from centos-1 (172.17.0.7): icmp_seq=2 ttl=64 time=0.116 ms
bytes from centos-1 (172.17.0.7): icmp_seq=3 ttl=64 time=0.112 ms
bytes from centos-1 (172.17.0.7): icmp_seq=4 ttl=64 time=0.114 ms
Method 3. Create a bridge network
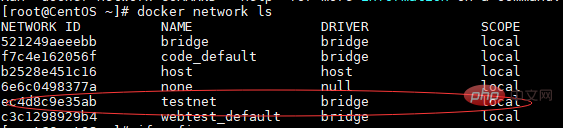
1. After installing docker, run the following command to create a bridge network: docker network create testnet
Query the newly created bridge testnet.
#2. Run the container and connect to the testnet network.
Usage: docker run -it --name
[root@CentOS ~]# docker run -it --name centos-1 --network testnet --network-alias centos-1 docker.io/centos:latest
[root@CentOS ~]# docker run -it --name centos-2 --network testnet --network-alias centos-2 docker.io/centos:latest
3. Ping from one container to another container, the test results are as follows:
[root@fafe2622f2af /]# ping centos-1
PING centos-1 (172.20.0.2) 56(84) bytes of data.
bytes from centos-1.testnet (172.20.0.2): icmp_seq=1 ttl=64 time=0.158 ms
bytes from centos-1.testnet (172.20.0.2): icmp_seq=2 ttl=64 time=0.108 ms
bytes from centos-1.testnet (172.20.0.2): icmp_seq=3 ttl=64 time=0.112 ms
bytes from centos-1.testnet (172.20.0.2): icmp_seq=4 ttl=64 time=0.113 ms
For more related tutorials, please pay attention to the docker tutorial column on the PHP Chinese website.
The above is the detailed content of How to access between containers in docker. For more information, please follow other related articles on the PHP Chinese website!

Hot AI Tools

Undresser.AI Undress
AI-powered app for creating realistic nude photos

AI Clothes Remover
Online AI tool for removing clothes from photos.

Undress AI Tool
Undress images for free

Clothoff.io
AI clothes remover

AI Hentai Generator
Generate AI Hentai for free.

Hot Article
Hot Tools

Notepad++7.3.1
Easy-to-use and free code editor

SublimeText3 Chinese version
Chinese version, very easy to use

Zend Studio 13.0.1
Powerful PHP integrated development environment

Dreamweaver CS6
Visual web development tools

SublimeText3 Mac version
God-level code editing software (SublimeText3)
Hot Topics
 1378
1378
 52
52

 How to use docker desktop
Apr 15, 2025 am 11:45 AM
How to use docker desktop
Apr 15, 2025 am 11:45 AM
How to use Docker Desktop? Docker Desktop is a tool for running Docker containers on local machines. The steps to use include: 1. Install Docker Desktop; 2. Start Docker Desktop; 3. Create Docker image (using Dockerfile); 4. Build Docker image (using docker build); 5. Run Docker container (using docker run).
 How to read the docker version
Apr 15, 2025 am 11:51 AM
How to read the docker version
Apr 15, 2025 am 11:51 AM
To get the Docker version, you can perform the following steps: Run the Docker command "docker --version" to view the client and server versions. For Mac or Windows, you can also view version information through the Version tab of the Docker Desktop GUI or the About Docker Desktop menu.
 How to create a mirror in docker
Apr 15, 2025 am 11:27 AM
How to create a mirror in docker
Apr 15, 2025 am 11:27 AM
Steps to create a Docker image: Write a Dockerfile that contains the build instructions. Build the image in the terminal, using the docker build command. Tag the image and assign names and tags using the docker tag command.
 How to change the docker image source in China
Apr 15, 2025 am 11:30 AM
How to change the docker image source in China
Apr 15, 2025 am 11:30 AM
You can switch to the domestic mirror source. The steps are as follows: 1. Edit the configuration file /etc/docker/daemon.json and add the mirror source address; 2. After saving and exiting, restart the Docker service sudo systemctl restart docker to improve the image download speed and stability.
 How to update the image of docker
Apr 15, 2025 pm 12:03 PM
How to update the image of docker
Apr 15, 2025 pm 12:03 PM
The steps to update a Docker image are as follows: Pull the latest image tag New image Delete the old image for a specific tag (optional) Restart the container (if needed)
 How to save docker image
Apr 15, 2025 am 11:54 AM
How to save docker image
Apr 15, 2025 am 11:54 AM
To save the image in Docker, you can use the docker commit command to create a new image, containing the current state of the specified container, syntax: docker commit [Options] Container ID Image name. To save the image to the repository, you can use the docker push command, syntax: docker push image name [: tag]. To import saved images, you can use the docker pull command, syntax: docker pull image name [: tag].
 How to check the name of the docker container
Apr 15, 2025 pm 12:21 PM
How to check the name of the docker container
Apr 15, 2025 pm 12:21 PM
You can query the Docker container name by following the steps: List all containers (docker ps). Filter the container list (using the grep command). Gets the container name (located in the "NAMES" column).
 How to build a private repository by docker
Apr 15, 2025 am 11:06 AM
How to build a private repository by docker
Apr 15, 2025 am 11:06 AM
You can build Docker private repositories to securely store and manage container images, providing strict control and security. The steps include: creating a repository, granting access, deploying a repository, pushing an image, and pulling an image. Advantages include security, version control, reduced network traffic and customization.
