How to automatically obtain the IP address under centos7

Background:
I have just installed CentOS7. The minimum installation does not enable the network card to automatically obtain an IP.
Method:
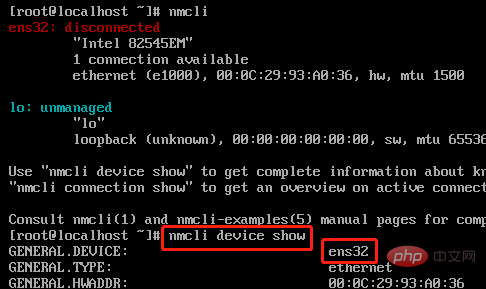
To view the current network card information, use the nmcli command. There is no need to install net-tools. Use ifconfig. Of course, you can also use the ip add show command to view the ip address. Use the following command to view it. Information about the current network card. ens32 is the alias of the network card. Remember this alias.
nmcli device show

(Recommended tutorial: centos tutorial)
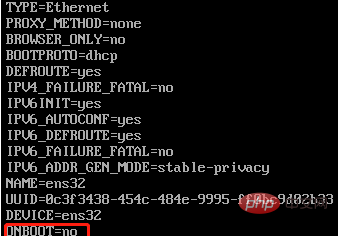
Look for the network card configuration file, find the file named ifcfg-ens32, edit this document.

Find the last line, ONBOOT=no

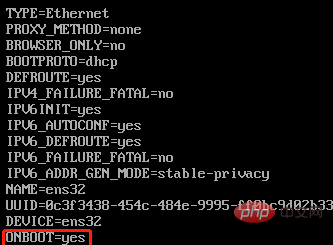
Set ONBOOT to yes and the IP address will be obtained automatically. After ESC, :wq save and exit.

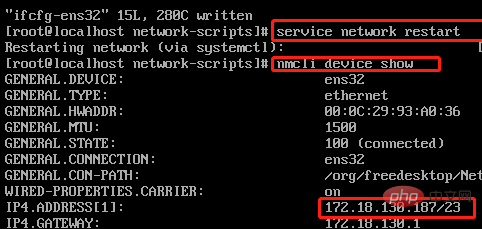
Restart the network service. After restarting the network service, check the network card information and IP address again.
service network restart

Related video tutorial recommendations: linux video tutorial
The above is the detailed content of How to automatically obtain the IP address under centos7. For more information, please follow other related articles on the PHP Chinese website!

Hot AI Tools

Undresser.AI Undress
AI-powered app for creating realistic nude photos

AI Clothes Remover
Online AI tool for removing clothes from photos.

Undress AI Tool
Undress images for free

Clothoff.io
AI clothes remover

AI Hentai Generator
Generate AI Hentai for free.

Hot Article

Hot Tools

Notepad++7.3.1
Easy-to-use and free code editor

SublimeText3 Chinese version
Chinese version, very easy to use

Zend Studio 13.0.1
Powerful PHP integrated development environment

Dreamweaver CS6
Visual web development tools

SublimeText3 Mac version
God-level code editing software (SublimeText3)

Hot Topics
 How do websites set black/whitelist IP restrictions and country and city IP access restrictions through nginx?
Jun 01, 2023 pm 05:27 PM
1. Black/white list IP restricted access configuration nginx There are several ways to configure black and white lists. Here are only two commonly used methods. 1. The first method: allow, denydeny and allow instructions belong to ngx_http_access_module. nginx loads this module by default, so it can be used directly. This method is the simplest and most direct. The setting is similar to the firewall iptable. How to use: Add directly to the configuration file: #Whitelist settings, followed by allow is accessible IPlocation/{allow123.13.123.12;allow23.53.32.1/100;denyall;}#Blacklist settings,
 CentOS7 various version image download addresses and version descriptions (including Everything version)
Feb 29, 2024 am 09:20 AM
When loading CentOS-7.0-1406, there are many optional versions. For ordinary users, they don’t know which one to choose. Here is a brief introduction: (1) CentOS-xxxx-LiveCD.ios and CentOS-xxxx- What is the difference between bin-DVD.iso? The former only has 700M, and the latter has 3.8G. The difference is not only in size, but the more essential difference is that CentOS-xxxx-LiveCD.ios can only be loaded into the memory and run, and cannot be installed. Only CentOS-xxx-bin-DVD1.iso can be installed on the hard disk. (2) CentOS-xxx-bin-DVD1.iso, Ce
 How to check IP address on WeChat
May 31, 2023 am 09:16 AM
How to check the IP address on WeChat: 1. Log in to the computer version of WeChat, right-click the taskbar at the bottom of the screen, and click "Task Manager"; 2. When the task manager pops up, click "Details" in the lower left corner; 3. Task management Enter the "Performance" option of the browser and click "Open Resource Monitor"; 4. Select "Network" and check the WeChat process "Wechat.exe"; 5. Click "TCP Connection" below to monitor the WeChat network IP related situation. Sending a message and getting a reply will reveal the other person's IP address.
 Steps to enter CentOS 7 emergency repair mode
Jan 13, 2024 am 09:36 AM
Open the centos7 page and appear: welcome to emergency mode! afterloggingin, type "journalctl -xb" to viewsystemlogs, "systemctlreboot" toreboot, "systemctldefault" to tryagaintobootintodefaultmode. giverootpasswordformaintenance(??Control-D???): Solution: execute r
 Local IP address query
Jan 05, 2024 pm 01:42 PM
The methods for querying the IP address of this machine are: 1. Under Windows system, open the "Start Menu" and search for "cmd" to open the command prompt, enter "ipconfig", and then press the Enter key to find a line named "IPv4 Address" , the number next to it is the IP address of the machine; 2. Under macOS system, click the Apple icon in the upper left corner of the screen, select "System Preferences", find the currently connected network in the "Network" option, and click the "Advanced" button , find the IP of the machine in the "TCP/IP" tab, etc.
 How to set password rules in centos7? How to set password rules in centos7
Jan 07, 2024 pm 01:17 PM
Set password rules for security reasons Set the number of days after which passwords expire. User must change password within days. This setting only affects created users, not existing users. If setting to an existing user, run the command "chage -M (days) (user)". PASS_MAX_DAYS60#Password expiration time PASS_MIN_DAYS3#Initial password change time PASS_MIN_LEN8#Minimum password length PASS_WARN_AGE7#Password expiration prompt time Repeat password restriction use [root@linuxprobe~]#vi/etc/pam.d/system-auth#nearline15:
 How to access and clean junk files in /tmp directory in CentOS 7?
Dec 27, 2023 pm 09:10 PM
There is a lot of garbage in the tmp directory in the centos7 system. If you want to clear the garbage, how should you do it? Let’s take a look at the detailed tutorial below. To view the list of files in the tmp file directory, execute the command cdtmp/ to switch to the current file directory of tmp, and execute the ll command to view the list of files in the current directory. As shown below. Use the rm command to delete files. It should be noted that the rm command deletes files from the system forever. Therefore, it is recommended that when using the rm command, it is best to give a prompt before deleting the file. Use the command rm-i file name, wait for the user to confirm deletion (y) or skip deletion (n), and the system will perform corresponding operations. As shown below.
 What should I do if my wifi shows no IP allocation?
Aug 30, 2023 am 11:58 AM
Solution to wifi showing no IP allocation: 1. Restart the device and router, turn off the Wi-Fi connection on the device, turn off the device, turn off the router, wait a few minutes, then reopen the router to connect to wifi; 2. Check the router settings and restart DHCP, make sure the DHCP function is enabled; 3. Reset network settings, which will delete all saved WiFi networks and passwords. Please make sure they are backed up before performing this operation; 4. Update the router firmware, log in to the router management interface, and find the firmware Update options and follow the prompts.


