

How to run the go language code edited by vscode


vscode needs to install the vscode-go plug-in to run go language code. Then use F5 (continue), F10 (step over), F11 (step into) and other shortcut keys to run the go language code.
Install the vscode-go plug-in
Enter the vscode interface, open the command panel Ctrl Shift P, enter install,

Plug-in features include:
Completion Lists (using gocode)
Signature Help (using godoc)
Snippets
Quick Info (using godef)
Goto Definition (using godef)
Find References (using guru)
File outline (using go-outline)
Workspace symbol search (using go-symbols)
Rename (using gorename)
Build-on-save (using go build and go test)
Lint-on-save (using golint or gometalinter)
Format (using goreturns or goimports or gofmt)
Generate unit tests squeleton (using gotests)
Add Imports (using gopkgs)
[partially implemented] Debugging (using delve)
Visual Studio Code Go plug-in configuration options
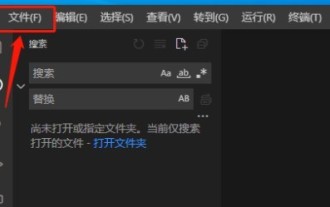
After starting vscode, select the File menu-> Preferences-> Workspace Settings
In the open. vscode/settings.json file, modify goroot and gopath
{
// Go configuration
    // Run 'go build'/'go test -c' on save.
    "go.buildOnSave": true,
    // Flags to `go build`/`go test` used during build-on-save or running tests. (e.g. ['-ldflags="-s"'])
    "go.buildFlags": [],
    // Run Lint tool on save.
    "go.lintOnSave": true,
    // Specifies Lint tool name.
    "go.lintTool": "golint",
    // Flags to pass to Lint tool (e.g. ['-min_confidenc=.8'])
    "go.lintFlags": [],
    // Run 'go tool vet' on save.
    "go.vetOnSave": true,
    // Flags to pass to `go tool vet` (e.g. ['-all', '-shadow'])
    "go.vetFlags": [],
    // Pick 'gofmt', 'goimports' or 'goreturns' to run on format.
    "go.formatTool": "goreturns",
    // Flags to pass to format tool (e.g. ['-s'])
    "go.formatFlags": [],
    // Run the formatting tools with the -d flag
    "go.useDiffForFormatting": true,
    // Complete functions with their parameter signature
    "go.useCodeSnippetsOnFunctionSuggest": false,
    // Specifies the GOPATH to use when no environment variable is set.
    "go.gopath": "//home/chenjianhua/gocode",
    // Specifies the GOROOT to use when no environment variable is set.
    "go.goroot": "/usr/local/go",
    // Run formatting tool on save.
    "go.formatOnSave": true,
    // Run 'go test -coverprofile' on save
    "go.coverOnSave": false,
    // Specifies the timeout for go test in ParseDuration format.
    "go.testTimeout": "30s",
    // Enable gocode's autobuild feature
    "go.gocodeAutoBuild": true,
    // The Go build tags to use for all commands that support a `-tags '...'` argument
    "go.buildTags": "",
    // Environment variables that will passed to the process that runs the Go tests
    "go.testEnvVars": {},
    // Autocomplete members from unimported packages.
    "go.autocompleteUnimportedPackages": true
}vscode editor shortcut key
Command panel Ctrl Shift P or F1
Go to file Ctrl P
Switch terminal Ctrl `
Rename F2
Debug F5(continue)F10(step over)F11(step into)
Jump to the next one with error or F8 where warning is
Jump to where function is defined F12
Zoom the entire screen Cmd /Ctrl
Recommended learning: vscode tutorial
The above is the detailed content of How to run the go language code edited by vscode. For more information, please follow other related articles on the PHP Chinese website!

Hot AI Tools

Undresser.AI Undress
AI-powered app for creating realistic nude photos

AI Clothes Remover
Online AI tool for removing clothes from photos.

Undress AI Tool
Undress images for free

Clothoff.io
AI clothes remover

AI Hentai Generator
Generate AI Hentai for free.

Hot Article
Hot Tools

Notepad++7.3.1
Easy-to-use and free code editor

SublimeText3 Chinese version
Chinese version, very easy to use

Zend Studio 13.0.1
Powerful PHP integrated development environment

Dreamweaver CS6
Visual web development tools

SublimeText3 Mac version
God-level code editing software (SublimeText3)
Hot Topics
 1378
1378
 52
52

 How to view word documents in vscode How to view word documents in vscode
May 09, 2024 am 09:37 AM
How to view word documents in vscode How to view word documents in vscode
May 09, 2024 am 09:37 AM
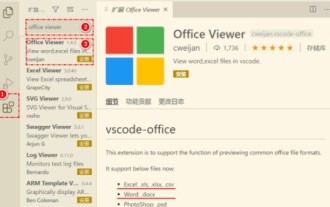
First, open the vscode software on the computer, click the [Extension] icon on the left, as shown in ① in the figure. Then, enter [officeviewer] in the search box of the extension interface, as shown in ② in the figure. Then, from the search Select [officeviewer] to install in the results, as shown in ③ in the figure. Finally, open the file, such as docx, pdf, etc., as shown below
 How to enable background updates in vscode How to enable background updates in vscode
May 09, 2024 am 09:52 AM
How to enable background updates in vscode How to enable background updates in vscode
May 09, 2024 am 09:52 AM
1. First, after opening the interface, click the file menu in the upper left corner. 2. Then, click the settings button in the preferences column. 3. Then, in the settings page that jumps, find the update section. 4. Finally, click the mouse to check and enable it. Download and install the new VSCode version button in the background on Windows and restart the program.
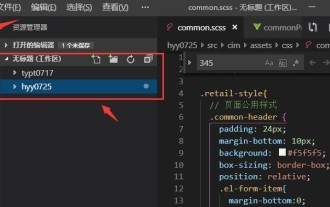 How to add files to vscode workspace How to add files to vscode workspace
May 09, 2024 am 09:43 AM
How to add files to vscode workspace How to add files to vscode workspace
May 09, 2024 am 09:43 AM
1. First, open the vscode software, click the explorer icon, and find the workspace window 2. Then, click the file menu in the upper left corner and find the add folder to workspace option 3. Finally, find the folder location in the local disk , click the add button
 How to disable wsl configuration file in vscode How to disable wsl configuration file in vscode
May 09, 2024 am 10:30 AM
How to disable wsl configuration file in vscode How to disable wsl configuration file in vscode
May 09, 2024 am 10:30 AM
1. First, open the settings option in the settings menu. 2. Then, find the terminal column in the commonly used page. 3. Finally, uncheck the usewslprofiles button on the right side of the column.
 How to set animation smooth insertion in VScode VScode tutorial to set animation smooth insertion
May 09, 2024 am 09:49 AM
How to set animation smooth insertion in VScode VScode tutorial to set animation smooth insertion
May 09, 2024 am 09:49 AM
1. First, after opening the interface, click the workspace interface 2. Then, in the open editing panel, click the File menu 3. Then, click the Settings button under the Preferences column 4. Finally, click the mouse to check the CursorSmoothCaretAnimation button and save Just set it
 How to open workspace trust permissions in Vscode Vscode method to open workspace trust permissions
May 09, 2024 am 10:34 AM
How to open workspace trust permissions in Vscode Vscode method to open workspace trust permissions
May 09, 2024 am 10:34 AM
1. First, after opening the editing window, click the configuration icon in the lower left corner 2. Then, click the Manage Workspace Trust button in the submenu that opens 3. Then, find the page in the editing window 4. Finally, according to your office Just check the relevant instructions if required
 How to open animation in Vscode Introduction to the method of opening animation in Vscode
May 09, 2024 am 10:28 AM
How to open animation in Vscode Introduction to the method of opening animation in Vscode
May 09, 2024 am 10:28 AM
1. First, click to open the settings option in the More menu. 2. Then, find the terminal column under the Features section. 3. Finally, on the right side of the column, click the enableanimation button with the mouse and save the settings.
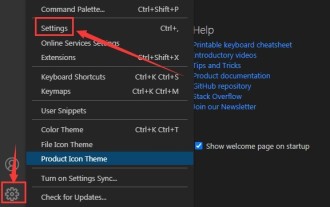
 How to set the file icon theme in vscode_How to set the file icon theme in vscode
May 09, 2024 am 10:00 AM
How to set the file icon theme in vscode_How to set the file icon theme in vscode
May 09, 2024 am 10:00 AM
1. After opening the interface, click the extension button in the lower left corner 2. Search for the vscode-icons plug-in in the extension store and install it 3. Then click the preferences button in the file menu in the upper left corner to find the file icon theme option 4. Find the just installed Just set the plug-in
