

centos7 cannot connect to ssh


Problem:
After installing CentOS with GNOME, I found that XShell cannot connect to Linux.
Cause:
sshd service is not started.
Solution:
1. IP addr found that the network card name is ens33

2. In /etc/sysconfig/network-scripts The ifcfg-ens33 file cannot be found in the / directory. The file is included in the picture below because it was a picture I took after the problem was solved.
You need to add an ens33 network configuration to the wired connection


3. After switching to the root user, check Whether sshd is installed on this machine. If it is not installed, you need to
yum install openssh-server
install the software.

#4. Start the SSH service. Enter the command:
service sshd restart
to restart the SSH service.
After restarting, you can enter:
netstat -antp | grep sshd
Check whether port 22 is started (optional)
5. Set the service to automatically start at boot
Enter the command:
chkconfig sshd on
Note: If chkconfig sshd off disables SSH startup.

Related tutorial recommendations: centos tutorial
The above is the detailed content of centos7 cannot connect to ssh. For more information, please follow other related articles on the PHP Chinese website!

Hot AI Tools

Undresser.AI Undress
AI-powered app for creating realistic nude photos

AI Clothes Remover
Online AI tool for removing clothes from photos.

Undress AI Tool
Undress images for free

Clothoff.io
AI clothes remover

AI Hentai Generator
Generate AI Hentai for free.

Hot Article
Hot Tools

Notepad++7.3.1
Easy-to-use and free code editor

SublimeText3 Chinese version
Chinese version, very easy to use

Zend Studio 13.0.1
Powerful PHP integrated development environment

Dreamweaver CS6
Visual web development tools

SublimeText3 Mac version
God-level code editing software (SublimeText3)
Hot Topics
 1371
1371
 52
52

 CentOS7 various version image download addresses and version descriptions (including Everything version)
Feb 29, 2024 am 09:20 AM
CentOS7 various version image download addresses and version descriptions (including Everything version)
Feb 29, 2024 am 09:20 AM
When loading CentOS-7.0-1406, there are many optional versions. For ordinary users, they don’t know which one to choose. Here is a brief introduction: (1) CentOS-xxxx-LiveCD.ios and CentOS-xxxx- What is the difference between bin-DVD.iso? The former only has 700M, and the latter has 3.8G. The difference is not only in size, but the more essential difference is that CentOS-xxxx-LiveCD.ios can only be loaded into the memory and run, and cannot be installed. Only CentOS-xxx-bin-DVD1.iso can be installed on the hard disk. (2) CentOS-xxx-bin-DVD1.iso, Ce
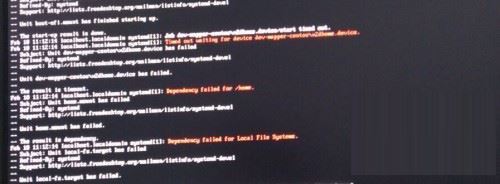 Steps to enter CentOS 7 emergency repair mode
Jan 13, 2024 am 09:36 AM
Steps to enter CentOS 7 emergency repair mode
Jan 13, 2024 am 09:36 AM
Open the centos7 page and appear: welcome to emergency mode! afterloggingin, type "journalctl -xb" to viewsystemlogs, "systemctlreboot" toreboot, "systemctldefault" to tryagaintobootintodefaultmode. giverootpasswordformaintenance(??Control-D???): Solution: execute r
 OpenSSH on Windows: Installation, Configuration, and Usage Guide
Mar 08, 2024 am 09:31 AM
OpenSSH on Windows: Installation, Configuration, and Usage Guide
Mar 08, 2024 am 09:31 AM
For most Windows users, Remote Desktop Protocol (RDP) has always been the first choice for remote management because it provides a friendly graphical interface. However, for system administrators who require more granular control, SSH may better suit their needs. Through SSH, administrators can interact with remote devices through the command line, which can make management work more efficient. The advantage of SSH is its security and flexibility, making it easier for administrators to perform remote management and maintenance work, especially when dealing with a large number of devices or performing automated tasks. So while RDP excels in terms of user-friendliness, for system administrators, SSH is superior in terms of power and control. Previously, Windows users needed to borrow
 How to access and clean junk files in /tmp directory in CentOS 7?
Dec 27, 2023 pm 09:10 PM
How to access and clean junk files in /tmp directory in CentOS 7?
Dec 27, 2023 pm 09:10 PM
There is a lot of garbage in the tmp directory in the centos7 system. If you want to clear the garbage, how should you do it? Let’s take a look at the detailed tutorial below. To view the list of files in the tmp file directory, execute the command cdtmp/ to switch to the current file directory of tmp, and execute the ll command to view the list of files in the current directory. As shown below. Use the rm command to delete files. It should be noted that the rm command deletes files from the system forever. Therefore, it is recommended that when using the rm command, it is best to give a prompt before deleting the file. Use the command rm-i file name, wait for the user to confirm deletion (y) or skip deletion (n), and the system will perform corresponding operations. As shown below.
 How to set password rules in centos7? How to set password rules in centos7
Jan 07, 2024 pm 01:17 PM
How to set password rules in centos7? How to set password rules in centos7
Jan 07, 2024 pm 01:17 PM
Set password rules for security reasons Set the number of days after which passwords expire. User must change password within days. This setting only affects created users, not existing users. If setting to an existing user, run the command "chage -M (days) (user)". PASS_MAX_DAYS60#Password expiration time PASS_MIN_DAYS3#Initial password change time PASS_MIN_LEN8#Minimum password length PASS_WARN_AGE7#Password expiration prompt time Repeat password restriction use [root@linuxprobe~]#vi/etc/pam.d/system-auth#nearline15:
 How to install mbstring extension under CENTOS7?
Jan 06, 2024 pm 09:59 PM
How to install mbstring extension under CENTOS7?
Jan 06, 2024 pm 09:59 PM
1.UncaughtError:Calltoundefinedfunctionmb_strlen(); When the above error occurs, it means that we have not installed the mbstring extension; 2. Enter the PHP installation directory cd/temp001/php-7.1.0/ext/mbstring 3. Start phpize(/usr/local/bin /phpize or /usr/local/php7-abel001/bin/phpize) command to install php extension 4../configure--with-php-config=/usr/local/php7-abel
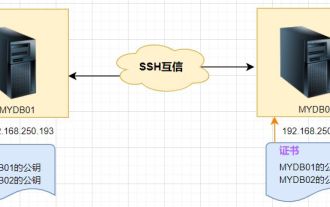 Linux SSH login mutual trust configuration
Feb 19, 2024 pm 07:48 PM
Linux SSH login mutual trust configuration
Feb 19, 2024 pm 07:48 PM
1. The purpose of ssh mutual trust 1. SSH mutual trust is required when building a cluster, which is conducive to convenient operation on another node. 2. When using scp remote copy operation, you need to enter the user name and password of the target server. At this time, you can configure SSH mutual trust between Linux servers, so that you can log in without a password when operating between multiple Linux servers. 2. The principle of ssh mutual trust configuration. In short, the server stores the certificate of the target host so that authentication can be completed automatically without entering a password. 3. SSH mutual trust configuration steps 1. Each node generates its own public key and private key pair. 2. Send your public key file to the other party. 3. Verify whether the mutual trust configuration is successful. 4. Configure ssh mutual trust here with MYDB01 and
 Install SSH on the Linux Debian11 server, create a new user and allow SSH remote login, and configure SSH secure login!
Mar 01, 2024 pm 07:16 PM
Install SSH on the Linux Debian11 server, create a new user and allow SSH remote login, and configure SSH secure login!
Mar 01, 2024 pm 07:16 PM
The steps to install SSH on your Debian11 server and create a new user to allow SSH remote login are as follows: Step 1: Install SSH In order to install the SSH server, you need to log in to your Debian11 server as the root user or a user with sudo privileges. Execute the following command in the terminal to install the SSH server: sudoaptupdatesudoaptinstallopenssh-server Step 2: Create a new user To create a new user, you can use the adduser command. Replace the following command with your desired username: sudoaddusernew_username You will be prompted to set the new user's password and other
