How to install centos7?
How to install centos7? The following article will introduce to you how to install CentOS7 in vmware workstations. It has certain reference value. Friends in need can refer to it. I hope it will be helpful to everyone.

This article shows the installation process of CentOS7 based on vmware workstations. I will not introduce the installation and configuration of vmware workstations here. The basic process is equivalent to installing a software under windows.
1. Open vmware workstations, File->New Virtual Machine, the following interface will appear, select the "Custom (Advanced)" option, and continue with the next step:

2. This step is by default. Continue to the next step:

3. When the following interface appears, select the "Install operating system later" option and continue to the next step:

4. When the following interface appears, select "linux" for the guest operating system and "CentOS 64-bit" for the version. Continue to the next step:

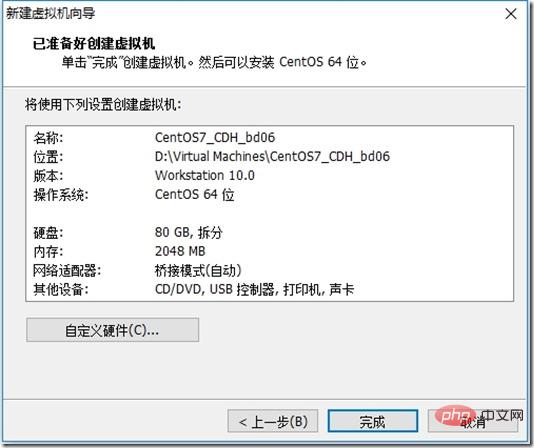
5. The following interface appears. Enter the custom virtual machine name. It is best to make the virtual machine name self-explanatory. Here is "CentOS7_CDH_bd06". Specify the virtual machine location. Here is "D:\Virtual Machines\ CentOS7_CDH_bd06", then continue with the next step:

6. The following interface appears, select the number of processors and the number of cores per processor, here are 2 and 4 respectively, next step Continue:

7. The following interface appears, specify the memory size occupied by the virtual machine, here is 2048M, continue to the next step:

8. The following interface appears. Select the network connection type. Here, select "Use Bridged Network". You can choose according to your needs during the installation of the virtual machine. The installation wizard has provided relatively standardized instructions for various modes. Here are additional instructions. As follows:
1) Use a bridged network: the virtual machine IP is in the same network segment as the local machine. The local machine and the virtual machine can communicate with each other through IP. When the local machine is connected to the Internet, the virtual machine can be connected to the Internet. At the same time, the virtual machine and the virtual machine can communicate with each other. Other hosts in this network segment can communicate with each other. This mode is often used in server environment architecture.
2) Use Network Address Translation (NAT): The virtual machine can connect to the Internet and communicate with the local machine, but cannot communicate with other hosts in the local network segment.
3) Use host-only mode network: the virtual machine cannot connect to the Internet, communicate with the local machine, and cannot communicate with other hosts in the local network segment.
Continue to the next step:

9. Default, continue to the next step:

10. Default, continue to the next step:

11, Default, continue to the next step:

12, The following interface appears, Enter the virtual machine disk size. The default 20g is generally not enough. It is recommended to set it slightly larger. Here, set the virtual machine disk size to 80G. Continue to the next step:

13. Default, Continue to the next step:

14. Default, click "Finish" to end virtual machine creation:

15. Exit After installing the wizard, we can see the newly created virtual machine in the left column of the virtual machine management interface, and the detailed configuration information of the virtual machine in the right column:

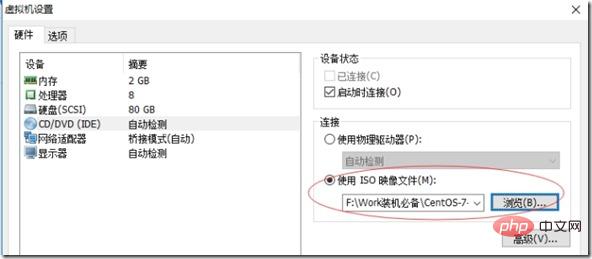
16 . Click the "Edit Virtual Machine Settings" option in the interface above, and the following interface will appear:

17. In the above picture, you need to specify the "CD/DVD (IDE)" installation image, remove the "USB Controller", "Sound Card" and "Printer", and then click OK. After following the above settings, the interface is as shown below :

18. Click to start the virtual machine to enter the CentOS7 operating system installation process:
19. When the virtual machine console interface appears, select Install CentOS liunx 7. Click the Enter key to continue:

20. Click the Enter key according to the prompts to continue:

21. The following interface English is selected by default, click Continue to continue:


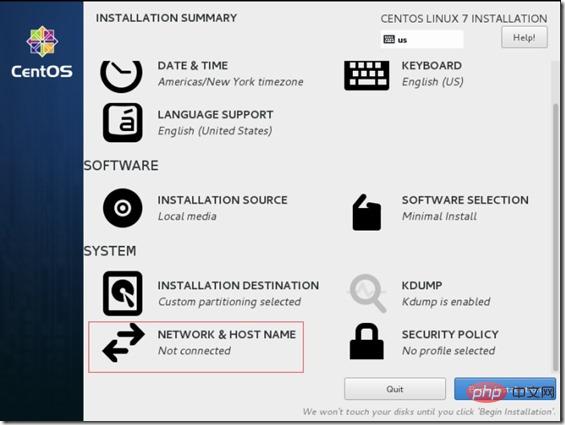
 ##24. After completing the disk planning, click on the red box in the picture below to modify the operating system host name. Here it is changed to db06 (as shown in the second picture), then click done to complete the host name configuration and return to the main configuration interface:

 25. In the picture below, in fact, starting from the configuration in step 24, we can find that the "begin installtion" button in the lower right corner has changed from the original The gray changes to blue, which means that the operating system installation is ready. Click "begin installtion" to proceed with the operating system installation process.
 26. All you need to do in the user settings in the picture below is to modify the root user password, click "root password", and set the password. If the password security is not high, such as mine The password here is "oracle", so you may need to click twice to confirm. When the root password is successfully set and returned to the installation interface, we can find that the red warning on the previous user setting interface has disappeared. Compare Figure 1 and Figure 3 below:


 27. In the picture below, the operating system installation has been completed. Click reboot to restart the operating system.
 28. Log in as root user (i.e. root/oracle) and modify the IP address (vi /etc/sysconfig/network-scripts/ifcfg-ens32):

Press the character key "i" to enter the edit mode and modify the /etc/sysconfig/network-scripts/ifcfg-ens32 file content as follows:
After pressing the "esc" key, enter: wq and press Enter to complete editing the configuration file.
Enter: service network restart command to restart the network card. Just change the IP address to take effect. Ping www.baidu.com to test network connectivity.
Okay, so far, the CentOS7 operating system has been installed successfully.
Recommended related tutorials: centos tutorial
The above is the detailed content of How to install centos7?. For more information, please follow other related articles on the PHP Chinese website!

Hot AI Tools

Undresser.AI Undress
AI-powered app for creating realistic nude photos

AI Clothes Remover
Online AI tool for removing clothes from photos.

Undress AI Tool
Undress images for free

Clothoff.io
AI clothes remover

AI Hentai Generator
Generate AI Hentai for free.

Hot Article

Hot Tools

Notepad++7.3.1
Easy-to-use and free code editor

SublimeText3 Chinese version
Chinese version, very easy to use

Zend Studio 13.0.1
Powerful PHP integrated development environment

Dreamweaver CS6
Visual web development tools

SublimeText3 Mac version
God-level code editing software (SublimeText3)

Hot Topics
 1382
1382
 52
52
 How to optimize CentOS HDFS configuration
Apr 14, 2025 pm 07:15 PM
Improve HDFS performance on CentOS: A comprehensive optimization guide to optimize HDFS (Hadoop distributed file system) on CentOS requires comprehensive consideration of hardware, system configuration and network settings. This article provides a series of optimization strategies to help you improve HDFS performance. 1. Hardware upgrade and selection resource expansion: Increase the CPU, memory and storage capacity of the server as much as possible. High-performance hardware: adopts high-performance network cards and switches to improve network throughput. 2. System configuration fine-tuning kernel parameter adjustment: Modify /etc/sysctl.conf file to optimize kernel parameters such as TCP connection number, file handle number and memory management. For example, adjust TCP connection status and buffer size
 Centos shutdown command line
Apr 14, 2025 pm 09:12 PM
The CentOS shutdown command is shutdown, and the syntax is shutdown [Options] Time [Information]. Options include: -h Stop the system immediately; -P Turn off the power after shutdown; -r restart; -t Waiting time. Times can be specified as immediate (now), minutes ( minutes), or a specific time (hh:mm). Added information can be displayed in system messages.
 Difference between centos and ubuntu
Apr 14, 2025 pm 09:09 PM
The key differences between CentOS and Ubuntu are: origin (CentOS originates from Red Hat, for enterprises; Ubuntu originates from Debian, for individuals), package management (CentOS uses yum, focusing on stability; Ubuntu uses apt, for high update frequency), support cycle (CentOS provides 10 years of support, Ubuntu provides 5 years of LTS support), community support (CentOS focuses on stability, Ubuntu provides a wide range of tutorials and documents), uses (CentOS is biased towards servers, Ubuntu is suitable for servers and desktops), other differences include installation simplicity (CentOS is thin)
 What are the backup methods for GitLab on CentOS
Apr 14, 2025 pm 05:33 PM
Backup and Recovery Policy of GitLab under CentOS System In order to ensure data security and recoverability, GitLab on CentOS provides a variety of backup methods. This article will introduce several common backup methods, configuration parameters and recovery processes in detail to help you establish a complete GitLab backup and recovery strategy. 1. Manual backup Use the gitlab-rakegitlab:backup:create command to execute manual backup. This command backs up key information such as GitLab repository, database, users, user groups, keys, and permissions. The default backup file is stored in the /var/opt/gitlab/backups directory. You can modify /etc/gitlab
 Centos configuration IP address
Apr 14, 2025 pm 09:06 PM
Steps to configure IP address in CentOS: View the current network configuration: ip addr Edit the network configuration file: sudo vi /etc/sysconfig/network-scripts/ifcfg-eth0 Change IP address: Edit IPADDR= Line changes the subnet mask and gateway (optional): Edit NETMASK= and GATEWAY= Lines Restart the network service: sudo systemctl restart network verification IP address: ip addr
 How to check CentOS HDFS configuration
Apr 14, 2025 pm 07:21 PM
Complete Guide to Checking HDFS Configuration in CentOS Systems This article will guide you how to effectively check the configuration and running status of HDFS on CentOS systems. The following steps will help you fully understand the setup and operation of HDFS. Verify Hadoop environment variable: First, make sure the Hadoop environment variable is set correctly. In the terminal, execute the following command to verify that Hadoop is installed and configured correctly: hadoopversion Check HDFS configuration file: The core configuration file of HDFS is located in the /etc/hadoop/conf/ directory, where core-site.xml and hdfs-site.xml are crucial. use
 How to restart the network in centos8
Apr 14, 2025 pm 08:57 PM
Restarting the network in CentOS 8 requires the following steps: Stop the network service (NetworkManager) and reload the network module (r8169), start the network service (NetworkManager) and check the network status (by ping 8.8.8.8)
 How to install centos
Apr 14, 2025 pm 09:03 PM
CentOS installation steps: Download the ISO image and burn bootable media; boot and select the installation source; select the language and keyboard layout; configure the network; partition the hard disk; set the system clock; create the root user; select the software package; start the installation; restart and boot from the hard disk after the installation is completed.


