 Backend Development
 PHP7
PHP7
 Laravel + Alibaba Cloud OSS completes the image and text separation architecture
Laravel + Alibaba Cloud OSS completes the image and text separation architecture
This case uses Laravel5.6 Alibaba Cloud OSS to complete the image upload function. It is full of practical information and can be completed by following the steps.
Before deploying the environment, we need to register an account on the Alibaba Cloud platform. Both personal and company accounts are acceptable. After the registration is completed, copy the access_key and access_secret configuration in the project and it is completed. Basic settings for the project.
1. Create a new project and install the Laravel5.6 version of the framework code
1. Environment configuration requirements
Laravel has some system requirements, your server meets the following requirements:
PHP >= 7.1.3
OpenSSL PHP
PHP PDO Extension
PHP Mbstring extension
PHP Tokenizer extension
PHP XML extension
PHP Ctype extension
PHP JSON extension
Remarks: You The above configuration requirements need to be met. This will not be explained in detail. Please refer to the PHP syntax for details.
2. Install the Laravel5.6 framework
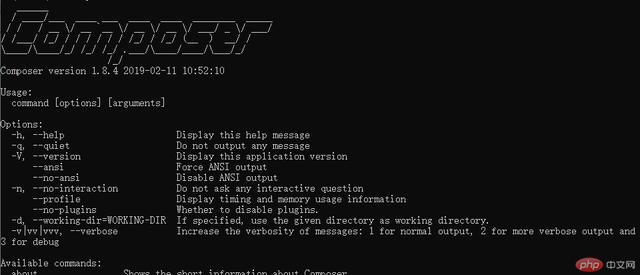
Laravel5.6 Use Composer to manage Project dependencies. Therefore, before using Laravel5.6, please make sure that Composer is installed on your machine.
composer -v

Note: Please refer to the link above for the specific installation of composer. You can install it according to the document. Next, we will install the Larvael5.6 framework specifically and enter the content in the control window ( My Windows operating system), wait for the installation to complete.
composer create-project --prefer-dist laravel/laravel blog
After the installation is complete, execute the following code to set a random string key for the application.
php artisan key:generate
Enter in the browser: http://localhost/blog/public/index.php. If you see the following interface, the access is normal.

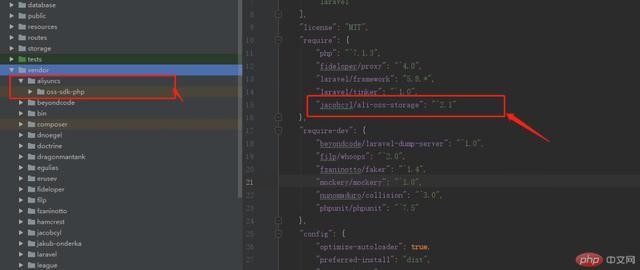
3. Configure Alibaba Cloud component package in composer.json
Add "jacobcyl/ in require ali-oss-storage": "^2.1"
"require": {
      "php": "^7.1.3",
      "fideloper/proxy": "^4.0",
      "laravel/framework": "5.8.*",
      "laravel/tinker": "^1.0",
      "jacobcyl/ali-oss-storage": "^2.1"
},Then execute the command:
composer update
composer dumpautoload


4. Configure Alibaba Cloud access_key and access_secret configuration (OSS self-activation)
This is very important: I wrote a separate file to do it ConfigurationThe first step: Add:Jacobcyl\AliOSS\AliOssServiceProvider::class,
'oss' => [
    'driver' => 'oss',
    'access_id' => env('OSS_ACCESS_ID', '填你自己的'),
    'access_key' => env('OSS_ACCESS_KEY', '填你自己的'),
    'bucket' => env('OSS_BUCKET', '填你自己的'),
    'endpoint' => env('OSS_ENDPOINT', 'oss-cn-hangzhou.aliyuncs.com'),
    'isCName' => false,
    'debug' => true,
],<?php
return [
'OSS_ACCESS_ID' => env('OSS_ACCESS_ID', '填你自己的'),
'OSS_ACCESS_KEY'=> env('OSS_ACCESS_KEY', '填你自己的'),
'OSS_ENDPOINT' => env('OSS_ENDPOINT', 'oss-cn-hangzhou.aliyuncs.com'),
'OSS_BUCKET' => env('OSS_BUCKET', '填你自己的'),
'OSS_HOST' => 'https://填你自己的.oss-cn-hangzhou.aliyuncs.com',//前台显示域名
'OSS_URL' => 'https://填你自己的.oss-cn-hangzhou.aliyuncs.com', // CDN域名,没有CDN就和OSS_HOST一致即可
];The file has been loaded at this point.
2. Write the interface controller methodNew controller: UploadsController inherits the Controller class for easy operation.
Step 1: Write API routing
Route::post('/index/image', '\App\Http\Controllers\Index\UploadsController@index');
public function index(Request $request) {
      $disk = \Storage::disk('oss');
      if (!isset($request->image)) {
      return $this->array_format('图片信息错误' . __LINE__, 414);
      }
      switch ($request->source) {
      case 'file':
      if (!($request->hasFile('image') && $request->file('image')->isValid())) {
      return $this->array_format('图片信息错误' . __LINE__, 414);
      }
            $file = $request->file('image');
            $image_str = @file_get_contents($file->getPathname());
            $base64_str = base64_encode($image_str);
            break;
        case 'url':
          $image_str = @file_get_contents($request->image);
          $base64_str = base64_encode($image_str);
          break;
        case 'base64':
          $base64_str = $request->image;
          break;
        default:
          return $this->array_format('图片类型错误', 414);
          break;
      }
      //获取图片信息
      $image_info = $this->base64_image_format($base64_str);
      if (!$image_info) {
      return $this->array_format('图片信息错误' . __LINE__, 414);
      }
      if ($image_info['image_size'] > 10 * 1024 * 1024) {
      return $this->array_format('图片信息太大', 414);
      }
      $image_path = 'uploads/image/'. date('Ym');
      $image_name = $image_path . '/' . md5($image_info['image_str']) . '.' . $image_info['image_suffix'];
      //上传图片
      $temp = $disk->put($image_name, $image_info['image_str']);
      if (!$temp) {
      return $this->array_format('上传失败', 414);
      }
      return $this->array_format('上传成功', 200, [
          'image_name' => $image_name,
          'image_url' => $disk->url($image_name),
      ]);
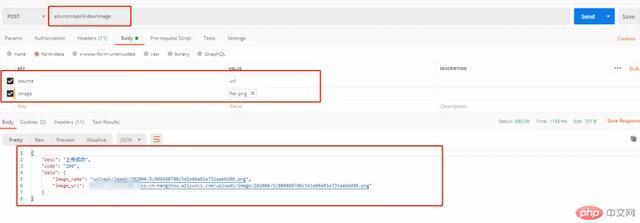
}4. Postman Tool interface test
 public account (
) reply "Alibaba Cloud OSS" and download the case source code.
The above is the detailed content of Laravel + Alibaba Cloud OSS completes the image and text separation architecture. For more information, please follow other related articles on the PHP Chinese website!

Hot AI Tools

Undresser.AI Undress
AI-powered app for creating realistic nude photos

AI Clothes Remover
Online AI tool for removing clothes from photos.

Undress AI Tool
Undress images for free

Clothoff.io
AI clothes remover

AI Hentai Generator
Generate AI Hentai for free.

Hot Article

Hot Tools

Notepad++7.3.1
Easy-to-use and free code editor

SublimeText3 Chinese version
Chinese version, very easy to use

Zend Studio 13.0.1
Powerful PHP integrated development environment

Dreamweaver CS6
Visual web development tools

SublimeText3 Mac version
God-level code editing software (SublimeText3)

Hot Topics
 Which versions of PHP7 have introduced new operators
Mar 03, 2025 pm 04:37 PM
This article details PHP 7's new operators: the null coalescing (??), spaceship (<=>), and null coalescing assignment (??=) operators. These enhance code readability and performance by simplifying null checks and comparisons, indirectl
 How to optimize PHP7 code to improve performance
Mar 03, 2025 pm 04:28 PM
This article examines optimizing PHP7 code for performance. It addresses common bottlenecks like inefficient database queries, I/O operations, and memory leaks. Solutions include efficient coding practices, database & caching strategies, asynch
 What are the impacts of different versions of PHP7 on memory consumption
Mar 03, 2025 pm 04:35 PM
PHP 7's minor version differences yield subtle memory consumption variations. While newer versions generally improve performance and memory efficiency via Zend Engine and garbage collection optimizations, the impact is application-dependent. Signif
 How to Use Sessions Effectively in PHP 7?
Mar 10, 2025 pm 06:20 PM
This article details effective PHP 7 session management, covering core functionalities like session_start(), $_SESSION, session_destroy(), and secure cookie handling. It emphasizes security best practices including HTTPS, session ID regeneration, s
 What bugs have been fixed in the PHP7 version update
Mar 03, 2025 pm 04:36 PM
PHP 7 significantly improved upon previous versions by addressing numerous bugs, enhancing performance, and bolstering security. Key improvements included a rewritten Zend Engine 3, optimized memory management, and refined error handling. While gene
 What impact does the PHP7 version update have on session processing?
Mar 03, 2025 pm 04:31 PM
This article examines session handling in PHP7, highlighting performance improvements stemming from the enhanced Zend Engine. It discusses potential compatibility issues from upgrading and details optimization strategies for security and scalability
 How to Monitor PHP 7 Performance with Tools like New Relic?
Mar 10, 2025 pm 06:28 PM
This article explains how to monitor PHP 7 application performance using New Relic. It details New Relic's setup, key performance indicators (KPIs) like Apdex score and response time, bottleneck identification via transaction traces and error track
 How to Upgrade from PHP 5.6 to PHP 7?
Mar 10, 2025 pm 06:29 PM
This article details upgrading PHP 5.6 to PHP 7, emphasizing crucial steps like backing up, checking server compatibility, and choosing an upgrade method (package manager, compiling, control panel, or web server configuration). It addresses potentia


