Solve the cross-domain problem of session in thinkphp

When used locally, everything is normal; both the back-end project and the front-end project are deployed to the server, and everything is normal; after the back-end project is deployed to the server, and cross-domain access is set to allow cross-domain access, the local front-end project When using the back-end project interface on the server, a problem arises:
First, use postman to test the interface for obtaining the image verification code and verifying the image verification code interface, which is normal.
Then, use the interface to obtain the image verification code in html, it works fine; finally, use the interface to verify the image verification code in JS, but an error occurs! ! !
Analysis
Through the problem description, we can see that the problem occurs across domains. So, there are two possibilities, one is because the cross-domain settings are incorrect; the other is because of a problem with thinkphp itself.
Using another cross-domain configuration, the problem still exists. That is a problem with thinkphp itself. After searching for information, the problem is located in thinkphp's session cross-domain.
Cross-subdomain solution
In fact, whether it is ThinkPHP or PHP itself, session.cookie_domain needs to be set when solving session cross-domain problems.
The solutions to the problem of cross-domain session mainly include the following:
The first case: If there is no .htaccess file in the directory, that is, if the url is not pseudo-static, then, Add in the first line of conf/config.php:
ini_set('session.cookie_domain',".domain.com");//跨域访问Session
If you enable debugging, it can be used! But if debugging is turned off, it doesn't work!
Second case: If there is a .htaccess file in your directory, then you add in the root directory, the first line of index.php:
This method does not matter whether it is enabled or not. It works for debugging!
However, our problem is not a cross-subdomain problem, but a completely cross-domain problem, so the above method is invalid.
Complete cross-domain solution
Get image verification code request
View the request information to get the image verification code, Request Headers are:
Accept:image/webp,image/*,*/*;q=0.8
Accept-Encoding:gzip, deflate, sdch
Accept-Language:zh-CN,zh;q=0.8,en-US;q=0.6,en;q=0.4
Connection:keep-alive
Cookie:pma_lang=zh_CN; pma_collation_connection=utf8_unicode_ci; pma_iv-1=wnpO4gv0eQRW1AMHmGr2ww%3D%3D; pmaUser-1=weZPqS0%2BW7nzFUVHRdqcfA%3D%3D
Host:api.voidking.com
Referer:http://localhost/ajax/ajax.html
User-Agent:Mozilla/5.0 (Windows NT 6.3; Win64; x64) AppleWebKit/537.36 (KHTML, like Gecko) Chrome/54.0.2840.71 Safari/537.36
Response Headers are:
Access-Control-Allow-Origin:*
Cache-Control:post-check=0, pre-check=0
Cache-Control:private, max-age=0, no-store, no-cache, must-revalidate
Connection:keep-alive
Content-Type:image/png
Date:Sun, 27 Nov 2016 12:10:44 GMT
Expires:Thu, 19 Nov 1981 08:52:00 GMT
Pragma:no-cache
Server:nginx
Set-Cookie:PHPSESSID=721t4sqanvsii550m1dk8gq1o3; path=/; domain=.voidking.com
Transfer-Encoding:chunked
Verification verification code request
View the request information for verification verification code, Request Headers are:
Accept:application/json, text/javascript, */*; q=0.01
Accept-Encoding:gzip, deflate
Accept-Language:zh-CN,zh;q=0.8,en-US;q=0.6,en;q=0.4
Connection:keep-alive
Content-Length:9
Content-Type:application/x-www-form-urlencoded; charset=UTF-8
Host:api.voidking.com
Origin:http://localhost
Referer:http://localhost/ajax/ajax.html
User-Agent:Mozilla/5.0 (Windows NT 6.3; Win64; x64) AppleWebKit/537.36 (KHTML, like Gecko) Chrome/54.0.2840.71 Safari/537.36
Response Headers are:
Access-Control-Allow-Origin:*
Cache-Control:no-store, no-cache, must-revalidate, post-check=0, pre-check=0
Connection:keep-alive
Content-Encoding:gzip
Content-Type:text/html; charset=UTF-8
Date:Sun, 27 Nov 2016 12:13:21 GMT
Expires:Thu, 19 Nov 1981 08:52:00 GMT
Pragma:no-cache
Server:nginx
Set-Cookie:PHPSESSID=149t0hhs2icqaaemvp39onkgp4; path=/; domain=.voidking.com
Transfer-Encoding:chunked
Vary:Accept-Encoding
Get the image verification code request again
Request Headers are:
Accept:image/webp,image/*,*/*;q=0.8
Accept-Encoding:gzip, deflate, sdch
Accept-Language:zh-CN,zh;q=0.8,en-US;q=0.6,en;q=0.4
Cache-Control:max-age=0
Connection:keep-alive
Cookie:pma_lang=zh_CN; pma_collation_connection=utf8_unicode_ci; pma_iv-1=wnpO4gv0eQRW1AMHmGr2ww%3D%3D; pmaUser-1=weZPqS0%2BW7nzFUVHRdqcfA%3D%3D; PHPSESSID=721t4sqanvsii550m1dk8gq1o3
Host:api.voidking.com
Referer:http://localhost/ajax/ajax.html
User-Agent:Mozilla/5.0 (Windows NT 6.3; Win64; x64) AppleWebKit/537.36 (KHTML, like Gecko) Chrome/54.0.2840.71 Safari/537.36
Response Headers are:
Access-Control-Allow-Origin:*
Cache-Control:private, max-age=0, no-store, no-cache, must-revalidate
Cache-Control:post-check=0, pre-check=0
Connection:keep-alive
Content-Type:image/png
Date:Sun, 27 Nov 2016 13:26:21 GMT
Expires:Thu, 19 Nov 1981 08:52:00 GMT
Pragma:no-cache
Server:nginx
Transfer-Encoding:chunked
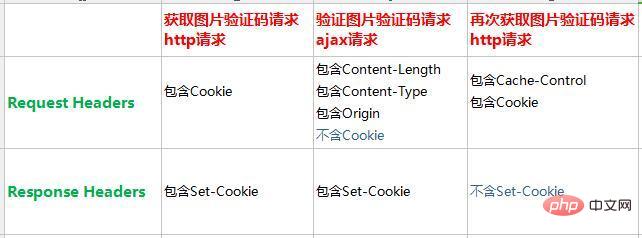
Comparison of three requests

#The first time to obtain the image verification code request, there is no PHPSESSID in the cookie, so the return information contains Set-Cookie. In the second request to obtain the image verification code, the cookie contains PHPSESSID, so Set-Cookie is not included in the return information.
And the PHPSESSID in the information Set-Cookie returned by the first request is the same as the PHPSESSID in the request information Cookie in the second request.
The ajax request to verify the image verification code does not have a cookie, and naturally there is no PHPSESSID, so the return information also contains Set-Cookie.
It can be seen that we need to make some modifications on the front end to send the request with Cookie.
Front-end jquery settings
<!DOCTYPE html>
<html>
<head>
<meta charset="UTF-8">
<title>jquery</title>
</head>
<body>
<p>
<img src="/static/imghw/default1.png" data-src="http://api.voidking.com/owner-bd/index.php/Home/CheckCode/getPicCode" class="lazy" alt="">
<input type="text" id="picCode">
<input type="button" id="send" value="验证">
</p>
<script src="http://apps.bdimg.com/libs/jquery/2.1.4/jquery.min.js"></script>
<script>
$(function(){
$('#send').click(function(){
//console.log(document.cookie);
$.ajax({
url: 'http://api.voidking.com/owner-bd/index.php/Home/CheckCode/checkPicCode',
type: 'POST',
crossDomain: true,
xhrFields: {
withCredentials: true
},
dataType: 'json',
data: {code: $('#picCode').val()},
success: function(data){
console.log(data);
},
error: function(xhr){
console.log(xhr);
}
});
});
});
</script>
</body>
</html>The error when requesting is as follows:
A wildcard '*' cannot be used in the 'Access-Control-Allow-Origin' header when the credentials flag is true. Origin 'http://localhost' is therefore not allowed access. The credentials mode of an XMLHttpRequest is controlled by the withCredentials attribute.
A cross-domain error occurred. It can be seen that the backend also needs to make some modifications so that It can receive cross-domain cookies.
Backend nginx settings
add_header Access-Control-Allow-Origin http://localhost;
add_header Access-Control-Allow-Credentials true;
Note:
When the server-side Access-Control-Allow-Credentials parameter is true, the Access-Control-Allow-Origin parameter The value cannot be *.
After the backend nginx is set up, jquery's ajax request is normal and cookies can be carried. The backend receives data normally and returns the data.
Since angular's ajax request is different from jquery, we also need to study how angular sends cross-domain requests carrying cookies.
Front-end angular settings
<!DOCTYPE html>
<html>
<head>
<meta charset="utf-8">
<title>angular</title>
<script src="http://cdn.static.runoob.com/libs/angular.js/1.4.6/angular.min.js"></script>
</head>
<body ng-app="myApp" >
<p ng-controller="myCtrl">
<img src="/static/imghw/default1.png" data-src="http://api.voidking.com/owner-bd/index.php/Home/CheckCode/getPicCode" class="lazy" alt="">
<input type="text" id="picCode" ng-model="picCode">
<input type="button" ng-click="send()" value="验证">
</p>
<script>
var app = angular.module('myApp', []);
app.controller('myCtrl', function($scope, $http, $httpParamSerializer) {
$scope.send = function(){
$http({
method:'POST',
url:'http://api.voidking.com/owner-bd/index.php/Home/CheckCode/checkPicCode',
headers:{
'Content-Type':'application/x-www-form-urlencoded'
},
withCredentials: true,
dataType: 'json',
data: $httpParamSerializer({code: $scope.picCode})
}).then(function successCallback(response) {
console.log(response.data);
$scope.username = response.data.username;
}, function errorCallback(response) {
console.log(response.data);
});
}
});
</script>
</body>
</html>Recommended tutorial: "TP5"
The above is the detailed content of Solve the cross-domain problem of session in thinkphp. For more information, please follow other related articles on the PHP Chinese website!

Hot AI Tools

Undresser.AI Undress
AI-powered app for creating realistic nude photos

AI Clothes Remover
Online AI tool for removing clothes from photos.

Undress AI Tool
Undress images for free

Clothoff.io
AI clothes remover

AI Hentai Generator
Generate AI Hentai for free.

Hot Article

Hot Tools

Notepad++7.3.1
Easy-to-use and free code editor

SublimeText3 Chinese version
Chinese version, very easy to use

Zend Studio 13.0.1
Powerful PHP integrated development environment

Dreamweaver CS6
Visual web development tools

SublimeText3 Mac version
God-level code editing software (SublimeText3)

Hot Topics
 How to run thinkphp project
Apr 09, 2024 pm 05:33 PM
To run the ThinkPHP project, you need to: install Composer; use Composer to create the project; enter the project directory and execute php bin/console serve; visit http://localhost:8000 to view the welcome page.
 There are several versions of thinkphp
Apr 09, 2024 pm 06:09 PM
ThinkPHP has multiple versions designed for different PHP versions. Major versions include 3.2, 5.0, 5.1, and 6.0, while minor versions are used to fix bugs and provide new features. The latest stable version is ThinkPHP 6.0.16. When choosing a version, consider the PHP version, feature requirements, and community support. It is recommended to use the latest stable version for best performance and support.
 How to run thinkphp
Apr 09, 2024 pm 05:39 PM
Steps to run ThinkPHP Framework locally: Download and unzip ThinkPHP Framework to a local directory. Create a virtual host (optional) pointing to the ThinkPHP root directory. Configure database connection parameters. Start the web server. Initialize the ThinkPHP application. Access the ThinkPHP application URL and run it.
 How to install thinkphp
Apr 09, 2024 pm 05:42 PM
ThinkPHP installation steps: Prepare PHP, Composer, and MySQL environments. Create projects using Composer. Install the ThinkPHP framework and dependencies. Configure database connection. Generate application code. Launch the application and visit http://localhost:8000.
 Which one is better, laravel or thinkphp?
Apr 09, 2024 pm 03:18 PM
Performance comparison of Laravel and ThinkPHP frameworks: ThinkPHP generally performs better than Laravel, focusing on optimization and caching. Laravel performs well, but for complex applications, ThinkPHP may be a better fit.
 Development suggestions: How to use the ThinkPHP framework to implement asynchronous tasks
Nov 22, 2023 pm 12:01 PM
"Development Suggestions: How to Use the ThinkPHP Framework to Implement Asynchronous Tasks" With the rapid development of Internet technology, Web applications have increasingly higher requirements for handling a large number of concurrent requests and complex business logic. In order to improve system performance and user experience, developers often consider using asynchronous tasks to perform some time-consuming operations, such as sending emails, processing file uploads, generating reports, etc. In the field of PHP, the ThinkPHP framework, as a popular development framework, provides some convenient ways to implement asynchronous tasks.
 How is the performance of thinkphp?
Apr 09, 2024 pm 05:24 PM
ThinkPHP is a high-performance PHP framework with advantages such as caching mechanism, code optimization, parallel processing and database optimization. Official performance tests show that it can handle more than 10,000 requests per second and is widely used in large-scale websites and enterprise systems such as JD.com and Ctrip in actual applications.
 ThinkPHP6 backend management system development: realizing backend functions
Aug 27, 2023 am 11:55 AM
ThinkPHP6 backend management system development: Implementing backend functions Introduction: With the continuous development of Internet technology and market demand, more and more enterprises and organizations need an efficient, safe, and flexible backend management system to manage business data and conduct operational management. This article will use the ThinkPHP6 framework to demonstrate through examples how to develop a simple but practical backend management system, including basic functions such as permission control, data addition, deletion, modification and query. Environment preparation Before starting, we need to install PHP, MySQL, Com


