

Press the Windows logo key R key and enter the "regedit" option in the run command menu to open the registry editor page.

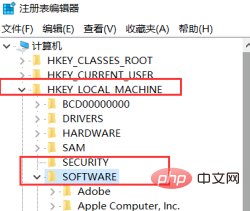
After entering the Registry Editor page, we double-click to open the column option on the left, and then locate it to: HKEY_LOCAL_MACHINE\SOFTWARE\Policies\Microsoft\
Next, in the Microsoft subkey we found, right-click on the subkey and select the "New-WindowsInkWorkspace" option.
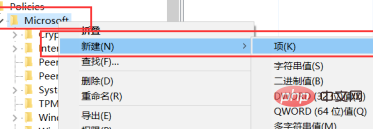
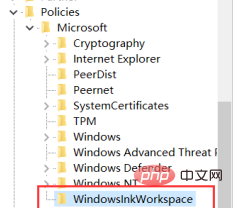
When creating a new subkey, we can right-click the new subkey, select the "Rename" button, and then modify it to the required name.
Next, we right-click on the blank page to the right of the newly created subkey and select the "New-DWORD (32-bit) Value" option.
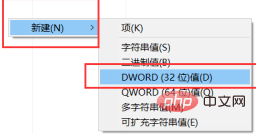
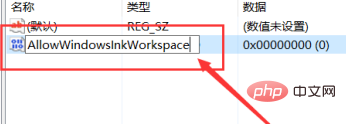
Next, we will see the newly created subkey value, then name the subkey value "AllowWindowsInkWorkspace" and save the modifications to the registry.
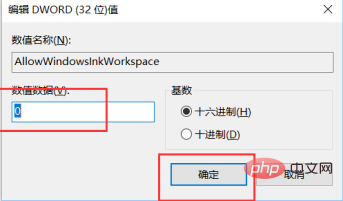
Next, we keep the default key value as "0" and do not modify the key value; if you want to re-enable the Windows Ink function, you can modify the key value to "1" and click the "OK" button.
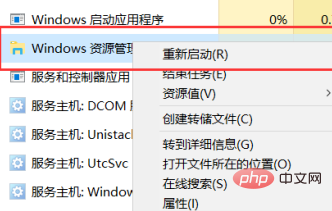
Next, we right-click on the taskbar, open Task Manager, and then execute the "Restart Windows Explorer" option in Task Manager.
After completing the above settings, windows lnk will be closed.
Recommended tutorial: windows tutorial
The above is the detailed content of How to close windows lnk in win10. For more information, please follow other related articles on the PHP Chinese website!
 win10 bluetooth switch is missing
 Why do all the icons in the lower right corner of win10 show up?
 The difference between win10 sleep and hibernation
 Win10 pauses updates
 What to do if the Bluetooth switch is missing in Windows 10
 win10 connect to shared printer
 Clean up junk in win10
 How to share printer in win10


