Introduction to layui event monitoring

1. Form event monitoring
1. lay-filter event filter
is equivalent to the selector, layui Exclusive selector
2, lay-verify verification attribute
The attribute value can be: required, phone number, email address, url, number, date, identity ID card. This is equivalent to a regular judgment. Of course, you can also define your own regular rules and make some complex judgments, for example:
    <input type="text" lay-verify="required">
    //这里写required就是必填项的意思,相反phone就是手机号,
如果是多个判断可以这样:ay-verify="required|phone",手机号必填。What if I want a complicated judgment? We need to reference the form module first
    layui.use('form',function()
    {
        var form = layui.form;
        //自定义一个验证器
        form.verify({
            account:[
            '正则'
            ,'提示语句'
            ]
            ,pass:[
            '正则'
            ,'提示语句'
            ]

        });

})When we finish writing the verification rules, we only need to write the name we defined, such as the account above into lay-verify="account", then for This rule verification is complete.
3. Lay-submit Binds the element that triggers submission
In the submit button label of the input, add such an attribute, then the verification effect of the layui form will come out.
4. form.on event
form.on('event(lay-filter)',function(){

})Among them, event can be radio, checkbox, submit and other elements, and the lay-filter is the event filter attribute value we added, such as:
<input type="submit" lay-filter="go" lay-submit value="提交"/>
Yes, it is the value in this lay-filter=" ". Now we only need these two attributes to execute our corresponding events.
2. Form event monitoring
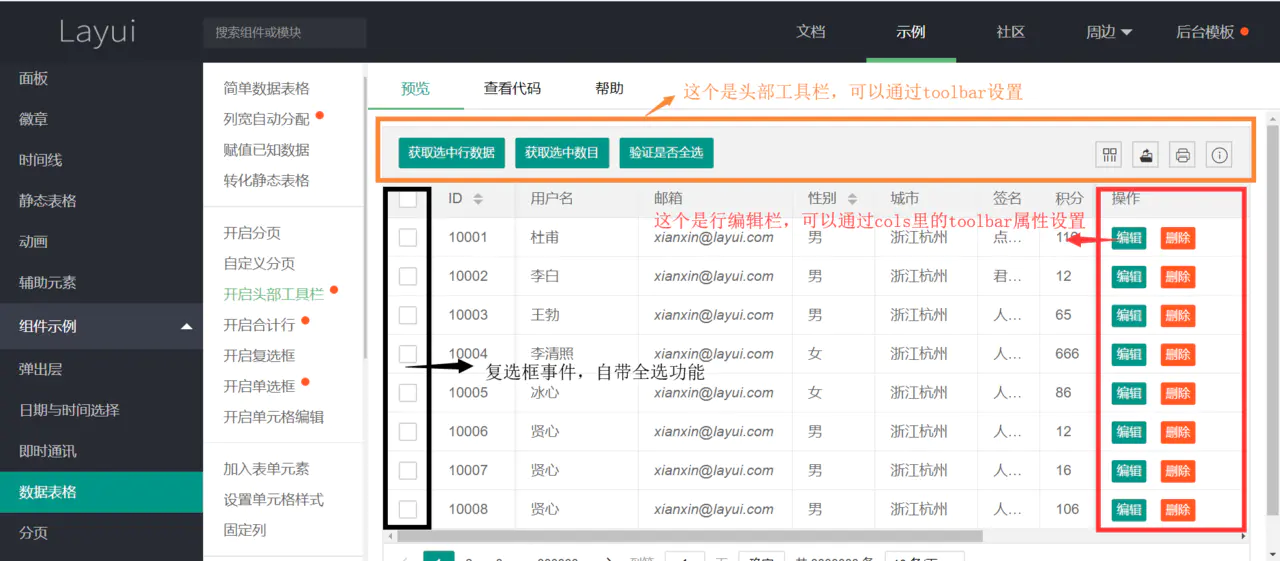
Before we start the introduction, we can get some ideas from this picture.

Okay, okay, let’s solve the problem! ! First create a table tag
<table id="demo" lay-filter="table"></table>
1. Header toolbar
This layui header toolbar is independent of the table and is attached to it, which means placing a box on top of the table , so it’s easy to understand!
The first step, so we first create a box, but this is a special box, we need to hide it
<div class="layui-hide layui-btn-group" id="toolbar">
    <button class="layui-btn " lay-event="getall">查看所选数据</button>
    <button class="layui-btn " lay-event="getnum">查看所选数量</button>
    <button class="layui-btn  layui-btn-danger" lay-event="delall">批量删除</button>
</div>Thinking about the problem
There are three attributes that need to be paid attention to, layui -hide hidden attributes, layui-btn-group group button, lay-event event name.
How to identify our operations is to set different values for layui-event to perform different behaviors.
The second step is to introduce our header box in the table module, and then listen to the event. Let’s take a look at our code!
    layui.use('table',function(){
       var table = layui.table;
       table.render({
           elem:'#demo'//表格ID
           ,url:'数据接口'
           ,toolbar:'#toolbar'//开启头部栏,写入我们的盒子id
           ,cols[[…………]]
       });
});At this point our table rendering is complete, let’s start the event!
    table.on('event(lay-filter)',function(obj){
    //这是格式,event有toolbar头部栏事件,tool行标签事件,edit编辑事件,等等,
    括号里的当然就是我们给表格设置的lay-filter属性啦!
    obj是这个表格里所有的数据,我们可以console.log(obj)来查看有哪些数据!!
})Now that the format is almost introduced, let’s start with the above typing
table.on('toolbar(table)',function(obj){//我给表格设置的lay-filter叫table
var checkStatus = table.checkStatus('demo')//表格id,获取选中行
//嘿嘿,到了这,我好像说复选框怎么打了,很简单的,{type:'checkbox',fixed:'left'},写到cols里
switch(obj.event)//对lay-event的值,进行不同的判断
{
case 'getall':
layer.msg(JSON.stringify(checkStatus.data));
break;
case 'getnum':
layer.msg(JSON.stringify(checkStatus.data.length));
break;
case 'delall':
//这是我自己打的一个批删,道理都差不多,遍历拿到id传到后台处理!
var a = [];
for (var i = 0; i < checkStatus.data.length; i++) {
a.push(checkStatus.data[i].ProductID)
}
console.log(checkStatus)
let strid = a.toString();
let num = checkStatus.data.length;
if (num != 0) {
$.ajax({
url: '/JD/ShopDelAll?strid=' + strid
, type: 'Delete'
, success: function (d) {
layer.msg("删除了" + num + "条数据");
location.href = '/JD/ShopList';
}
})
}
else {
layer.msg("至少选择一个!")
}
break;
break;
}
});2. Table row toolbar
In fact, the principles are similar. It also attaches a box. In the table, it just exists in every row, so just write the code we added into the cols attribute! !
Create a box
<div class="layui-hide layui-btn-group" id="tool">
    <a class="layui-btn layui-btn-warm" lay-event="particulars">查看</a>
    <a class="layui-btn layui-btn-normal" lay-event="edit">修改</a>
    <a class="layui-btn layui-btn-danger" lay-event="delid">删除</a>
</div>Event monitoring
This is simple. Did we use checkStats to get the selected status earlier? Yes! ! !
We don’t need it here, haha, you can get the data directly from obj.data
table.on('tool(table2)', function (obj) {
                switch (obj.event) {
                    case 'particulars':
                        location.href = "/JD/Particulars?productID=" + obj.data.ProductID;
                        break;//获取id跳转到详情页
                    case 'delid':
                        $.ajax({
                            url: '/JD/ShopDelAll?strid=' +  obj.data.ProductID
                            , type: 'Delete'
                            , success: function (d) {
                                obj.del();
                                layer.msg("删除成功");
                            }
                        })
                        break;//这是我的一个ajax删除方法了,记得删除后要有obj.del()哦,否则数据是不会更新的!
                    case 'edit':
                        layer.msg("功能暂未开放,你没有权限");
                        //嘿嘿,修改和删除差不多啦
                        break;
}For more informationlayuiPlease pay attention to the PHP Chinese websitelayui tutorialColumn
The above is the detailed content of Introduction to layui event monitoring. For more information, please follow other related articles on the PHP Chinese website!

Hot AI Tools

Undresser.AI Undress
AI-powered app for creating realistic nude photos

AI Clothes Remover
Online AI tool for removing clothes from photos.

Undress AI Tool
Undress images for free

Clothoff.io
AI clothes remover

AI Hentai Generator
Generate AI Hentai for free.

Hot Article

Hot Tools

Notepad++7.3.1
Easy-to-use and free code editor

SublimeText3 Chinese version
Chinese version, very easy to use

Zend Studio 13.0.1
Powerful PHP integrated development environment

Dreamweaver CS6
Visual web development tools

SublimeText3 Mac version
God-level code editing software (SublimeText3)

Hot Topics
 How to get form data in layui
Apr 04, 2024 am 03:39 AM
layui provides a variety of methods for obtaining form data, including directly obtaining all field data of the form, obtaining the value of a single form element, using the formAPI.getVal() method to obtain the specified field value, serializing the form data and using it as an AJAX request parameter, and listening Form submission event gets data.
 How to set up jump on layui login page
Apr 04, 2024 am 03:12 AM
Layui login page jump setting steps: Add jump code: Add judgment in the login form submit button click event, and jump to the specified page through window.location.href after successful login. Modify the form configuration: add a hidden input field to the form element of lay-filter="login", with the name "redirect" and the value being the target page address.
 How layui implements self-adaptation
Apr 26, 2024 am 03:00 AM
Adaptive layout can be achieved by using the responsive layout function of the layui framework. The steps include: referencing the layui framework. Define an adaptive layout container and set the layui-container class. Use responsive breakpoints (xs/sm/md/lg) to hide elements under specific breakpoints. Specify element width using the grid system (layui-col-). Create spacing via offset (layui-offset-). Use responsive utilities (layui-invisible/show/block/inline) to control the visibility of elements and how they appear.
 What is the difference between layui and vue?
Apr 04, 2024 am 03:54 AM
The difference between layui and Vue is mainly reflected in functions and concerns. Layui focuses on rapid development of UI elements and provides prefabricated components to simplify page construction; Vue is a full-stack framework that focuses on data binding, component development and state management, and is more suitable for building complex applications. Layui is easy to learn and suitable for quickly building pages; Vue has a steep learning curve but helps build scalable and easy-to-maintain applications. Depending on the project needs and developer skill level, the appropriate framework can be selected.
 How to run layui
Apr 04, 2024 am 03:42 AM
To run layui, perform the following steps: 1. Import layui script; 2. Initialize layui; 3. Use layui components; 4. Import layui styles (optional); 5. Ensure script compatibility and pay attention to other considerations. With these steps, you can build web applications using the power of layui.
 What language is layui framework?
Apr 04, 2024 am 04:39 AM
The layui framework is a JavaScript-based front-end framework that provides a set of easy-to-use UI components and tools to help developers quickly build responsive web applications. Its features include: modular, lightweight, responsive, and has complete documentation and community support. layui is widely used in the development of management backend systems, e-commerce websites, and mobile applications. The advantages are quick start-up, improved efficiency, and easy maintenance. The disadvantages are poor customization and slow technology updates.
 Which one is better, layui or elementui?
Apr 04, 2024 am 04:15 AM
Question: Which one is better, layui or ElementUI? Answer: It depends on the project requirements. Layui is more comprehensive, customizable and suitable for large projects, while ElementUI is more lightweight, beautiful and easy to use. The specific reasons for selection are as follows: Choose layui: Provides a wider range of functions and modules that allow a high degree of customization of component appearance and behavior. Suitable for large projects that require a wide range of functions and scalability. Choose ElementUI: Smaller size and faster loading speed. Components follow Material Design principles. , high aesthetics, providing a large number of ready-made components, reducing development complexity and time
 The difference between layui framework and vue framework
Apr 26, 2024 am 01:27 AM
layui and vue are front-end frameworks. layui is a lightweight library that provides UI components and tools; vue is a comprehensive framework that provides UI components, state management, data binding, routing and other functions. layui is based on a modular architecture, and vue is based on a componentized architecture. layui has a smaller ecosystem, vue has a large and active ecosystem. The learning curve of layui is low, and the learning curve of vue is steep. Layui is suitable for small projects and rapid development of UI components, while vue is suitable for large projects and scenarios that require rich functions.


