How IDEA quickly implements Docker image deployment

1. Docker enables remote access
[root@izwz9eftauv7x69f5jvi96z docker]# vim /lib/systemd/system/docker.service
#修改ExecStart这行
ExecStart=/usr/bin/dockerd  -H tcp://0.0.0.0:2375  -H unix:///var/run/docker.sock

#重新加载配置文件
[root@izwz9eftauv7x69f5jvi96z docker]# systemctl daemon-reload
#重启服务
[root@izwz9eftauv7x69f5jvi96z docker]# systemctl restart docker.service
#查看端口是否开启
[root@izwz9eftauv7x69f5jvi96z docker]# netstat -nlpt
#直接curl看是否生效
[root@izwz9eftauv7x69f5jvi96z docker]# curl http://127.0.0.1:2375/info
2. Intellij IDEA installs the Docker plug-in
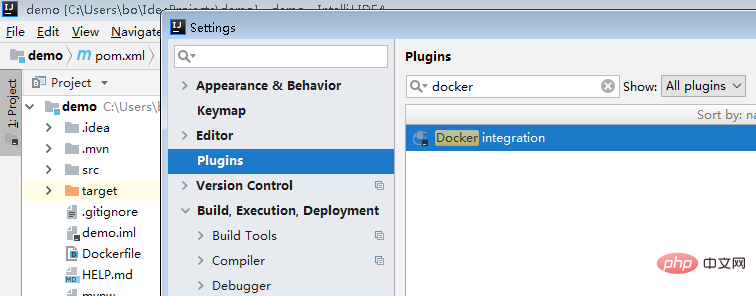
Open Idea and enter the plug-in installation interface from File->Settings->Plugins->Install JetBrains plugin, in the search box Enter docker, you can see Docker integration, click the Install button on the right to install. Restart Idea after installation.
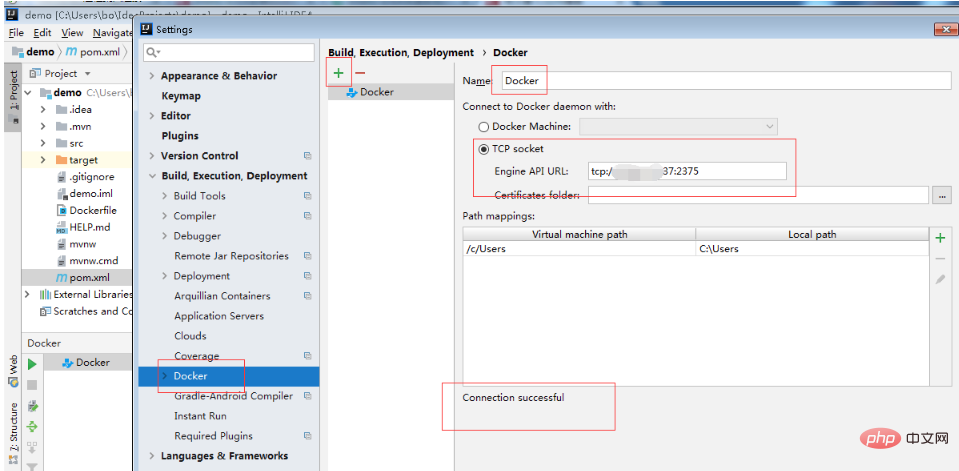
Configure docker after restarting and connect to the remote docker service. Open the configuration interface from File->Settings->Build,Execution,Deployment->Docker.
3. Spring boot service Docker deployment
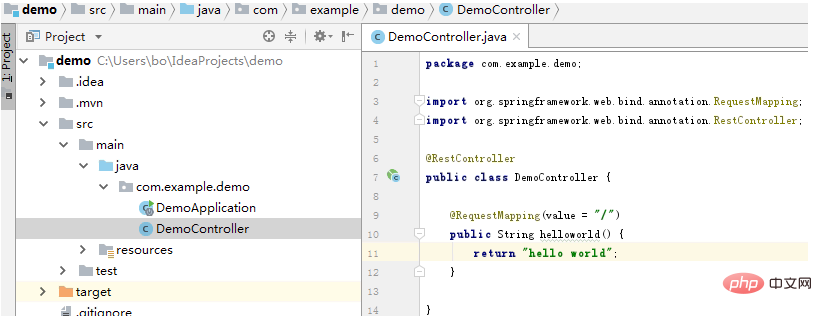
3.1 Create a new Spring boot project and write a test interface
3.2 Modify the pom file, add properties, add plugin
<properties>
        <java.version>1.8</java.version>
        <docker.image.prefix>bozai</docker.image.prefix>
    </properties>


    <build>
        <plugins>
            <plugin>
                <groupId>org.springframework.boot</groupId>
                <artifactId>spring-boot-maven-plugin</artifactId>
            </plugin>
            <plugin>
                <groupId>com.spotify</groupId>
                <artifactId>docker-maven-plugin</artifactId>
                <version>1.0.0</version>
                <configuration>
                    <imageName>${docker.image.prefix}/${project.artifactId}</imageName>
                    <dockerDirectory></dockerDirectory>
                    <resources>
                        <resource>
                            <targetPath>/</targetPath>
                            <directory>${project.build.directory}</directory>
                            <include>${project.build.finalName}.jar</include>
                        </resource>
                    </resources>
                </configuration>
            </plugin>
        </plugins>
</build>3.3 Configure the Dockerfile file: Create a new Dockerfile file in the project root directory.
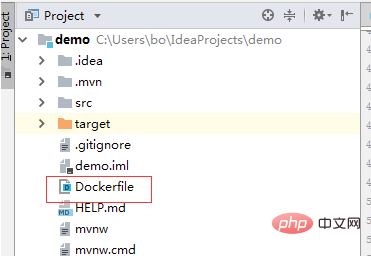
Contents are as follows:
FROM java:8
VOLUME /tmp
COPY target/demo-0.0.1-SNAPSHOT.jar demo.jar
RUN bash -c "touch /demo.jar"
EXPOSE 8080
ENTRYPOINT ["java","-jar","demo.jar"]
4. Create a Docker image
Package the project in the idea Terminal Execute the mvn clean package command to compile and package. After packaging, a jar package will be generated in the target directory. After generating the jar package, you can start the service locally for testing. After testing, configure the docker image production command. Enter the configuration interface from Run->Edit Configrations.
Click Docker, then click , add a docker command, enter Name, select Server, select the Dockerfile file, enter the image tag, and complete the configuration.
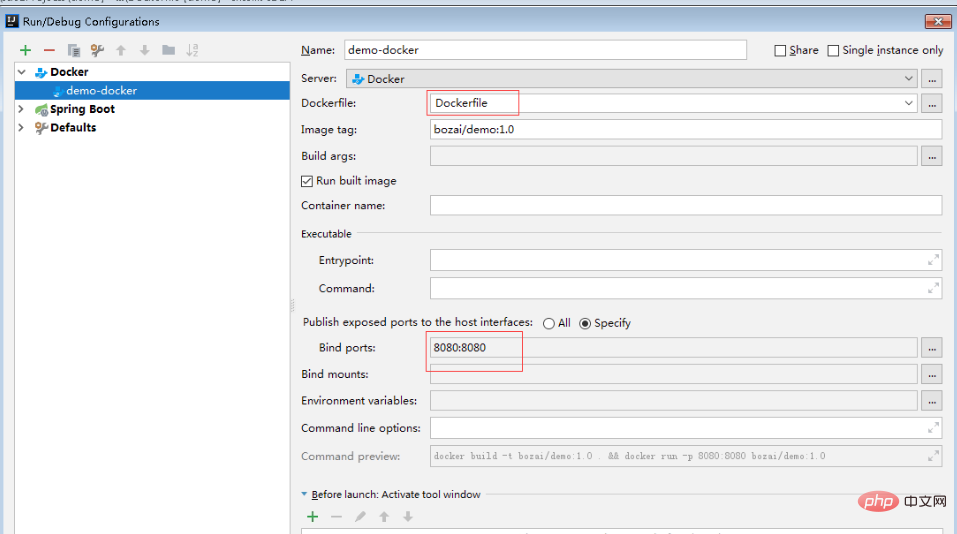
After completion, execute this command:
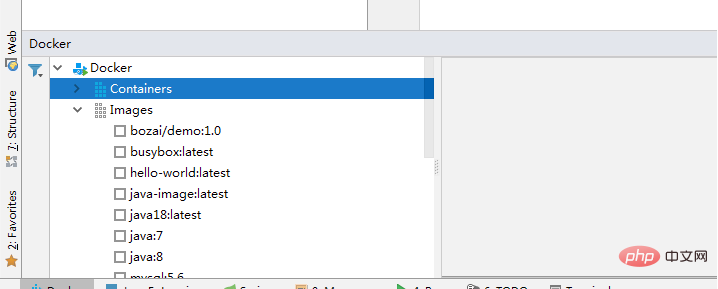
After successful execution, you can see this image on the remote docker:

Execute docker ps and you can see that the image has been produced and the container has started running:

Open the browser and access the test :

Related recommendations: docker tutorial
The above is the detailed content of How IDEA quickly implements Docker image deployment. For more information, please follow other related articles on the PHP Chinese website!

Hot AI Tools

Undresser.AI Undress
AI-powered app for creating realistic nude photos

AI Clothes Remover
Online AI tool for removing clothes from photos.

Undress AI Tool
Undress images for free

Clothoff.io
AI clothes remover

Video Face Swap
Swap faces in any video effortlessly with our completely free AI face swap tool!

Hot Article

Hot Tools

Notepad++7.3.1
Easy-to-use and free code editor

SublimeText3 Chinese version
Chinese version, very easy to use

Zend Studio 13.0.1
Powerful PHP integrated development environment

Dreamweaver CS6
Visual web development tools

SublimeText3 Mac version
God-level code editing software (SublimeText3)

Hot Topics
 1387
1387
 52
52
 How to update the image of docker
Apr 15, 2025 pm 12:03 PM
The steps to update a Docker image are as follows: Pull the latest image tag New image Delete the old image for a specific tag (optional) Restart the container (if needed)
 How to use docker desktop
Apr 15, 2025 am 11:45 AM
How to use Docker Desktop? Docker Desktop is a tool for running Docker containers on local machines. The steps to use include: 1. Install Docker Desktop; 2. Start Docker Desktop; 3. Create Docker image (using Dockerfile); 4. Build Docker image (using docker build); 5. Run Docker container (using docker run).
 How to copy files in docker to outside
Apr 15, 2025 pm 12:12 PM
Methods for copying files to external hosts in Docker: Use the docker cp command: Execute docker cp [Options] <Container Path> <Host Path>. Using data volumes: Create a directory on the host, and use the -v parameter to mount the directory into the container when creating the container to achieve bidirectional file synchronization.
 How to exit the container by docker
Apr 15, 2025 pm 12:15 PM
Four ways to exit Docker container: Use Ctrl D in the container terminal Enter exit command in the container terminal Use docker stop <container_name> Command Use docker kill <container_name> command in the host terminal (force exit)
 How to view the docker process
Apr 15, 2025 am 11:48 AM
Docker process viewing method: 1. Docker CLI command: docker ps; 2. Systemd CLI command: systemctl status docker; 3. Docker Compose CLI command: docker-compose ps; 4. Process Explorer (Windows); 5. /proc directory (Linux).
 How to start mysql by docker
Apr 15, 2025 pm 12:09 PM
The process of starting MySQL in Docker consists of the following steps: Pull the MySQL image to create and start the container, set the root user password, and map the port verification connection Create the database and the user grants all permissions to the database
 How to check the name of the docker container
Apr 15, 2025 pm 12:21 PM
You can query the Docker container name by following the steps: List all containers (docker ps). Filter the container list (using the grep command). Gets the container name (located in the "NAMES" column).
 How to save docker image
Apr 15, 2025 am 11:54 AM
To save the image in Docker, you can use the docker commit command to create a new image, containing the current state of the specified container, syntax: docker commit [Options] Container ID Image name. To save the image to the repository, you can use the docker push command, syntax: docker push image name [: tag]. To import saved images, you can use the docker pull command, syntax: docker pull image name [: tag].


