 Operation and Maintenance
 Windows Operation and Maintenance
 How to solve the problem that the win7 system printer shows that the local lower-level document is being printed
How to solve the problem that the win7 system printer shows that the local lower-level document is being printed

1. Check in the command prompt and execute the [net stop spooler] command to close the Print Spooler service;
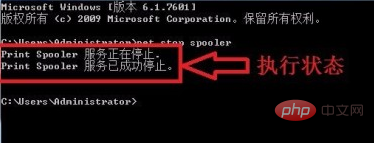
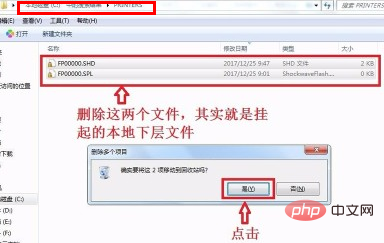
2. Enter PRINTERS directory under the C drive, delete all files in this directory;
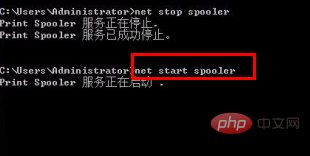
3. Enter the command prompt again, execute the [net start spooler] command to restart the Print Spooler service ;
4. Open the control panel, enter the [Devices and Printers] settings, and click the [See what is being printed now] option;
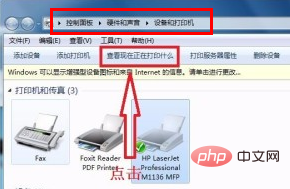
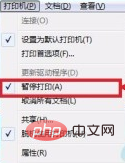
5. Uncheck the [Pause Printing] option.
Recommended tutorial: windows tutorial
The above is the detailed content of How to solve the problem that the win7 system printer shows that the local lower-level document is being printed. For more information, please follow other related articles on the PHP Chinese website!

Hot AI Tools

Undresser.AI Undress
AI-powered app for creating realistic nude photos

AI Clothes Remover
Online AI tool for removing clothes from photos.

Undress AI Tool
Undress images for free

Clothoff.io
AI clothes remover

Video Face Swap
Swap faces in any video effortlessly with our completely free AI face swap tool!

Hot Article

Hot Tools

Notepad++7.3.1
Easy-to-use and free code editor

SublimeText3 Chinese version
Chinese version, very easy to use

Zend Studio 13.0.1
Powerful PHP integrated development environment

Dreamweaver CS6
Visual web development tools

SublimeText3 Mac version
God-level code editing software (SublimeText3)

Hot Topics
 1386
1386
 52
52
 What should I do if the Win7 taskbar does not display the icon? How to solve the problem of the computer taskbar icon disappearing
Jun 09, 2024 pm 01:49 PM
Recently, many users using Win7 system have found that the icons in the taskbar suddenly disappeared, which makes the operation very inconvenient and they do not know how to solve the problem. This article will introduce to you how to solve the problem of disappearing taskbar icons in Win7 system. Bar! Cause Analysis When encountering such a situation, there are generally two situations: one is that the taskbar on the computer does not really disappear, but is just hidden, and the other is that the taskbar does disappear. Method 1: 1. There is a situation that you need to confirm first, that is, when the mouse is placed at the bottom of the screen, the taskbar will be displayed. You can directly click the mouse on the taskbar and select "Properties". 2. In the dialog box that opens, click & on the "Hide taskbar" option.
 How to clear all desktop background images in Win7? Tips for deleting personalized background images in Win7
Jun 02, 2024 am 09:01 AM
In Win7 system, many users want to delete personalized desktop background images, but do not know how to delete them. This article will show you how to delete personalized background images in Win7 system. 1. First, open the control panel interface of the Win7 system and click to enter the "Appearance and Personalization" settings; 2. Then, in the opened interface, click the "Change Desktop Background" setting; 3. Then, click below "Desktop background" option; 4. Then, select Select all, and then click Clear all. Of course, you can also use it under "Customize", right-click the theme you want to delete, and then click &q on the shortcut menu
 Lenovo Xiaoxin Panda Pro Panda Printer Pro goes on sale on May 6: black and white laser printing, built-in learning resources, 999 yuan
May 01, 2024 am 08:46 AM
According to news from this site on April 30, Lenovo Xiaoxin PandaPro Panda Printer Pro is now available on JD.com. This printer will go on sale on May 6. It supports black and white laser printing, has an optional two-color body, and has built-in learning resources. The initial price is 999. Yuan. Lenovo Xiaoxin Panda Printer Pro measures 350x275x141mm and is available in two color options: Xiling White and Qingcheng Gray. This printer supports 2.4GHz/5GHz dual-band Wi-Fi, USB wired and other connection methods. It can print with one click after being configured with the network, and can also achieve NFC one-touch printing. Xiaoxin Panda Printer Pro supports black and white laser printing and can print 22 pages per minute. In addition to printing functions, this model also supports copying and scanning functions, with a color scanning resolution of 4800d.
 Mobile phone directly connected to printer (explore various connection methods of mobile phone connected directly to printer)
Apr 25, 2024 pm 07:31 PM
Direct-connection of mobile phone printers has become an increasingly popular printing solution in modern life, as mobile devices become more popular and their functions continue to increase. To quickly print files, we can directly connect to the printer through our mobile phones without the need for a computer. To help you choose the printing solution that best suits your needs, this article will introduce you to the various connection methods for direct connection of your mobile phone to the printer. Wi-Fi direct printing Wi-Fi direct printing is currently one of the most common methods of directly connecting a mobile phone to a printer. By connecting the printer and mobile phone to the same Wi-Fi network, users can easily transfer and print files through the mobile app. Bluetooth direct printing Bluetooth direct printing is a simpler and more convenient way to connect a mobile phone directly to a printer. can realize the file
 How to add Windows credentials in Win7
Mar 26, 2024 pm 07:46 PM
1. First, select the Control Panel option in the Start button of the Win7 system. 2. Then in the control panel that pops up, click the [User Accounts and Family Safety] item. 3. Then click [Credential Manager] in the pop-up interface. 4. Finally, click [Add Windows Credentials] to create your credentials. The operation method of adding and managing windows credentials in win7 is shared here in detail with friends. More exciting tutorials are available on the PHP Chinese website!
 Where is the network discovery in Win7? Tips for enabling the network discovery function in Win7
Jun 04, 2024 am 09:02 AM
Many computer users know that network discovery is a network setting. This setting will affect whether the computer can find other computers and devices on the network and whether it can find the computer when other computers on the network are found. So how to enable network discovery in win7? The following computer System Home U Disk Installation will introduce you to the tutorial on how to enable network discovery in win7 system. 1. First, click the "Start Menu" icon on the desktop taskbar and choose to open the "Control Panel" interface. 2. Then, in the interface that opens, set "View by" to "Category", and then choose to enter "Network and Internet"
 The Print Spooler service automatically shuts down and the printer cannot print normally.
Jun 18, 2024 pm 08:20 PM
My friend's printer suddenly stopped printing. When WPS was printing, it prompted "The system print service has been closed" and "The system PrintSpooler service has been detected to be closed. Please enable it and try again." The PrintSpooler service executes print jobs in the background and handles interactions with the printer. . If you turn off the service, you cannot print or view the printer. According to the prompts, generally we only need to find the PrintSpooler service in the service, start it and change it to automatic. After my friend's computer started the PrintSpooler service, the service automatically stopped in about a minute and started again, and the same situation occurred. Saw spoolsv.exe and a dl through event viewer
 How to delete vbs virus in win7
Mar 26, 2024 pm 09:21 PM
1. Click [Start → Run] and enter gpedit.msc. On the left side of the [Group Policy] window, click the [Computer Configuration → Windows Settings → Security Settings → Software Restriction Policy] item, and then click the [Action → Create New Policy] menu item. As shown in the picture: 2. Select [Other Rules] from the left. Right-click the blank space in the right pane and select the [New Path Rule] item in the menu. In the pop-up window, click the [Browse] button after [Path], select the wscript.exe file in the C: WindowsSystem32 folder, and set the [Security Level] to [Not Allowed]. Change C: System32, Dllcache and I386 under Windows


