

What is the startup process of centos6

centos6启动流程是什么?
下面开始简单的了解一下CentOS6的启动流程吧。
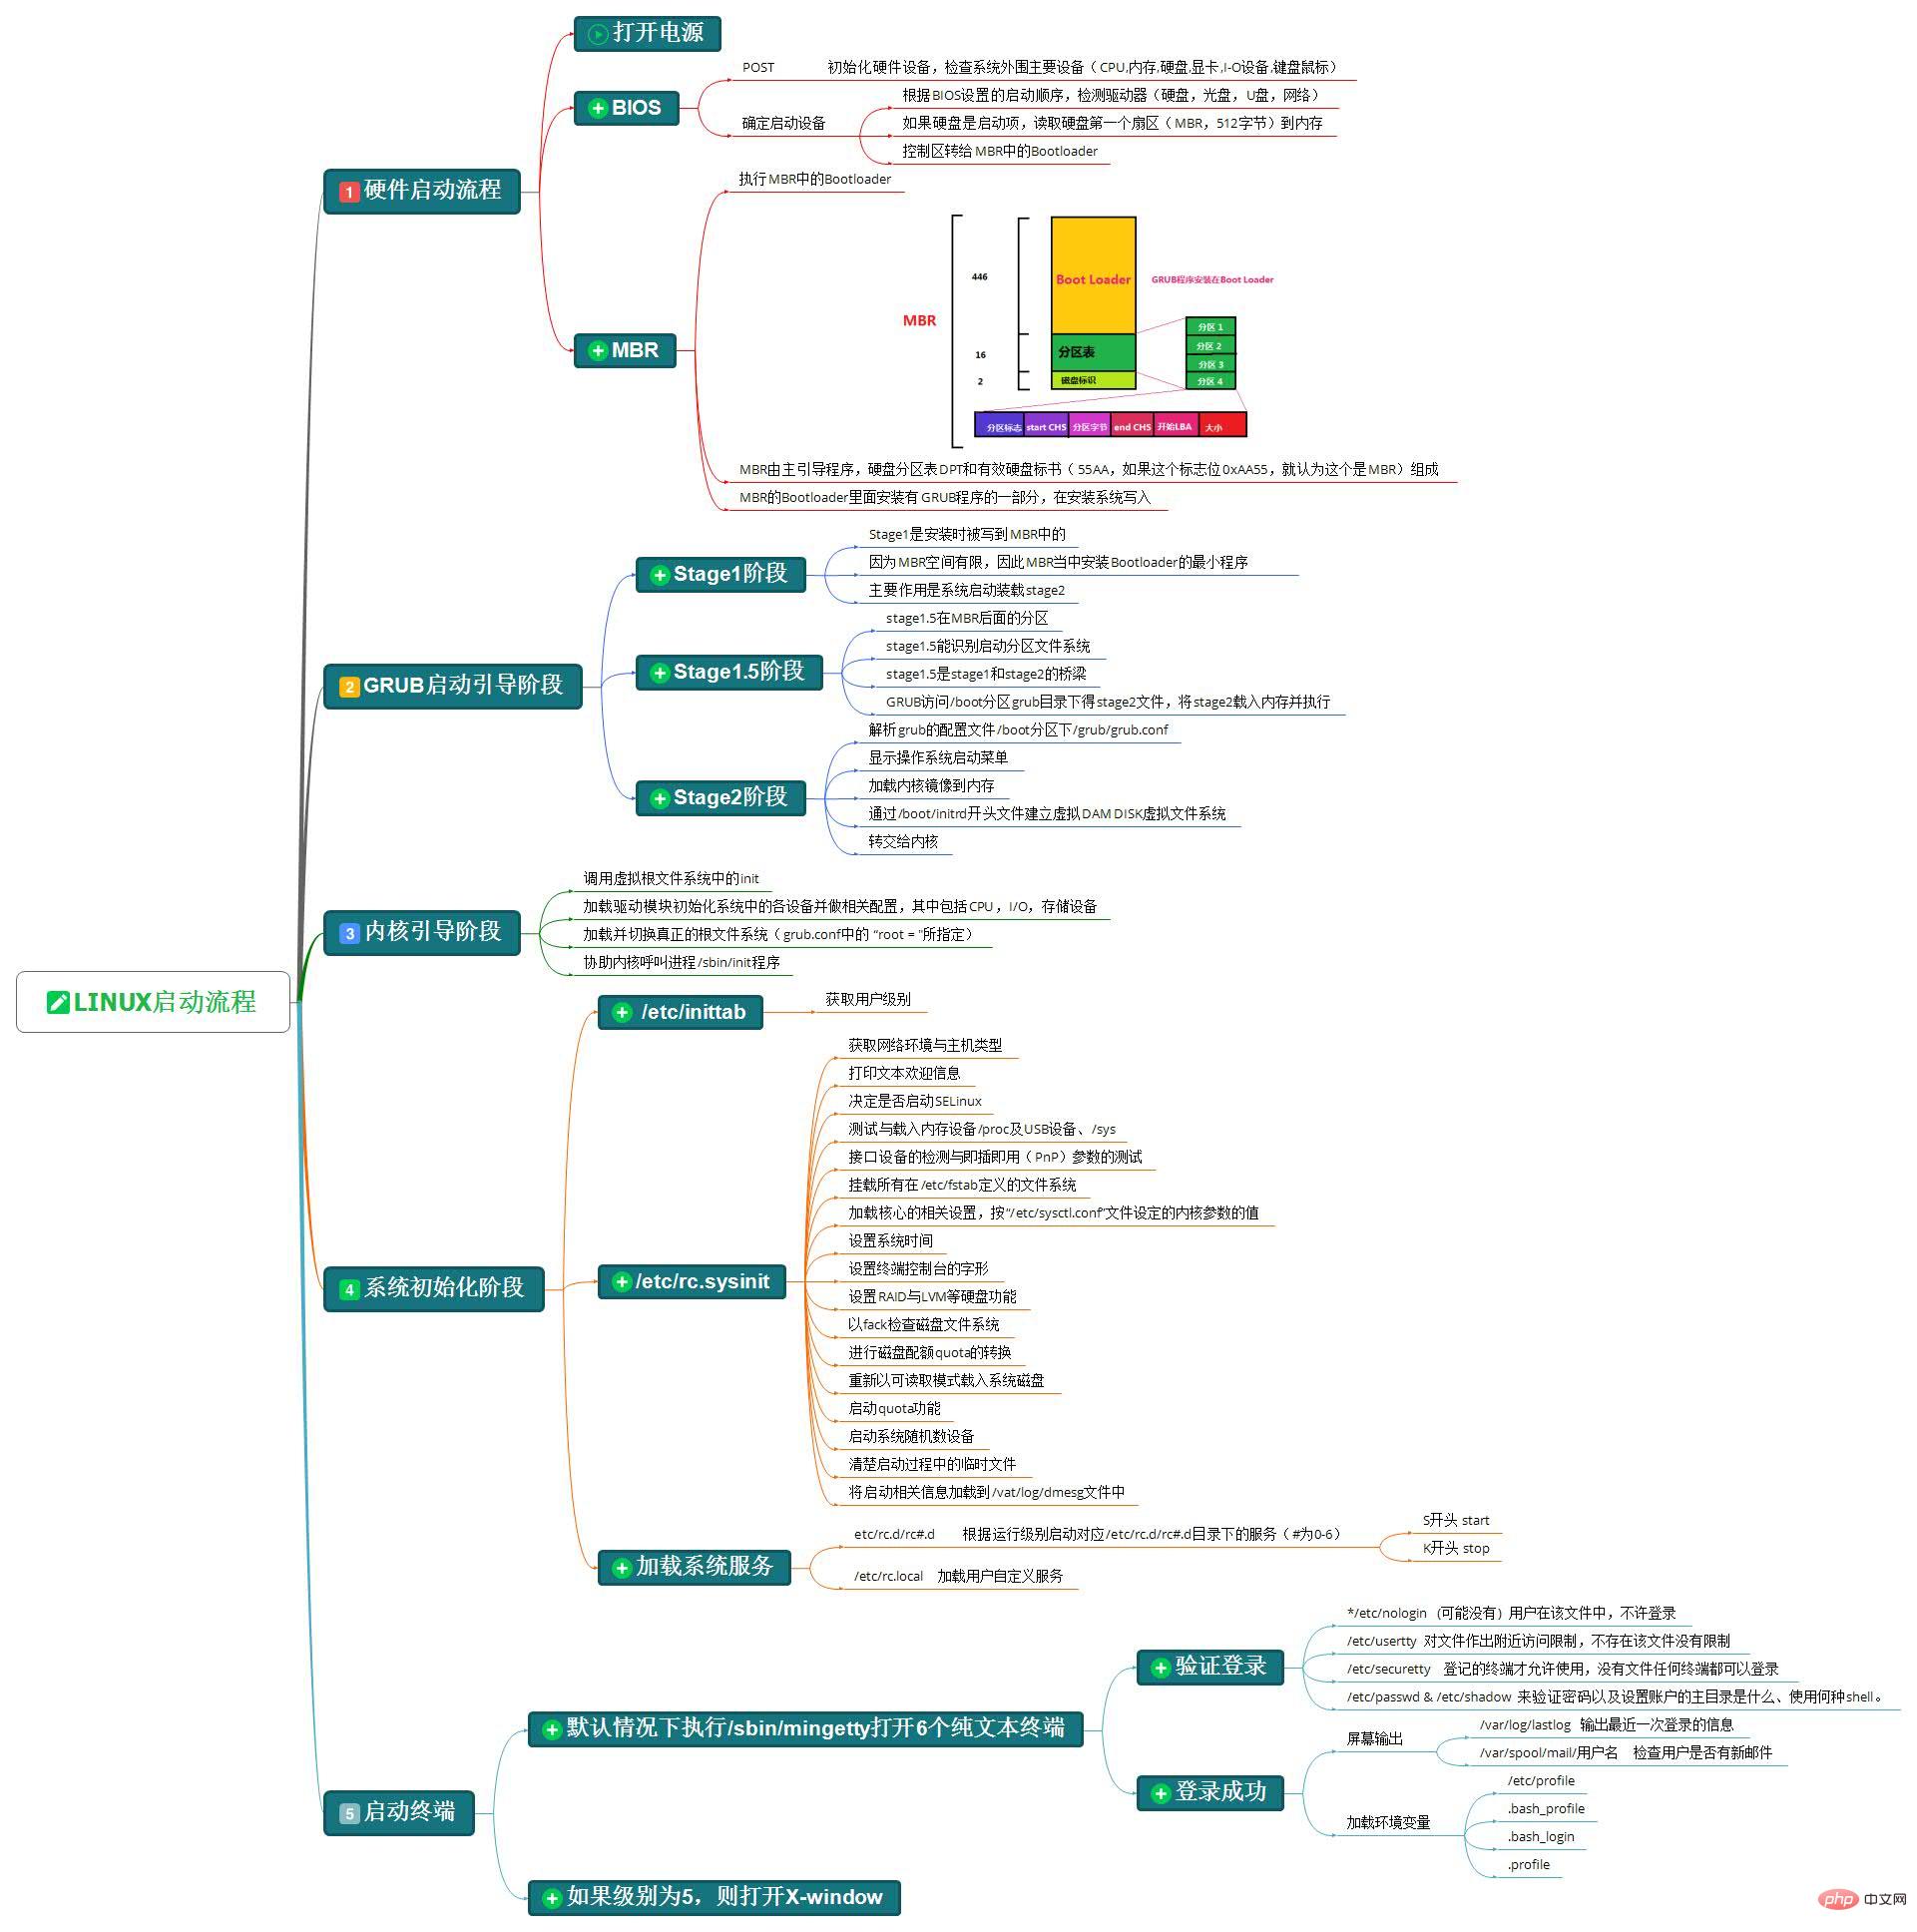
第一步、硬件启动阶段
简单说一下这一步的流程:打开电源;POST自检;BIOS逐一排查设备启动顺序;如果是硬盘启动,读取硬盘的<span style="color: #ff0000;">MBR</span>的<span style="color: #ff0000;">BootLoader</span>。(这里默认MBR分区,暂不考虑GPT分区)
这里主要有三个需要了解的地方BIOS启动顺序、MBR和BootLoader。BIOS启动顺序大部分人应该都知道,我就不赘述了。
(1).MBR
MBR(Main Boot Record),是硬盘的0柱面,0磁道、1扇区(第一个扇区),称为主引导扇区,也称为主引导记录。它由三部分组成:主引导程序(BootLoader)、硬盘分区表DPT(Disk Partition table)和硬盘有效标志(55AA)。
注:硬盘默认一个扇区大小为512字节。
第一部分,主引导程序(BootLoader)占446个字节,负责从活动分区中装载,并运行系统引导程序。
第二部分,硬盘分区表DPT占64个字节,有4个分区表项,每个分区表项占16个字节,硬盘中分区有多少以及每一个分区的大小都记录在其中。
第三部分,硬盘有效标志,占2个字节,固定为55AA。如果这个标志位0xAA55,就认为这个是MBR。
(2).BootLoader
不同的系统有不同的主引导程序(BootLoader)。Windows使用的是NTLDR(NT Loader,Windows NT系列操作系统)、Bootmgr(Boot Manager,Windows Vista,7,8,10),Linux一般使用的是grub(也叫grub legacy)和grub2。
CentOS6一般使用的是grub。GRUB(GRand Unified Bootloader)是一个来自GNU项目的多操作系统启动程序。
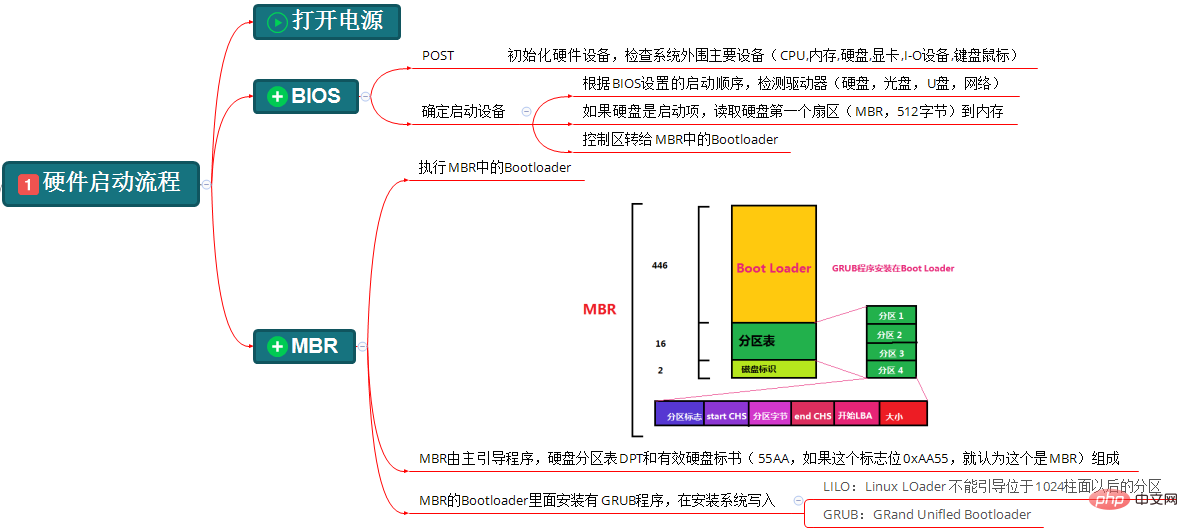
第二步、GRUB引导阶段
简单说一下这一步的流程:GRUB程序加载执行并引导kernel(内核)程序,其中有三个阶段。
grub引导阶段的文件都在/boot/grub/目录下
(1).Stage1阶段
这一阶段其实执行的就是系统安装时预先写入到MBR的Bootloader程序。它的任务仅是读取(加载)硬盘的0柱面,0磁道,2扇区的内容(/boot/grub/stage1)并执行。
[root@CentOS6 ~]# ll /boot/grub/stage1
-rw-r--r--. 1 root root 512 Mar 13  2018 /boot/grub/stage1
这一阶段,使硬件初始化,为Stage2准备RAM空间(内存空间),读取Stage2到RAM空间(应该涉及到了Stage1.5阶段)。就是Stage1.5阶段或Stage2阶段的入口,引导进入Stage1.5阶段或Stage2阶段。
另外,这一阶段并没有识别文件系统的能力。
(2).Stage1.5阶段
这一阶段是Stage1阶段和Stage2阶段的桥梁,具有识别分区文件系统的能力,此后grub程序便有能力去访问/boot/grub/stage2,并将其读取到内存执行。
[root@CentOS6 ~]# ll -h /boot/grub/stage2  //大于512字节了
-rw-r--r--. 1 root root 124K Mar 21  2018 /boot/grub/stage2
[root@CentOS6 ~]# ls /boot/grub/*stage1_5  //有各种文件系统格式
/boot/grub/e2fs_stage1_5     /boot/grub/minix_stage1_5
/boot/grub/fat_stage1_5      /boot/grub/reiserfs_stage1_5
/boot/grub/ffs_stage1_5      /boot/grub/ufs2_stage1_5
/boot/grub/iso9660_stage1_5  /boot/grub/vstafs_stage1_5
/boot/grub/jfs_stage1_5      /boot/grub/xfs_stage1_5
(3).Stage2阶段
这一阶段会(初始化本阶段需要用到的硬件,检测系统的内存映像,)解析grub的配置文件/boot/grub/grub.cnf,根据配置文件加载内核镜像到内存中,通过initrd程序建立虚拟根文件系统,最后调用(转交)内核
[root@CentOS6 ~]# cat /boot/grub/grub.conf
# grub.conf generated by anaconda
#
# Note that you do not have to rerun grub after making changes to this file
# NOTICE:  You have a /boot partition.  This means that
#          all kernel and initrd paths are relative to /boot/, eg.
#          root (hd0,0)
#          kernel /vmlinuz-version ro root=/dev/mapper/vg_centos6-lv_root
#          initrd /initrd-[generic-]version.img
#boot=/dev/sda
default=0  //设置默认启动项为第一个内核
timeout=5  //菜单项等待选项时间为5秒
splashimage=(hd0,0)/grub/splash.xpm.gz  //菜单背景图片
hiddenmenu  //隐藏菜单
//这里有时候会有passwrod参数,意思是进入急救模式(单用户模式)的密码是多少,可以是明文密码,可以是加密密码
//例如password --md5 $1$1S9Xy$1MuGZSoPc2vAtkW.jvz0X/,这代表进入急救模式的password经过MD5加密,
//加密密码为$1$1S9Xy$1MuGZSoPc2vAtkW.jvz0X/
title CentOS 6 (2.6.32-642.el6.x86_64)  //菜单项名称
        root (hd0,0)  //grub查找stage2文件及kernel文件所在设备分区,grub的根。第一块硬盘的第一个分区
        //启动的内核
        kernel /vmlinuz-2.6.32-642.el6.x86_64 ro root=/dev/mapper/vg_centos6-lv_root
        rd_NO_LUKS rd_NO_MD rd_LVM_LV=vg_centos6/lv_swap crashkernel=128M LANG=zh_CN.UTF-8
        rd_LVM_LV=vg_centos6/lv_root  KEYBOARDTYPE=pc KEYTABLE=us rd_NO_DM rhgb quiet
initrd /initramfs-2.6.32-642.el6.x86_64.img //内核匹配的ramfs文件,img是镜像文件第三步、内核引导阶段

简单说一下这一步的流程:通过内存中的虚拟根文件系统,加载驱动,然后切换到真正的根文件系统,并执行/sbin/init程序。
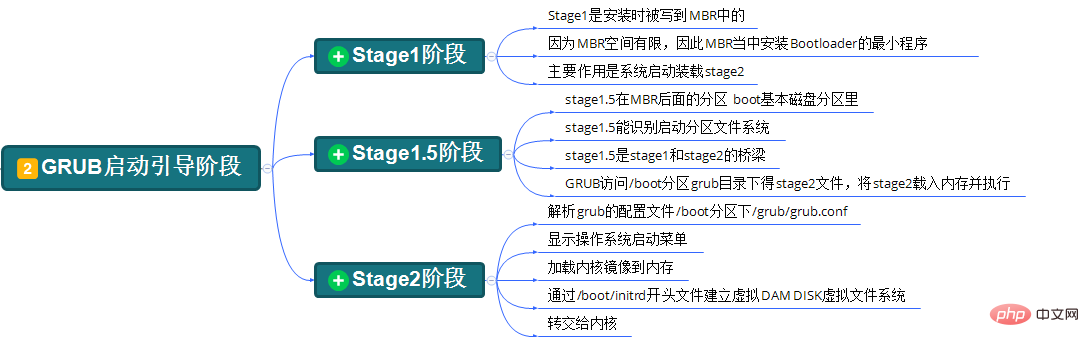
第四步、init初始化阶段(又叫系统初始化阶段)
简单说一下这一步的流程:/sbin/init程序会读取/etc/inittab文件确认运行级别,然后执行/etc/rc.d/rc脚本,根据确认的运行级别启动对应/etc/rc.d/rc#.d/目录下的服务(#为0~6),与此同时执行系统初始化脚本/etc/rc.sysinit(软链接,指向/etc/rc.d/rc.sysinit),还会加载/etc/rc.local(软链接,指向/etc/rc.d/rc.local文件)用户自定义服务(脚本)。
这里有个有意思的地方,/etc/rc.d/目录下的文件几乎在上一次都有相应的软链接(也就是/etc/目录下),唯一没有的/etc/rc.d/init.d/目录又似乎与/etc/init.d/目录完全相同
[root@CentOS6 ~]# ls -ld /etc/rc*
lrwxrwxrwx.  1 root root    7 Mar 13  2018 /etc/rc -> rc.d/rc
lrwxrwxrwx.  1 root root   10 Mar 13  2018 /etc/rc0.d -> rc.d/rc0.d
lrwxrwxrwx.  1 root root   10 Mar 13  2018 /etc/rc1.d -> rc.d/rc1.d
lrwxrwxrwx.  1 root root   10 Mar 13  2018 /etc/rc2.d -> rc.d/rc2.d
lrwxrwxrwx.  1 root root   10 Mar 13  2018 /etc/rc3.d -> rc.d/rc3.d
lrwxrwxrwx.  1 root root   10 Mar 13  2018 /etc/rc4.d -> rc.d/rc4.d
lrwxrwxrwx.  1 root root   10 Mar 13  2018 /etc/rc5.d -> rc.d/rc5.d
lrwxrwxrwx.  1 root root   10 Mar 13  2018 /etc/rc6.d -> rc.d/rc6.d
drwxr-xr-x. 10 root root 4096 Feb 18 02:17 /etc/rc.d
lrwxrwxrwx.  1 root root   13 Mar 13  2018 /etc/rc.local -> rc.d/rc.local
lrwxrwxrwx.  1 root root   15 Mar 13  2018 /etc/rc.sysinit -> rc.d/rc.sysinit
[root@CentOS6 ~]# ls /etc/rc.d/
init.d  rc0.d  rc2.d  rc4.d  rc6.d     rc.sysinit
rc      rc1.d  rc3.d  rc5.d  rc.local
[root@CentOS6 ~]# diff -ruNa /etc/rc.d/init.d/ /etc/init.d/
(1)./etc/inittab文件
[root@CentOS6 ~]# cat /etc/inittab
# inittab is only used by upstart for the default runlevel.
#
# ADDING OTHER CONFIGURATION HERE WILL HAVE NO EFFECT ON YOUR SYSTEM.
#
# System initialization is started by /etc/init/rcS.conf
#
# Inpidual runlevels are started by /etc/init/rc.conf
#
# Ctrl-Alt-Delete is handled by /etc/init/control-alt-delete.conf
#
# Terminal gettys are handled by /etc/init/tty.conf and /etc/init/serial.conf,
# with configuration in /etc/sysconfig/init.
#
# For information on how to write upstart event handlers, or how
# upstart works, see init(5), init(8), and initctl(8).
#
# Default runlevel. The runlevels used are:
#   0 - halt (Do NOT set initdefault to this)
#   1 - Single user mode
#   2 - Multiuser, without NFS (The same as 3, if you do not have networking)
#   3 - Full multiuser mode
#   4 - unused
#   5 - X11
#   6 - reboot (Do NOT set initdefault to this)
#
id:5:initdefault:
这个文件直接看最后一行的那个数字就好了,我这里是5,就代表启动级别是5。
另外,还需要了解下系统的启动级别:
0 关机
1 单用户模式、维护模式、急救模式,都可以
2 多用户模式,但没有网络
3 完整的多用户模式
4 预留级别,暂时没用,不用考虑
5 图形界面,XWindows
6 重启
(2)./etc/rc.d/rc#.d/目录
在启动时执行的/etc/rc.d/rc脚本,会调用/etc/rc.d/rc#.d/目录下的文件
K01smartd        		K50dnsmasq     	   K73winbind         K88sssd
S01sysstat       		S12rsyslog     	   S24nfslock         S26udev-post
S82abrt-ccpp     		K02oddjobd     	   K50xinetd          K74ntpd
K89netconsole    		S02lvm2-monitor    S13cpuspeed        S24rpcgssd
S28autofs        		S82abrtd       	   K05wdaemon         K60nfs
K75ntpdate       		K89rdisc       	   S08ip6tables       S13irqbalance
S25blk-availability  	        S50bluetooth       S90crond           S80postfix
K10psacct        		K61nfs-rdma    	   K75quota_nld       K92pppoe-server
S08iptables      		S13rpcbind     	   S25cups            S50kdump
S95atd           		K10saslauthd   	   K69rpcsvcgssd      K76ypbind
K95firstboot     		S10network     	   S15mdmonitor       S25netfs
S55sshd          		S99certmonger  	   K15htcacheclean    K71cgred
K84wpa_supplicant  		K95rdma      	   S11auditd          S22messagebus
S26acpid         		S70spice-vdagentd  S99local           K15httpd
K72cgconfig      		K87restorecond     K99rngd            S11portreserve
S23NetworkManager  		S26haldaemon
K开头的文件:要停止的服务(脚本),从01开始关闭,数字越小越优先关闭
S开头的文件:要启动的服务(脚本),从01开始启动,数字越小越优先启动
这些文件其实都是软链接,指向的都是/etc/rc.d/init.d/目录下的文件
[root@CentOS6 ~]# ll /etc/rc.d/rc5.d/K01smartd
lrwxrwxrwx. 1 root root 16 Mar 13  2018 /etc/rc.d/rc5.d/K01smartd -> ../init.d/smartd
第五步、启动终端
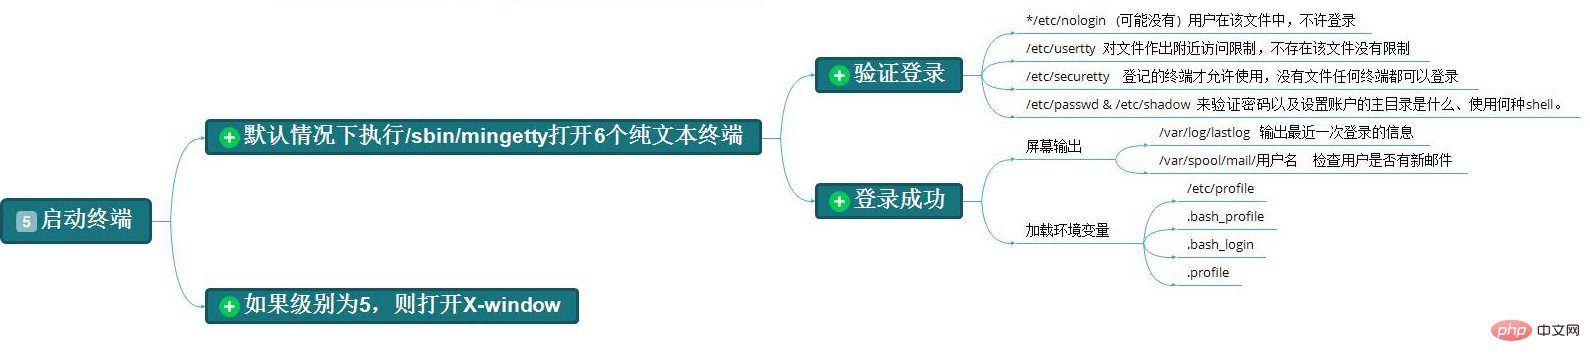
最后一步就是用户登录了,没什么说的。
推荐教程: 《CentOS教程》
The above is the detailed content of What is the startup process of centos6. For more information, please follow other related articles on the PHP Chinese website!

Hot AI Tools

Undresser.AI Undress
AI-powered app for creating realistic nude photos

AI Clothes Remover
Online AI tool for removing clothes from photos.

Undress AI Tool
Undress images for free

Clothoff.io
AI clothes remover

Video Face Swap
Swap faces in any video effortlessly with our completely free AI face swap tool!

Hot Article
Hot Tools

Notepad++7.3.1
Easy-to-use and free code editor

SublimeText3 Chinese version
Chinese version, very easy to use

Zend Studio 13.0.1
Powerful PHP integrated development environment

Dreamweaver CS6
Visual web development tools

SublimeText3 Mac version
God-level code editing software (SublimeText3)
Hot Topics
 1390
1390
 52
52

 CentOS Containerization with Docker: Deploying and Managing Applications
Apr 03, 2025 am 12:08 AM
CentOS Containerization with Docker: Deploying and Managing Applications
Apr 03, 2025 am 12:08 AM
Using Docker to containerize, deploy and manage applications on CentOS can be achieved through the following steps: 1. Install Docker, use the yum command to install and start the Docker service. 2. Manage Docker images and containers, obtain images through DockerHub and customize images using Dockerfile. 3. Use DockerCompose to manage multi-container applications and define services through YAML files. 4. Deploy the application, use the dockerpull and dockerrun commands to pull and run the container from DockerHub. 5. Carry out advanced management and deploy complex applications using Docker networks and volumes. Through these steps, you can make full use of D
 What are the methods of tuning performance of Zookeeper on CentOS
Apr 14, 2025 pm 03:18 PM
What are the methods of tuning performance of Zookeeper on CentOS
Apr 14, 2025 pm 03:18 PM
Zookeeper performance tuning on CentOS can start from multiple aspects, including hardware configuration, operating system optimization, configuration parameter adjustment, monitoring and maintenance, etc. Here are some specific tuning methods: SSD is recommended for hardware configuration: Since Zookeeper's data is written to disk, it is highly recommended to use SSD to improve I/O performance. Enough memory: Allocate enough memory resources to Zookeeper to avoid frequent disk read and write. Multi-core CPU: Use multi-core CPU to ensure that Zookeeper can process it in parallel.
 What are the backup methods for GitLab on CentOS
Apr 14, 2025 pm 05:33 PM
What are the backup methods for GitLab on CentOS
Apr 14, 2025 pm 05:33 PM
Backup and Recovery Policy of GitLab under CentOS System In order to ensure data security and recoverability, GitLab on CentOS provides a variety of backup methods. This article will introduce several common backup methods, configuration parameters and recovery processes in detail to help you establish a complete GitLab backup and recovery strategy. 1. Manual backup Use the gitlab-rakegitlab:backup:create command to execute manual backup. This command backs up key information such as GitLab repository, database, users, user groups, keys, and permissions. The default backup file is stored in the /var/opt/gitlab/backups directory. You can modify /etc/gitlab
 CentOS Backup and Recovery: Ensuring Data Integrity and Availability
Apr 04, 2025 am 12:02 AM
CentOS Backup and Recovery: Ensuring Data Integrity and Availability
Apr 04, 2025 am 12:02 AM
The steps for backup and recovery in CentOS include: 1. Use the tar command to perform basic backup and recovery, such as tar-czvf/backup/home_backup.tar.gz/home backup/home directory; 2. Use rsync for incremental backup and recovery, such as rsync-avz/home//backup/home_backup/ for the first backup. These methods ensure data integrity and availability and are suitable for the needs of different scenarios.
 How to optimize CentOS HDFS configuration
Apr 14, 2025 pm 07:15 PM
How to optimize CentOS HDFS configuration
Apr 14, 2025 pm 07:15 PM
Improve HDFS performance on CentOS: A comprehensive optimization guide to optimize HDFS (Hadoop distributed file system) on CentOS requires comprehensive consideration of hardware, system configuration and network settings. This article provides a series of optimization strategies to help you improve HDFS performance. 1. Hardware upgrade and selection resource expansion: Increase the CPU, memory and storage capacity of the server as much as possible. High-performance hardware: adopts high-performance network cards and switches to improve network throughput. 2. System configuration fine-tuning kernel parameter adjustment: Modify /etc/sysctl.conf file to optimize kernel parameters such as TCP connection number, file handle number and memory management. For example, adjust TCP connection status and buffer size
 Centos stops maintenance 2024
Apr 14, 2025 pm 08:39 PM
Centos stops maintenance 2024
Apr 14, 2025 pm 08:39 PM
CentOS will be shut down in 2024 because its upstream distribution, RHEL 8, has been shut down. This shutdown will affect the CentOS 8 system, preventing it from continuing to receive updates. Users should plan for migration, and recommended options include CentOS Stream, AlmaLinux, and Rocky Linux to keep the system safe and stable.
 How to check CentOS HDFS configuration
Apr 14, 2025 pm 07:21 PM
How to check CentOS HDFS configuration
Apr 14, 2025 pm 07:21 PM
Complete Guide to Checking HDFS Configuration in CentOS Systems This article will guide you how to effectively check the configuration and running status of HDFS on CentOS systems. The following steps will help you fully understand the setup and operation of HDFS. Verify Hadoop environment variable: First, make sure the Hadoop environment variable is set correctly. In the terminal, execute the following command to verify that Hadoop is installed and configured correctly: hadoopversion Check HDFS configuration file: The core configuration file of HDFS is located in the /etc/hadoop/conf/ directory, where core-site.xml and hdfs-site.xml are crucial. use
 Centos shutdown command line
Apr 14, 2025 pm 09:12 PM
Centos shutdown command line
Apr 14, 2025 pm 09:12 PM
The CentOS shutdown command is shutdown, and the syntax is shutdown [Options] Time [Information]. Options include: -h Stop the system immediately; -P Turn off the power after shutdown; -r restart; -t Waiting time. Times can be specified as immediate (now), minutes ( minutes), or a specific time (hh:mm). Added information can be displayed in system messages.
