

What is the shortcut key for the PS brush tool?

What is the shortcut key for the ps brush tool?
The shortcut key for the brush tool is B
1. How to use:
The brush tool The shortcut key is B. By default, the foreground color is used for drawing. After setting, multiple colors can be drawn at the same time. Adjust the brush shortcut key:
Adjust size - press the "[" key to reduce the size, press "]" Key to increase the number
Decrease the hardness: shift [Add the hardness: shift]


The brush hardness can be understood as The strength of the strokes on the paper. The intensity is strong and the color is dark, so that the contrast between the handwriting and the surroundings will be more obvious and the handwriting will be more highlighted.
ps brushes are divided into 4 categories: regular brushes, dry medium brushes, wet medium brushes, and special effect brushes. Click to see the details and you will understand after using them.
2. Adjust advanced parameters
Press shortcut key f5 to bring up the brush setting panel, where you can adjust advanced parameters

Brush tip shape: You can change the angle and roundness of the brush. You can also set the spacing. The adjusted brush will be more useful than the default brush and it will be easier to achieve the effect you want.
Shape Dynamics: Shape dynamics is mainly about fine-tuning the size, angle and roundness of the brush. If you have drawings on a drawing tablet, you can adjust the tilt. And if you draw with a mouse, you can try fade. Both angle jitter and roundness jitter can be automatically adjusted.
Pass: Pass changes the visibility (flow and opacity) of the brush. You can change the flow and opacity dither values.
Walking: You can modify the arrangement of the pen tips and spread them around the stroke path
Texture: You can change the drawing effect of the brush to increase the texture of path drawing, by adjusting the depth and height , contrast and jitter values to adjust the texture effect
Double brush: It is to superimpose a brush on the basis of the original brush to create a new brush.
3. Download and load external brushes

#Select the brush tool, expand the brush options in the options bar → Settings in the upper right corner Button → Import Brush
4. Custom Brush
When using PS, we often need to use some special shapes, and they are shapes that need to be used in large quantities. It usually takes a lot of time to make. At this time, we can customize this shape into a brush for drawing, and then draw it in batches, which can save us a lot of time. Of course, we can also search for many useful custom brushes through the Internet. Download the *.ABR format file and choose to import the brush. At this time, just select the downloaded brush. After the brush is imported, it will automatically be displayed in the brush style. . Here's how to customize the brush: Select the graphic you want to define the brush, then select Edit → Define Brush Preset in the menu bar, then name it and click OK to define it successfully

Under the brush tool, click directly to draw the newly preset brush, and you can draw the just preset brush

Of course, press the f5 key, or You can find and select all your preset brush graphics, as shown below:

5. Export brushes
Manage through presets Not only can the tool easily load brushes, it can also easily export custom brushes. After saving it in this way, you can work on other computers. The steps are as follows:


The function of the brush is very powerful, but it is used to When drawing by hand, only by having a certain sketching foundation can you create better works.
Recommended tutorial: "ps tutorial"
The above is the detailed content of What is the shortcut key for the PS brush tool?. For more information, please follow other related articles on the PHP Chinese website!

Hot AI Tools

Undresser.AI Undress
AI-powered app for creating realistic nude photos

AI Clothes Remover
Online AI tool for removing clothes from photos.

Undress AI Tool
Undress images for free

Clothoff.io
AI clothes remover

Video Face Swap
Swap faces in any video effortlessly with our completely free AI face swap tool!

Hot Article
Hot Tools

Notepad++7.3.1
Easy-to-use and free code editor

SublimeText3 Chinese version
Chinese version, very easy to use

Zend Studio 13.0.1
Powerful PHP integrated development environment

Dreamweaver CS6
Visual web development tools

SublimeText3 Mac version
God-level code editing software (SublimeText3)
Hot Topics
 1386
1386
 52
52

 How to solve the problem that the NVIDIA graphics card screen recording shortcut key cannot be used?
Mar 13, 2024 pm 03:52 PM
How to solve the problem that the NVIDIA graphics card screen recording shortcut key cannot be used?
Mar 13, 2024 pm 03:52 PM
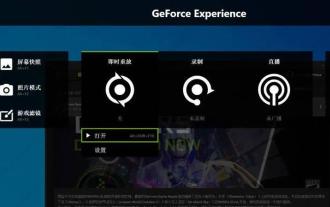
NVIDIA graphics cards have their own screen recording function. Users can directly use shortcut keys to record the desktop or game screen. However, some users reported that the shortcut keys cannot be used. So what is going on? Now, let this site give users a detailed introduction to the problem of the N-card screen recording shortcut key not responding. Analysis of the problem of NVIDIA screen recording shortcut key not responding Method 1, automatic recording 1. Automatic recording and instant replay mode. Players can regard it as automatic recording mode. First, open NVIDIA GeForce Experience. 2. After calling out the software menu with the Alt+Z key, click the Open button under Instant Replay to start recording, or use the Alt+Shift+F10 shortcut key to start recording.
 How to use shortcut keys to take screenshots in Win8?
Mar 28, 2024 am 08:33 AM
How to use shortcut keys to take screenshots in Win8?
Mar 28, 2024 am 08:33 AM
How to use shortcut keys to take screenshots in Win8? In our daily use of computers, we often need to take screenshots of the content on the screen. For users of Windows 8 system, taking screenshots through shortcut keys is a convenient and efficient operation method. In this article, we will introduce several commonly used shortcut keys to take screenshots in Windows 8 system to help you take screenshots more quickly. The first method is to use the "Win key + PrintScreen key" key combination to perform full
 Introduction to the process of extracting line drawings in PS
Apr 01, 2024 pm 12:51 PM
Introduction to the process of extracting line drawings in PS
Apr 01, 2024 pm 12:51 PM
1. Open the software and import a piece of material, as shown in the picture below. 2. Then ctrl+shift+u to remove color. 3. Then press ctrl+J to copy the layer. 4. Then reverse ctrl+I, and then set the layer blending mode to Color Dodge. 5. Click Filter--Others--Minimum. 6. In the pop-up dialog box, set the radius to 2 and click OK. 7. Finally, you can see the line draft extracted.
 How to merge cells using shortcut keys
Feb 26, 2024 am 10:27 AM
How to merge cells using shortcut keys
Feb 26, 2024 am 10:27 AM
How to use the shortcut keys for merging cells In daily work, we often need to edit and format tables. Merging cells is a common operation that can merge multiple adjacent cells into one cell to improve the beauty of the table and the information display effect. In mainstream spreadsheet software such as Microsoft Excel and Google Sheets, the operation of merging cells is very simple and can be achieved through shortcut keys. The following will introduce the shortcut key usage for merging cells in these two software. exist
 What are the shortcut keys for the win11 taskbar manager_What are the shortcut keys for the win11 taskbar manager
Mar 20, 2024 pm 09:11 PM
What are the shortcut keys for the win11 taskbar manager_What are the shortcut keys for the win11 taskbar manager
Mar 20, 2024 pm 09:11 PM
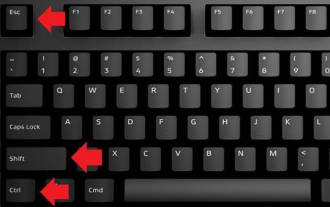
Recently, netizens find it very troublesome to find the taskbar manager. They asked the editor if there is a way to open the taskbar manager immediately. Of course, there is. So today, the editor will teach you the shortcut key tutorial to quickly open the win11 taskbar manager. I hope it can help. To all netizens. Method 1: Find the Ctrl+Shift+ESC shortcut key in Win11 system. 1. Press [Ctrl+Shift+ESC] to open the Task Manager. Method 2: Right-click the Start menu to open and find Task Manager. 1. Right-click the start menu to open: After right-clicking the start icon with the mouse, you can see a simplified version of the function list. Most of the commands here are related to the system, and "Task Manager" is also among them.
 How to solve the problem of pressing W key to trigger the stylus function in Win10 system?
Mar 23, 2024 pm 01:01 PM
How to solve the problem of pressing W key to trigger the stylus function in Win10 system?
Mar 23, 2024 pm 01:01 PM
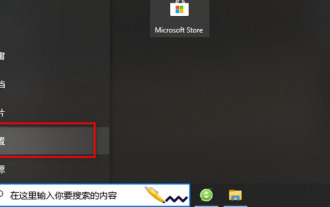
Recently, some friends who are using Win10 system have encountered that whenever the "W" key on the keyboard is pressed, the stylus function is activated, causing normal work to be disrupted. In order to solve this problem, we will bring you several different detailed solutions below, let’s take a look. Solution Method 1: Click "Start" in the taskbar in the lower left corner and select "Settings" in the option list. 2. After entering the new interface, click the "Device" option. 3. Then click "Pen and WindowsInk" in the left column. 4. Then find "Write with fingers on the handwriting panel" on the right, and finally uncheck the small box. Method 2: 1. Use the "win+R" shortcut key to start running, enter "regedit", and press Enter to start.
 Complete list of ps shortcut keys
Mar 11, 2024 pm 04:31 PM
Complete list of ps shortcut keys
Mar 11, 2024 pm 04:31 PM
1. Ctrl + N: Create a new document. 2. Ctrl + O: Open a file. 3. Ctrl + S: Save the current file. 4. Ctrl + Shift + S: Save as. 5. Ctrl + W: Close the current document. 6. Ctrl + Q: Exit Photoshop. 7. Ctrl + Z: Undo. 8. Ctrl + Y: Redo. 9. Ctrl + X: Cut the selected content. 10. Ctrl + C: Copy the selected content.
 What is the shortcut key for minimizing a windows window?
Mar 13, 2024 am 09:56 AM
What is the shortcut key for minimizing a windows window?
Mar 13, 2024 am 09:56 AM
Shortcut key introduction: 1. The win+D shortcut key can minimize all windows and display the desktop. If no other operations are performed, pressing win+D again will restore the window; 2. The win+M shortcut key can also minimize the window, and pressing the win+shift+M shortcut key can restore it; 3. Alt+ESC shortcut The key can close the open small window, provided that the full-screen window is opened; 4. Alt+Space+N can minimize the current window.
