 WeChat Applet
 Mini Program Development
 Get started with WeChat applet development in eight minutes
Get started with WeChat applet development in eight minutes

Register WeChat Mini Program
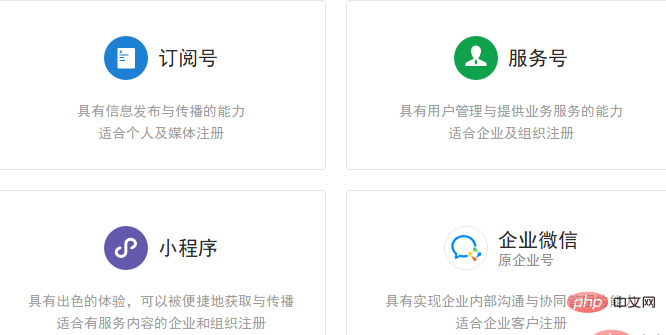
If you don’t have an account on the WeChat public platform yet, please enter the WeChat public platform first On the home page, click the "Register Now" button to register. The account types registered can be subscription accounts, service accounts, mini programs, and corporate WeChat. We can select “mini program”.
Then fill in the account information. It should be noted that the email address filled in must be an email address that has not been registered on the WeChat public platform or bound to a personal WeChat account, and each email address can only apply for one mini program.
After activating the email, select the subject type as "Personal Type" and register the subject information as required. The subject information cannot be modified after submission. The subject will become the only legal subject and contracting party for you to use the services and functions of the WeChat public platform, and it shall not be changed or modified when subsequently opening other business functions.
#If everything is OK, you can directly enter the mini program management platform. If the direct jump fails, you can also log in manually from the WeChat public platform. Fill in the basic information of the mini program, including name, icon, description, etc. After the submission is successful, add the developer. The developer is the administrator by default. We can also add and bind developers from here. This is an operation that only administrators have permission to do.
Then click "Settings" on the left navigation bar, find the development settings, and obtain the AppID of the mini program.
WeChat Developer Tools
Download the WeChat web developer tools and download the corresponding installation package according to your operating system to install it.
Open the developer tools, use WeChat to scan the QR code to log in to the developer tools, and prepare to develop your first small program!
The first mini program
New project
Open the developer tools, select "Mini Program Project", click " " in the lower right corner to create a new project project.
Select an empty folder as the project directory, fill in the AppID just now, and then fill in a project name, for example, it is called GoZeroWaster here. Click "OK" to enter the main interface of the tool.
Project directory structure
The basic file structure and project directory structure of the WeChat applet are described as follows:
    .
    ├── app.js     # 小程序的逻辑文件
    ├── app.json   # 小程序的配置文件
    ├── app.wxss   # 全局公共样式文件
    ├── pages      # 存放小程序的各个页面
    │   ├── index  # index页面
    │   │   ├── index.js     # 页面逻辑
    │   │   ├── index.wxml   # 页面结构
    │   │   └── index.wxss   # 页面样式表
    │   └── logs   # logs页面
    │       ├── logs.js      # 页面逻辑
    │       ├── logs.json    # 页面配置
    │       ├── logs.wxml    # 页面结构
    │       └── logs.wxss    # 页面样式表
    ├── project.config.json
    └── utils
        └── util.js
Copy after login
Root directory There are three files below: app.js, app.json, and app.wxss. The mini program must have these three files describing the APP and place them in the root directory. These three are application-level files, and parallel to them there is a pages folder, which is used to store each page of the mini program.
We can make an analogy with web front-end development technology:
- wxml is similar to an HTML file, used to write the tags and skeleton of the page, but only Components that can be encapsulated by small programs;
- wxss is similar to CSS files, used to write page styles, but the css files are replaced by wxss files;
- js files are similar to front-end programming The JavaScript file is used to write the page logic of the mini program; the
- json file is used to configure the style and behavior of the page.
Target results
Let’s take a look at the final goals and results first. It’s very simple. There are two pages in total:
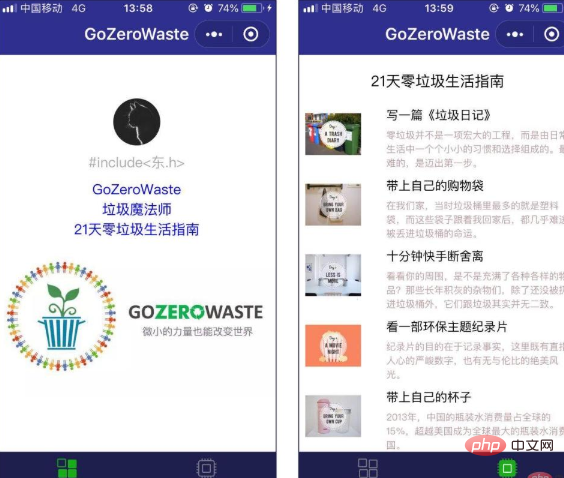
(In order to allow programmers to protect the environment and love life, I specially chose the theme of "zero waste life" to do the demo)
Step breakdown
Demo code download: https:// gitee.com/luhuadong/Web_Learning/tree/master/WeChat/GoZeroWaster
Decompose target results:
- Personal Center
- Life Guide
- Simulation pop-up window
- Preview image
Header and Footer
In the preview of the target results, we can see that both pages have common parts - the header and the footer. So before building the page content, we first process the header and footer. We can easily guess that these two parts belong to the global configuration of the mini program, so the app.json file needs to be modified.
The initial content is as follows:
    {
        "pages":[
            "pages/index/index",
            "pages/logs/logs"
        ],
        "window":{
            "backgroundTextStyle": "light",
            "navigationBarBackgroundColor": "#fff",
            "navigationBarTitleText": "WeChat",
            "navigationBarTextStyle": "balack"
        }
}The pages attribute is used to set the page path. It is an array, and each item is a string to specify which pages the mini program consists of. The first item in the array represents the initial page of the applet. Adding or reducing pages in the applet requires modifying the pages array.
The window property is used to set the status bar, navigation bar, title, and window background color of the mini program.
We modify the title and color of the header. We make a tab bar at the end of the page to switch pages. This attribute is called tabBar. The code is as follows:
{
  "pages":[
    "pages/index/index",
    "pages/logs/logs"
  ],
  "window":{
    "backgroundTextStyle":"light",
    "navigationBarBackgroundColor": "#2f2f8f",
    "navigationBarTitleText": "GoZeroWaste",
    "navigationBarTextStyle":"white"
  },
  "tabBar":{
    "color": "#bfc1ab",
    "selectedColor": "#13b11c",
    "backgroundColor": "#1f1f4f",
    "list": [
      {
        "pagePath": "pages/index/index",
        "iconPath": "image/icon_component.png",
        "selectedIconPath": "image/icon_component_HL.png",
        "text": "个人中心"
      },
      {
        "pagePath": "pages/details/details",
        "iconPath": "image/icon_API.png",
        "selectedIconPath": "image/icon_API_HL.png",
        "text": "生活指南"
      }
    ]
}}(the pictures used are placed In the image directory of the project, you can also use your own pictures)
The properties of several tabBar used here are color, selectedColor, backgroundColor and list. List is an array, mainly used to set the navigation path. .
CTRL S After saving, the simulator will automatically refresh and you can see the effect immediately.
个人中心
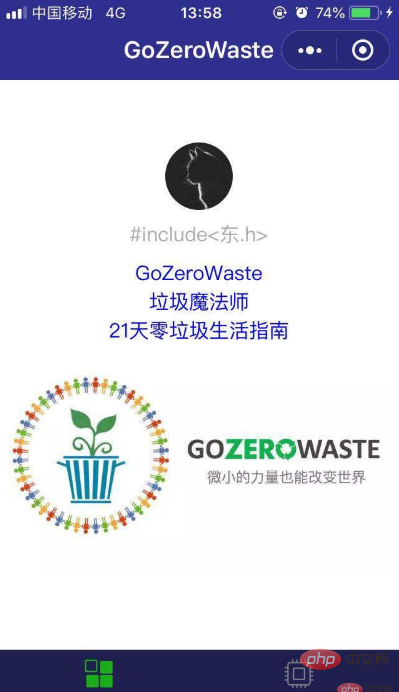
简单起见,我们就在 pages/index 目录下实现 “个人中心” 页面好了。双击打开 index.wxml,初始内容如下:
    <!--index.wxml-->
    <view>
      <view>
        <button> 获取头像昵称 </button>
        <block>
          <image></image>
          <text>{{userInfo.nickName}}</text>
        </block>
      </view>
      <view>
        <text>{{motto}}</text>
      </view>
</view>这里已经有一些代码了,虽然现在可能还看不懂,但我们知道,这就是现在页面的源代码。我们把 “Hello World” 部分注释掉,增加我们希望显示的内容:
<!--index.wxml--><view>
  <view>
    <button> 获取头像昵称 </button>
    <block>
      <image></image>
      <text>{{userInfo.nickName}}</text>
    </block>
  </view>
   <!-- <view class="usermotto">
    <text class="user-motto">{{motto}}</text>
  </view>  -->
  <view>
    <view>
      <text>{{company}}</text>
    </view>
    <view>
      <text>{{position}}</text>
    </view>
    <view>
      <text>{{lesson}}</text>
    </view>
</view></view>这里分别使用 {{company}}、{{position}} 和 {{lesson}} 作为占位符,用法类似于 Django 的模板语言。当然也可以直接用相应的字符来替换它,只不过我们想沿用 {{motto}} 的做法,让你知道在哪里修改这些数据。没错,就是在 index.js 文件:
Page({
  data: {
    motto: 'Hello World',
    company: "GoZeroWaste",
    lesson: "21天零垃圾生活指南",
    position: "垃圾魔法师",
    /* ... */
}wxml 文件中的 <view></view> 组件类似于网页开发中的 <p></p>,而 <text></text> 组件是用来写文本的,需要注意的是 <text></text> 组件内只支持 <text></text> 嵌套。当然,可用用 <image></image> 插入图片,图片要保存到 image 目录,否则在测试的时候是无法上传的。
    <view>
        <!-- 省略 -->
        <view>
          <text>{{lesson}}</text>
        </view>
        <view>
          <image></image>
        </view>
</view>mode=‘widthFix’ 表示以宽度不变,高度自动变化,保持原图宽高比不变的方式进行缩放以适应屏幕大小。
接下来还需要修改 index.wxss 文件来设置样式:
/**index.wxss**/.userinfo {
  display: flex;
  flex-direction: column;
  align-items: center;}.userinfo-avatar {
  width: 128rpx;
  height: 128rpx;
  margin: 20rpx;
  border-radius: 50%;}.userinfo-nickname {
  color: #aaa;}.usermotto {
  margin-top: 200px;}.ID_Badge {
  padding-top: 20rpx;
  color: blue;}.ID_info {
  display: flex;
  flex-direction: column;
  align-items: center;}.pics {
width: 400rpx;}保存刷新,“个人中心” 页面就完成了。
生活指南
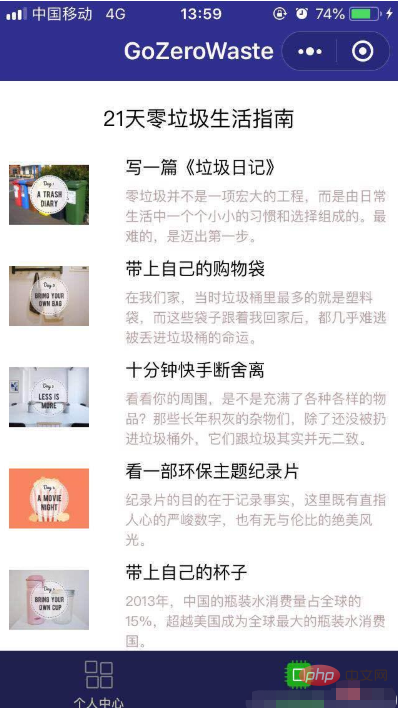
原来的项目中 pages 目录下只有 index 和 logs 两个目录,因此我们还需要为第二个页面创建一个目录。
创建页面有两种方法:
- 在目录结构的 pages 图表上,新建目录,然后在目录下逐一创建页面构成文件
- 在 app.json 下,直接添加
建议采用第二种方法,修改 app.json 文件:
    {
      "pages":[
        "pages/index/index",
        "pages/logs/logs",
        "pages/details/details"
]保存刷新之后就会发现,目录结构里自动创建了这一页。对应的,也要修改 app.json 中的 tabBar 的链接(实际上我们已经做了):
    	{
            "pagePath": "pages/details/details",
            "iconPath": "image/icon_API.png",
            "selectedIconPath": "image/icon_API_HL.png",
            "text": "生活指南"
}然后修改 details.wxml 设置这一页的标题:
    <!--pages/details/details.wxml-->
    <view>
      <view>
        <text>21天零垃圾生活指南</text>
      </view>
    </view>
修改 details.wxss 设置样式:
    /* pages/details/details.wxss */
    .title {
      display: flex;
      flex-direction: column;
      align-items: center;
      margin-top: 40rpx;
      margin-bottom: 40rpx;
      font-size: 40rpx;
}这个页面是一个列表展示的页面,我们先在 details.js 文件中准备好数据:
// pages/details/details.jsPage({

  /**
   * 页面的初始数据
   */
  data: {
    showModalStatus: false,
    list: [
      {
        id: 0,
        name : "写一篇《垃圾日记》",
        introduce: "零垃圾并不是一项宏大的工程,而是由日常生活中一个个小小的习惯和选择组成的。最难的,是迈出第一步。",
        src: '../../image/day01.jpg',
        showModalStatus: false,
        catalog: [
          { section: "1. xxx" },
          { section: "2. xxx" },
          { section: "3. xxx" },
          { section: "4. xxx" },
        ]
      },
      {
        id: 1,
        name: "带上自己的购物袋",
        introduce: "在我们家,当时垃圾桶里最多的就是塑料袋,而这些袋子跟着我回家后,都几乎难逃被丢进垃圾桶的命运。",
        src: '../../image/day02.jpg',
        showModalStatus: false,
        catalog: [
          { section: "1. xxx" },
          { section: "2. xxx" },
          { section: "3. xxx" },
          { section: "4. xxx" },
        ]
      },
      /* 省略 */
    ]
}接下来我们要使用列表渲染(wx:for)的方法将这些数据绑定一个数组,并在页面上重复渲染。修改 details.wxml 文件:
      <view>
        <view>
          <view>
            <image></image>
            <view>{{item.name}}</view>
            <view>{{item.introduce}}</view>
          </view>
        </view>
</view>默认数组的当前项的下标变量名默认为 index,数组当前项的变量名默认为 item。
修改 details.wxss 文件添加样式:
    .lesson {
      height: 190rpx;
      padding-left: 20rpx;
    }

    .lessonPic {
      position: absolute;
      height: 150rpx;
      width: 150rpx;
    }

    .lessonName {
      position: absolute;
      margin-left: 220rpx;
      font-size: 35rpx;
    }

    .lessonIntroduce {
      position: absolute;
      margin-left: 220rpx;
      margin-top: 60rpx;
      margin-right: 20rpx;
      color: rgb(185, 161, 161);
      font-size: 28rpx;
}好啦,第二个页面也完成了。
模拟弹窗
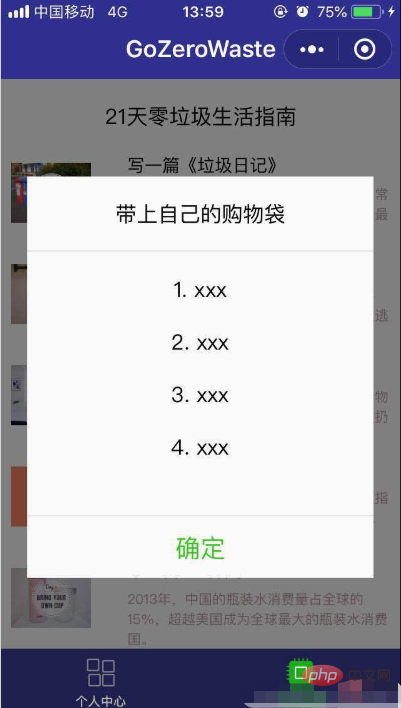
接下来我们要在 “生活指南” 页面模拟一个弹窗的效果,正常的时候不显示,只有在点击的时候才出现,摁下面的 “确定” 就会消失。
完了实现这个功能,我们要在组件中绑定一个事件处理函数 bindtap,点击该组件的时候,小程序会在该页面对应的 Page 中找到相应的事件处理函数。
我们先在 details.js 中为每一列数据里引入一个 boolean 变量 showModalStatus 来描述对应的弹窗状态,并且初始值为 false,表示不显示。同时外层也增加一个初始值为 false 的 showModalStatus 变量实现遮罩效果。如下:
       data: {
        showModalStatus: false,
        list: [
          {
            id: 0,
            name : "写一篇《垃圾日记》",
            introduce: "零垃圾并不是一项宏大的工程,而是由日常生活中一个个小小的习惯和选择组成的。最难的,是迈出第一步。",
            src: '../../image/day01.jpg',
            showModalStatus: false,
            catalog: [
              { section: "1. xxx" },
              { section: "2. xxx" },
              { section: "3. xxx" },
              { section: "4. xxx" },
            ]
}然后在 details.wxml 中插入弹窗,并用条件渲染(wx:if)来判断是否渲染(显示)弹窗。同时为每一个 item 添加 data-statu 来表示弹窗的状态。如下:
  <view>
    <view>
      <view>
        <image></image>
        <view>{{item.name}}</view>
        <view>{{item.introduce}}</view>
      </view>

      <!-- 弹窗 -->
      <view>
        <view>{{item.name}}</view>
        <view>
          <view>
            {{catalog.section}}          </view>
        </view>
        <!-- 确定按钮 -->
        <view>确定</view>
      </view>
    </view>

    <!-- 遮罩层 -->
    <view></view>
</view>在 details.js 添加 powerDrawer 事件处理,包括显示和关闭事件:
      powerDrawer: function (e) {
        console.log("clicked");

        var currentStatu = e.currentTarget.dataset.statu;
        var index = e.currentTarget.id;

        // 关闭
        if (currentStatu == 'close') {
          this.data.list[index].showModalStatus = false;
          this.setData({
            showModalStatus: false,
            list: this.data.list,
          });
        }

        // 显示
        if (currentStatu == 'open') {
          this.data.list[index].showModalStatus = true;
          this.setData({
            showModalStatus: true,
            list: this.data.list,
          });
        }
},最后在 details.wxss 设置一下弹窗和遮罩层的样式:
    .drawer_box {
      width: 650rpx;
      overflow: hidden;
      position: fixed;
      top: 50%;
      z-index: 1001;
      background: #FAFAFA;
      margin: -150px 50rpx 0 50rpx;
    }

    .drawer_content {
      border-top: 1.5px solid #E8E8EA;
      height: 210px;
      overflow-y: scroll; /* 超出父盒子高度可滚动 */
    }

    .btn_ok {
      padding: 10px;
      font: 20px "microsoft yahei";
      text-align: center;
      border-top: 1.5px solid #E8E8EA;
      color: #3CC51F;
    }

    .drawer_screen {
      width: 100%;
      height: 100%;
      position: fixed;
      top: 0;
      left: 0;
      z-index: 1000;
      background: black;
      opacity: 0.5;
      overflow: hidden;
}OK,模拟弹窗也实现了。
预览图片

最后一步就是在第一个页面实现图片预览和图片保存的功能,在 index.wxml 中为图片添加一个点击事件 previewImage。
<image></image>
在 index.js 中添加 imgalist 项(我们直接把公众号的二维码图片上传到 CSDN 的图片服务器了),并且实现 previewImage 事件处理。如下:
    Page({
      data: {
        motto: 'Hello World',
        company: "GoZeroWaste",
        lesson: "21天零垃圾生活指南",
        position: "垃圾魔法师",
        imgalist: ['https://img-blog.csdnimg.cn/20190109104518898.jpg'],
        userInfo: {},
        hasUserInfo: false,
        canIUse: wx.canIUse('button.open-type.getUserInfo')
      },
      previewImage: function (e) {
        wx.previewImage({
          current: this.data.imgalist,  // 当前显示图片的http链接
          urls: this.data.imgalist      // 需要预览的图片http链接列表
        })
},大功告成,点击开发者工具中的 “预览”,使用微信扫描生成的二维码即可在手机端查看。
教程就到这里,希望大家可以对微信小程序有所了解。
本文转自:https://luhuadong.blog.csdn.net/article/details/86181251
推荐教程:《微信小程序》
The above is the detailed content of Get started with WeChat applet development in eight minutes. For more information, please follow other related articles on the PHP Chinese website!

Hot AI Tools

Undresser.AI Undress
AI-powered app for creating realistic nude photos

AI Clothes Remover
Online AI tool for removing clothes from photos.

Undress AI Tool
Undress images for free

Clothoff.io
AI clothes remover

AI Hentai Generator
Generate AI Hentai for free.

Hot Article

Hot Tools

Notepad++7.3.1
Easy-to-use and free code editor

SublimeText3 Chinese version
Chinese version, very easy to use

Zend Studio 13.0.1
Powerful PHP integrated development environment

Dreamweaver CS6
Visual web development tools

SublimeText3 Mac version
God-level code editing software (SublimeText3)

Hot Topics
 1385
1385
 52
52

