Understanding the usage of PHP yield coroutine generator

Written before
In this article, I want to discuss with you the usage of PHP yield in the generator without foreach , for, while kind of loop. Let’s discuss the use of yield to turn a function into a generator.
Regarding the
yieldfeature, it was put on the agenda when developingPHP5, and thePHP5.5version was officially added.
Regarding the use of yield, I see that most of the articles are stuck on how to use yield to wear out in foreach Data, today I want to tell you all the syntax of generators.
Related learning recommendations: PHP programming from entry to proficiency
Official website explanation
Generator Allows you to write code in a foreach block to iterate over a set of data without creating an array in memory, which would hit your memory limit or take up considerable processing time. Instead, you can write a generator function, just like a normal custom function. Unlike a normal function that only returns once, the generator can yield as many times as needed to generate the iteration that needs to be value.
Looked at the official website and explained to him: php.net generator syntax. I knew every word, but I still seemed to understand the connotation of it. On the official website, we mainly look at two parts: the syntax of
yield.Code example.
Let’s talk about the syntax first. The left side of yield is an assignment statement, and the right side can be a value (or expression). Yield will first execute the expression on the right and send the value $value to the outside of the generator. When the generator receives the value, it will execute the statement to the left of yield and assign the value to $data.
<?phpfunction func(){
$data = (yield [$express]);}The syntax is like this. I guess everyone is still a little confused, so take a look at the code example below on the official website. I’ll look inside. Examples are mixed.
Pay attention to the layer of parentheses wrapped around yield. If it is in php5.5, the priority of $express on the right is judged, and may be lower than the assignment statement of $data on the left. So use yield in php5. The right side of yield is an operable expression, and the left side needs to accept returns and assign values, so this bracket is necessary. This problem will not occur in php7.
Learn it through examples
Whether learning human language or computer language, it all starts with imitation
For a description in human language, it is not so clear, so let me tell you through examples what it can and cannot do.
I have put the relevant code on gitee. I hope you can copy it to your local environment and run it yourself to experience it, which will help you understand the following content.
git clone gitee.com/xupaul/PHP-generator-yie...
How to generate Generator
First define a function, write the yield keyword in the function, and assign this function call to a variable. A generator is generated.
The code /php-yield-test/yieldFunctions.php is a generator that defines multiple generators according to different syntax combinations.
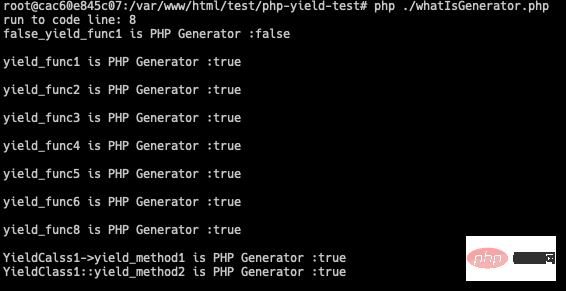
Test code /php-yield-test/whatIsGenerator.php, used to check which functions can form a generator and which cannot. The running result is as follows

- The function must contain the
yieldkeyword. The function can be a full play function or a class method. - Even if
yieldwill definitely not be executed, a generator will be generated. See: yield_func4 - The bare
yieldkeyword will do (no sending out, no processing of external input). See: yield_func2 - Using a generator within a function does not make itself a generator, see: yield_func5
- directly running
yieldin the eval function will report an error, see: yield_func11
Yes, it doesn’t matter whether there are foreach, while, or for statements in the function. The key is yield. Use
$gen instanceof Generator# to determine the type of the generator.
##Generator functions
Generator objects are returned from generators.Generator objects cannot be instantiated through new.
- Generator::current — 返回当前产生的值
- Generator::key — 返回当前产生的键
- Generator::next — 生成器继续执行
- Generator::rewind — 重置迭代器
- Generator::send — 向生成器中传入一个值
- Generator::throw — 向生成器中抛入一个异常
- Generator::valid — 检查迭代器是否被关闭
- Generator::__wakeup — 序列化回调
- Gengerator::getReturn - Get the return value of a generator
摘自 php.net generator
看着以上方法,是不想起了
Iterator, 他们的确很像。同时注意,官网zh语言版本的文档没有索引方法getReturn,访问也是404。文档以en版为准,ch做参考。
以上就是生成器所有的方法,我们一个个来看。
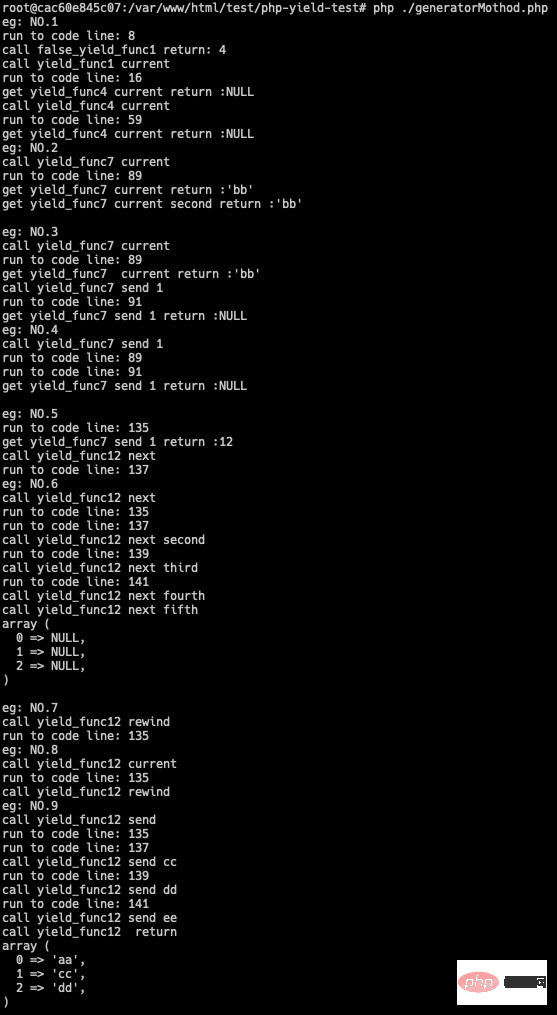
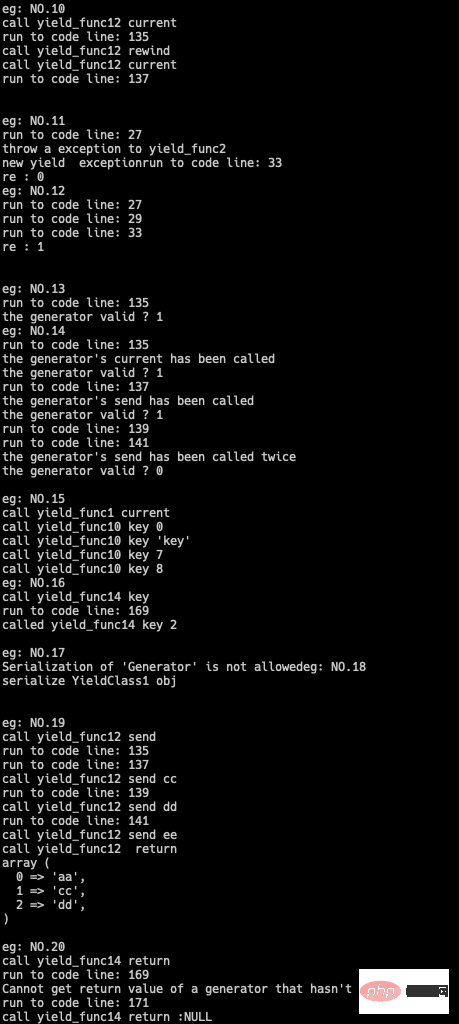
测试方法代码 /php-yield-test/generatorMothod.php, 这里面对每个方法都有使用举例,运行结果如下。


好接下来对举例做个一一讲解。
Generator::current
- 返回当前产生的值
<?phpfunction yield_func(){
yield 12;
return 'a';}$gen = yield_func();$re = $gen->current();echo 'current return : ' . $re;输出:
current return : 12
看到 php-yield-test/generatorMothod.php 代码。
通过第一个代码事例,可得,对一个generator调用current方法,才算真正开始执行。执行到yield为止。如果不能命中yield,则执行到函数结束。
非generoator会立马执行并得到结果,而非一个生成器对象。
通过例子2,调用current一次,两次呢,第一次可以看到代码执行日志,第二次,只是把上一次的结果返回给我们而已,并不是让该生成器重新执行。
通过例子1,调用该函数还会获取到返回值,返回的内容就是 yield 表达式左边的内容。如果表达式无内容,则是NULL.
Generator::send
- 向生成器
yield点中传入一个值,并返回下一次current值。
<?phpfunction yield_func(){
$data = yield 12;
echo 'get yield data: ' . $data;
return 'a';}$gen = yield_func();$re = $gen->current();$gen->send(32);输出:
get yield data: 32
例子3,是一个current,send的常规调用。调用current代码运行yield等到用户send输入参数。接收到输入后,继续运行。current能够接收到yield弹出的值,send返回值为空。
例子4,直接调用send,相当于调用current,send。不过current的返回值,并不会通过send传给用户。
例子21中,可以看到直接调用send(1),会运行生成器,并向第一个yield处输入1,继续运行至下一个yield的返回值value。所以,$gen->send(2),和 $gen->current() 结果都是同一个值。
也就是说:跳过current,直接调用send,会丢失第一次yield的弹出值。
Generator::next
- 跳过中断,并让生成器继续执行
<?phpfunction yield_func(){
echo 'run to code line: ' . __LINE__ . PHP_EOL;
yield;
echo 'run to code line: ' . __LINE__ . PHP_EOL;
return $result;}$gen = yield_func();$gen->current();echo 'current called' . PHP_EOL;$gen->next();输出:
run to code line: 4current called
run to code line: 6
例子5,这是一个较为常规的调用,调用current代码运行yield等到用户输入,这是调用next跳过,让代码继续运行。
例子6,直接调用next,相当于调用current,next。而且通过最后打印$result, 我们发现怎么有点像在调用 $gen->send(NULL);。
Generator::rewind
- 重置迭代器
<?phpfunction yield_func(){
echo 'run to code line: ' . __LINE__ . PHP_EOL;
$result = yield 12;
echo 'run to code line: ' . __LINE__ . PHP_EOL;}$gen = yield_func();echo 'call yield_func rewind ' . PHP_EOL;$gen->rewind();输出:
call yield_func rewind
run to code line: 4
例子7,8 中,发现调用该方法,会导致隐式调用current。
例子9 中,发现在执行过一个yield代码段后,再次调用该方法,会导致报错(哪怕该 生成器已结束)。
Generator::throw
- 向生成器中抛入一个异常
<?phpfunction yield_func(){
try {
$re = yield 'exception';
} catch (Exception $e) {
echo 'catched exception msg: ' .$e->getMessage();
}}$gen = yield_func();$gen->throw(new \Exception('new yield exception'));输出:
catched exception msg: new yield exception
通过以上简单的例子可得,throw 就是让yield这行代码产生异常,让外面的try catch 捕获我们生成的那个异常。
例子11中,构造生成器,并调用current方法,运行到yield处,再调用throw,就能捕获到异常。
例子12中,当调用send方法,跳过函数内yield代码时,再调用throw传入异常,就没法捕获了。
Generator::valid
- 检查迭代器是否被关闭
<?phpfunction yield_func(){
yield 12;
return 'a';}$gen = yield_func();$gen->send(1);$check = $gen->valid();echo 'the generator valid ? ' . intval($check);输出:
the generator valid ? 0
例子12中,发现current被隐式调用。
例子13中,可得,当生成器运行到yield代码段时,用valid函数检查,都会返回true。
所以,别问我是否已运行,问就是运行。该方法用来获取是否关闭状态,不是 是否运行状态!运行到底,运行到return就是 关闭状态。
Generator::key
- 返回当前产生的键
<?phpfunction yield_func(){
yield 1 => 'abc';}$gen = yield_func();echo 'value is :' . $gen->current() . PHP_EOL;echo 'key is: ' . $gen->key() . PHP_EOL;输出:
value is :abc
key is: 1
从以上例子中,可得yield可显示设置返回的key.
例子15 中,发现key的分发规律和PHP数组键值发放策略是差不多的,默认从0开始,未指定则是以上一个数字key+1作为当前的key.
例子16 中,我们又发现current被隐式调用。
Generator::__wakeup
- Generator::__wakeup — 序列化回调
<?phpfunction yield_func(){
yield 1 => 'abc';}$gen = yield_func();try {$ser = serialize($gen);} catch (\Exception $e) {
print_r($e->getMessage());}输出:
Serialization of 'Generator' is not allowed
这是一个魔术方法,见 PHP 魔术方法,也就是说 生成器 不能被序列化成一个字符串。
例子17就不用说了,看下例子18,看样子序列化成功了。也就是说一个生成器做为一个方法可以被序列化,当函数变成生成器时,就不能被序列化了。
Generator::getReturn
<?phpfunction yield_func(){
yield 1 => 'abc';
return 32;}$gen = yield_func();$gen->send(0);echo 'call yield_func return, and get: ' . $gen->getReturn();输出:
call yield_func return, and get: 32
该函数就是获取生成器最后的返回值。如果没有return语句,或者没有执行到return语句,调用该函数得到的就是NULL。
例子19 可得,getReturn 能够获取到生成器最后的返回值。
例子19、20 可得,当生成器没有执行到return语句,或者没有执行到最后时,调用getReturn是会导致报错。
综上所述
到这里,我们就发现rewind,next 和 __wakeup 这两个函数感觉没啥叼用呢,为啥还存在呢,因为Generator继承Iterator,自然就有了rewind, next方法,PHP 虽然支持方法覆盖,但子类的访问修饰符 不能缩紧,所以Generator只能重写这两个方法。 __wakeup 继承自 stdClass。
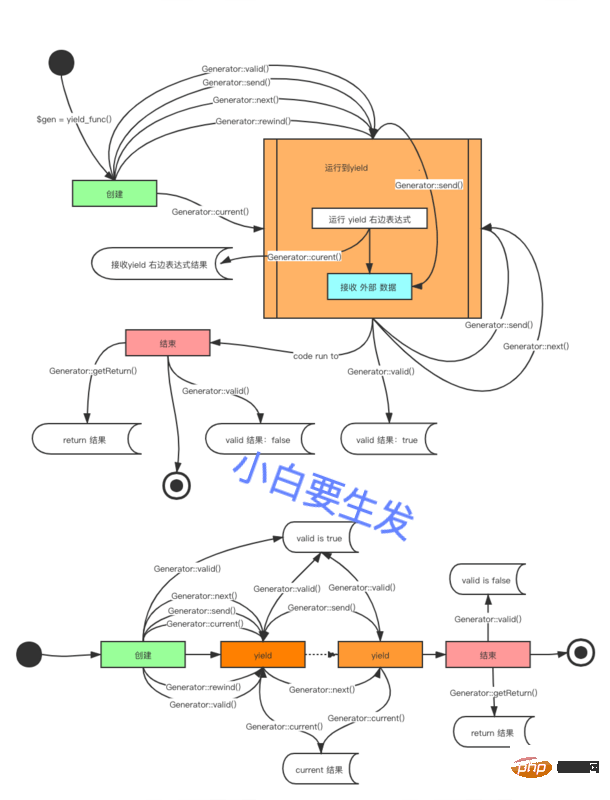
状态转换
看图:
PHP yield 生命周期图
画了两个状态转换图,上面的要细致,繁复一点。下面的精简版,便于快速理解。
总结
以上就是关于 PHP 生成器的基础内容,希望你看了后对它有更进一步认识。下一讲,我们手把手一起来做一个任务调度器,实战一下。
有问题欢迎提问,谢谢大家!

The above is the detailed content of Understanding the usage of PHP yield coroutine generator. For more information, please follow other related articles on the PHP Chinese website!

Hot AI Tools

Undresser.AI Undress
AI-powered app for creating realistic nude photos

AI Clothes Remover
Online AI tool for removing clothes from photos.

Undress AI Tool
Undress images for free

Clothoff.io
AI clothes remover

AI Hentai Generator
Generate AI Hentai for free.

Hot Article

Hot Tools

Notepad++7.3.1
Easy-to-use and free code editor

SublimeText3 Chinese version
Chinese version, very easy to use

Zend Studio 13.0.1
Powerful PHP integrated development environment

Dreamweaver CS6
Visual web development tools

SublimeText3 Mac version
God-level code editing software (SublimeText3)

Hot Topics
 CakePHP Project Configuration
Sep 10, 2024 pm 05:25 PM
In this chapter, we will understand the Environment Variables, General Configuration, Database Configuration and Email Configuration in CakePHP.
 PHP 8.4 Installation and Upgrade guide for Ubuntu and Debian
Dec 24, 2024 pm 04:42 PM
PHP 8.4 brings several new features, security improvements, and performance improvements with healthy amounts of feature deprecations and removals. This guide explains how to install PHP 8.4 or upgrade to PHP 8.4 on Ubuntu, Debian, or their derivati
 CakePHP Date and Time
Sep 10, 2024 pm 05:27 PM
To work with date and time in cakephp4, we are going to make use of the available FrozenTime class.
 CakePHP File upload
Sep 10, 2024 pm 05:27 PM
To work on file upload we are going to use the form helper. Here, is an example for file upload.
 CakePHP Routing
Sep 10, 2024 pm 05:25 PM
In this chapter, we are going to learn the following topics related to routing ?
 Discuss CakePHP
Sep 10, 2024 pm 05:28 PM
CakePHP is an open-source framework for PHP. It is intended to make developing, deploying and maintaining applications much easier. CakePHP is based on a MVC-like architecture that is both powerful and easy to grasp. Models, Views, and Controllers gu
 CakePHP Creating Validators
Sep 10, 2024 pm 05:26 PM
Validator can be created by adding the following two lines in the controller.
 CakePHP Working with Database
Sep 10, 2024 pm 05:25 PM
Working with database in CakePHP is very easy. We will understand the CRUD (Create, Read, Update, Delete) operations in this chapter.


