How to set the header to the title of each chapter
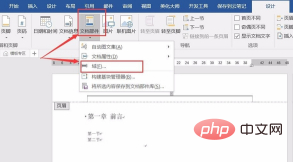
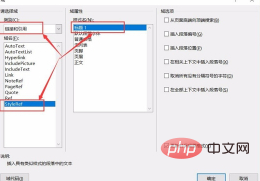
How to set the header as the title of each chapter: 1. Set the content of all chapters in the document as title 1; 2. Double-click the header to enter the header editing mode; 3. Click [Design] ], [Document Parts], [Field]; 4. Select [Links and References], [Title 1], and click [OK].

First, set the content of all chapters in the document to title 1;

Then, double-click Header part, enter header editing mode. Click Design, Document Parts, and Domains in sequence;

Then, the Domain dialog box will pop up, select "Links and References" in the category drop-down menu, then click StyleRef, and Select Title 1 in the style name on the right and click OK.

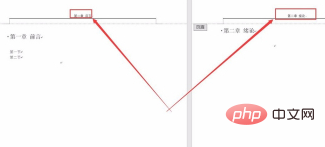
#Finally, we can see that the content of the corresponding chapter in the header part has been automatically generated.

The above is the detailed content of How to set the header to the title of each chapter. For more information, please follow other related articles on the PHP Chinese website!

Hot AI Tools

Undresser.AI Undress
AI-powered app for creating realistic nude photos

AI Clothes Remover
Online AI tool for removing clothes from photos.

Undress AI Tool
Undress images for free

Clothoff.io
AI clothes remover

Video Face Swap
Swap faces in any video effortlessly with our completely free AI face swap tool!

Hot Article

Hot Tools

Notepad++7.3.1
Easy-to-use and free code editor

SublimeText3 Chinese version
Chinese version, very easy to use

Zend Studio 13.0.1
Powerful PHP integrated development environment

Dreamweaver CS6
Visual web development tools

SublimeText3 Mac version
God-level code editing software (SublimeText3)

Hot Topics
 1386
1386
 52
52
 How to remove headers and footers in Excel
Feb 18, 2024 pm 05:52 PM
Excel is a powerful spreadsheet software that is often widely used in office work and data processing. In Excel, each worksheet can contain header and footer content, which are used to display some additional information on the printed page, such as company name, file path, page number, etc. However, sometimes we may need to delete or modify headers and footers. This article will introduce how to delete headers and footers in Excel. In Excel, deleting headers and footers is very simple, users only need to follow these steps: Step 1:
 How to remove header and footer in Word?
Feb 26, 2024 am 10:00 AM
In this post, we will show you how to remove document headers and footers in Microsoft Word. How to remove header and footer in Word? Here are the different ways to remove headers and footers from a document in Microsoft Word: Use the Remove Header/Remove Footer function. Use the Delete key to clear all headers and footers from the document. Use the "Inspect Document" feature to remove headers and footers. Use VBA script to remove header and footer. 1] Use the Remove Header/Delete Footer function To remove headers and footers from selected pages of the active document, you can take advantage of the dedicated options provided by Word. These options include Remove Header and Remove Footer functionality. Using these features is very simple: First, open the source text
 Practical Word skills sharing: setting, deleting, lengthening and shortening header horizontal lines
Aug 16, 2022 am 10:15 AM
In the previous article "Sharing Practical Word Tips: How to Set the Size of the Page, Page Center, Header and Footer", we learned how to set the page size, page center size, header and footer. Today we will talk about the tips for setting up headers and footers in Word. We will look at how to set up headers and footers in Word, how to delete horizontal header lines in Word, how to lengthen and shorten horizontal header lines in Word, etc.
 How to delete header in WPS document
Mar 20, 2024 pm 12:25 PM
We always use WPSOffice in our daily work, which includes three categories: documents, tables, and presentations. We often set fonts, modify page sizes, find and replace, and delete headers and footers for documents. wait. The most popular thing recently is how to delete the header in WPS. In this issue, I will share with you the specific steps. You can study it carefully. Come and take a look! 1. First, open the file from which you want to delete the header. Then, find the [Menu Bar] at the top of the page and click the [Insert] option. Subsequently, the menu bar at the bottom of the page will switch to the new page. Then click the [Header and Footer] option below Insert, as shown in the red circle in the picture. 3. Next, a new menu bar is replaced, continue clicking
 How to remove the horizontal line from the header in word, how to remove the horizontal line from the header in word
Mar 04, 2024 am 10:13 AM
Word is a commonly used office software. Word provides a wealth of document editing functions, including text input, format adjustment, table creation, chart insertion, etc. When using Word to edit a document, it is easy to overlook some details, making the entire page look unsightly, such as extra horizontal lines in the Word header. In order to make the page look more beautiful, I want to remove the horizontal lines in the header, but I don't know how to do it. So how to remove the horizontal lines from the header in Word? Next, let’s learn the practical operation of removing the horizontal lines from the header in Word. How to remove horizontal lines from the header in Word. The specific steps to remove horizontal lines from the header in Word are as follows: 1. Double-click the header, and then click "Start". 2. Select the text in the header
 How to add header in excel
Mar 20, 2024 pm 12:16 PM
Excel tables can also set headers like word documents. However, many friends have not added headers in excel. Below, we will share how to add headers in excel. Let us learn together! 1. Turn on your computer, create and open an excel file. 2. After entering the main interface of the software, we enter data in the form, and then click [Page Layout] in the top menu. In [Page Settings] in the page layout menu bar, click the drop-down button below to enter the page setting main page. interface. 3. After entering the main page setting interface, we find and click the [Header/Footer] option above to enter the header/footer setting interface. 4. Below, set the header, click [Customize Header], and then
 Why did I change the header and footer all at once?
Feb 28, 2023 pm 02:34 PM
The reason for changing the entire header and footer is because WPS changes the header by default, so it must be changed separately and must be set separately. The setting method: 1. Open the word document and go to the page before the header that needs to be changed. At the end of the page, click "Insert->Break->Next Page Section Break"; 2. Double-click the header that needs to be modified, and click "Header and Footer->Cancel Same as Previous Section->Edit Header"; 3. , re-edit the header.
 How to remove page header
Jan 16, 2024 pm 02:54 PM
How to delete the header: 1. Delete the header text content directly, find the header location in the document, place the mouse over the header text content, press the left mouse button, select the text content, and press on the keyboard "Delete" or "Backspace" key to delete the selected text content. At this time, the header on the page will be deleted, but the position and format of the header will be retained; 2. Taking WPS 2019 version as an example, double-click the header/ For the footer, just delete the header and footer content. In the WPS Word document, you need to delete the header, footer, etc.


