Case Study PHP Web Form Builder

The examples in this article describe the PHP Web form generator. Share it with everyone for your reference, the details are as follows:
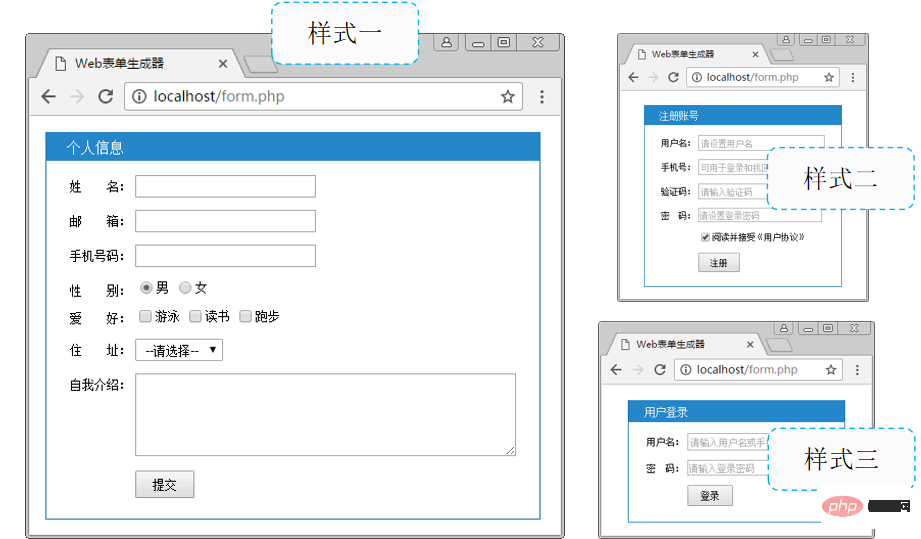
1. Example:
##Related learning recommendations:2. Requirements analysis
In the actual development of the project, it is often necessary to design various forms. Although it is simple to write HTML forms directly, it is relatively troublesome to modify and maintain. Therefore, you can use PHP to implement a Web form generator, so that you can customize forms with different functions according to specific needs. The specific implementation requirements are as follows:
- Use multi-dimensional arrays to save form-related information
- Supported form items include text boxes, text fields, radio boxes, check boxes and 5 types of drop-down lists
- Save the tag, prompt text, attributes, option values, default values, etc. of each form item
- Encapsulate the function into a function and generate the specified form based on the passed parameters
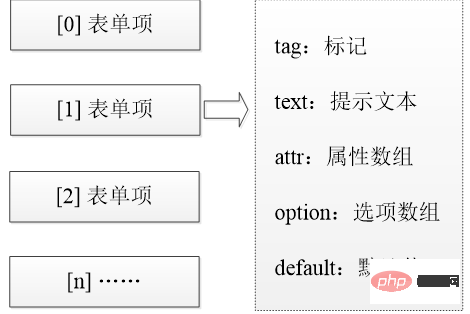
The storage form of data determines the way the program is implemented. Therefore, according to the above development requirements, each form item can be used as an array element, and each element is described by an associative array, which are: tag, prompt text, attribute array attr, option array option and default value. default.
The main function of the form: on the web page The area used to input information collects the information entered by the user and submits it to the back-end server for processing to realize the interaction between the user and the server. For example: shopping settlement, information search, etc. are all implemented through forms.
A complete form is composed of form fields and form controls. Among them, the form field is defined by the form tag and is used to collect and transfer user information.
<form action="form.php" method="post" enctype="multipart/form-data">
  <!-- 各种表单控件 -->
</form>
"

- The value of the action attribute can be an absolute path or a relative path. If this attribute is omitted, it means that it is submitted to the current file for processing.
-
The form passed by GET method is visible in the URL address bar.
Compared with the GET method, the data submitted by the POST method is invisible and relatively safe during interaction. Therefore, POST is usually used to submit form data. The default value of the enctype attribute is application/x-www-form-urlencoded, which means that all characters are encoded before sending the form data. In addition, it can also be set to multipart/form-data (POST mode) to indicate no character encoding, especially forms containing file uploads must use this value; set to text/plain (POST mode) to transmit ordinary text.
//input控件
<input type="text" name="user" value="test">	<!-- 文本框 -->
<input type="password" name="pwd" value="">		<!-- 密码框 -->
<input type="file" name="upload">     		<!-- 文件上传域 -->
<input type="hidden" name="id" value="2"> 		<!-- 隐藏域 -->
<input type="reset" value="重置">     		<!-- 重置按钮 -->
<input type="submit" value="提交">    		<!-- 提交按钮 -->
Copy after login
//input控件 <input type="text" name="user" value="test"> <!-- 文本框 --> <input type="password" name="pwd" value=""> <!-- 密码框 --> <input type="file" name="upload"> <!-- 文件上传域 --> <input type="hidden" name="id" value="2"> <!-- 隐藏域 --> <input type="reset" value="重置"> <!-- 重置按钮 --> <input type="submit" value="提交"> <!-- 提交按钮 -->
- Set different values for the type attribute to get different form controlsname attribute is used Specify the name of the control to distinguish multiple identical controls in the formThe value property is used to set the default value of the form control
//input控件
<!-- 单选框 -->
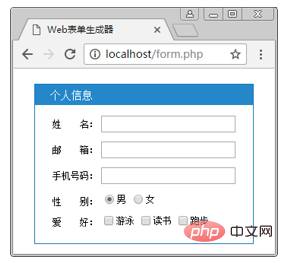
<input type="radio" name="gender" value="m" checked> 男
<input type="radio" name="gender" value="w"> 女
<!-- 复选框 -->
<input type="checkbox" name="hobby[]" value="swimming"> 游泳
<input type="checkbox" name="hobby[]" value="reading"> 读书
<input type="checkbox" name="hobby[]" value="running"> 跑步
- The checked property is used to set the default Selected items
//textarea控件
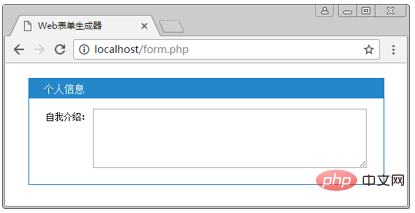
<textarea name="introduce" cols="5" rows="10">
<!-- 文本内容 -->
</textarea>
- The textarea control is suitable for self-evaluation, comments and other functions that may require input of a large amount of informationThe attributes cols and rows are used to define the height and width of the text area
//select控件
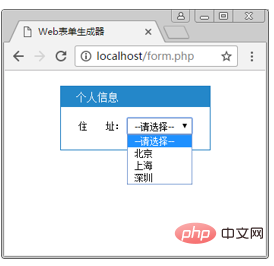
<select name="area">
  <option selected>--请选择--</option>
  <option value="Beijing">北京</option>
  <option value="Shenzhen">深圳</option>
  <option value="Shanghai">上海</option>
</select>
- select is the tag that defines the drop-down list option is the tag that defines the specific options in the drop-down list The selected attribute is used to set the default selected item
When writing form controls, in order to provide a better user experience, the input control is often used in conjunction with the label mark. Expand the selection of controls. For example, when selecting gender, click the prompt text "Male" or "Female", or select the corresponding radio button.
Use label tags to wrap radio buttons and prompt text, so that when you click the content in the label tag, the corresponding form control will be selected.
<label><input type="radio" name="gender" value="m">男</label>
<label><input type="radio" name="gender" value="w">女</label>
According to the demand analysis of the case, the relevant data of the form items are uniformly saved in a multi-dimensional array. Among them, numeric key names are used to distinguish different form items, and each form item is a two-dimensional associative array.
// 利用多维数组保存表单元素
[
  0 => [],	// 表单项---单选按钮
  1 => [],	// 表单项
  2 => [],	// 表单项---文本框
  3 => [],	// 表单项
  ……
];
// 每个表单项的数组结构
0 => [
  'tag' => '', 	// 标记----input、textarea、select
  'text' => '', 	// 提示文本----label标签内显示的内容
  'attr' => [],	// 属性数组----表单元素的属性,如type
  'option' => [], 	// 选项数组----单选框或复选框中的每个选项
  'default' => ''	// 默认值----默认值
],
//准备表单数组
// $elements数组保存整个表单
$elements = [
  0 => [],		// 第1个表单项数组
  1 => [],		// 第2个表单项数组
];
//文本框
0 => [
  'tag' => 'input',
  'text' => '姓  名:',
  'attr' => ['type' => 'text', 'name' => 'user']
],
//单选框
3 => [
  'tag' => 'input',
  'text' => '性  别:',
  'attr' => ['type' => 'radio', 'name' => 'gender'],
  'option' => ['m' => '男', 'w' => '女'],
  'default' => 'm'
 ],
option uses an associative array to save specific radio options. The key names m and w are the value attributes of the radio button, and the corresponding values "male" and "female" are the single options. Option prompt informationThe value of default is a key name in the option associative array, indicating which item is selected by default
//复选框
4 => [
  'tag' => 'input',
  'text' => '爱  好:',
  'attr' => ['type' => 'checkbox', 'name' => 'hobby[]'],
  'option' => ['swimming' => '游泳', 'reading' => '读书', 'running' => '跑步'],
  'default' => ['swimming', 'reading']
],
//下拉列表
5 => [
  'tag' => 'select',
  'text' => '住  址:',
  'attr' => ['name' => 'area'],
  'option' => ['' => '--请选择--', 'BJ'=>'北京', 'SH'=>'上海', 'SZ'=>'深圳']
],
//文本域
6 => [
  'tag' => 'textarea',
  'text' => '自我介绍:',
  'attr' => ['name' => 'introduce', 'cols' => 50, 'rows' => 5]
],
//提交按钮
7 => [
  'tag' => 'input',
  'attr' => ['type' => 'submit', 'value' => '提交']
]
Implementation ideas
- In order to facilitate the processing of user-submitted data, each form item in $elements is merged with the specified array, so that each form item contains five keys: tag, text, attr, option and default. elements in the same order.
- According to the tag value, call the functions prefixed with "generate_" to splice the form items.
- Each form item occupies one line and returns the spliced form
2. Automatic generation of forms - splicing attributes of form elements
Implementation ideas
- Define the function generate_attr($attr, $items = '' ) used to complete the splicing of form element attributes
- The key of the element in the $attr array is the attribute name, and the value of the element is the value of the attribute
- Completes the splicing of attributes and $items by traversing and returns , such as type="radio" name="gender"
3. Automatic generation of forms - splicing input elements
Implementation ideas
- Determine whether it is single selection or multi-selection based on whether it contains option elements
- If not, directly call the attribute function to complete the splicing of form items
- If so, traverse in sequence Complete the splicing of multiple options and return

4. Automatic generation of forms - splicing select elements
Implementation ideas
- Options for splicing drop-down lists
- Complete the complete splicing of select tags and return

5. Automatic generation of forms - splicing textarea elements
Implementation ideas
- Splicing attributes of textarea elements
- Completely splice textarea and return

The above is the detailed content of Case Study PHP Web Form Builder. For more information, please follow other related articles on the PHP Chinese website!

Hot AI Tools

Undresser.AI Undress
AI-powered app for creating realistic nude photos

AI Clothes Remover
Online AI tool for removing clothes from photos.

Undress AI Tool
Undress images for free

Clothoff.io
AI clothes remover

AI Hentai Generator
Generate AI Hentai for free.

Hot Article

Hot Tools

Notepad++7.3.1
Easy-to-use and free code editor

SublimeText3 Chinese version
Chinese version, very easy to use

Zend Studio 13.0.1
Powerful PHP integrated development environment

Dreamweaver CS6
Visual web development tools

SublimeText3 Mac version
God-level code editing software (SublimeText3)

Hot Topics
 1378
1378
 52
52
 PHP 8.4 Installation and Upgrade guide for Ubuntu and Debian
Dec 24, 2024 pm 04:42 PM
PHP 8.4 brings several new features, security improvements, and performance improvements with healthy amounts of feature deprecations and removals. This guide explains how to install PHP 8.4 or upgrade to PHP 8.4 on Ubuntu, Debian, or their derivati
 How To Set Up Visual Studio Code (VS Code) for PHP Development
Dec 20, 2024 am 11:31 AM
Visual Studio Code, also known as VS Code, is a free source code editor — or integrated development environment (IDE) — available for all major operating systems. With a large collection of extensions for many programming languages, VS Code can be c
 7 PHP Functions I Regret I Didn't Know Before
Nov 13, 2024 am 09:42 AM
If you are an experienced PHP developer, you might have the feeling that you’ve been there and done that already.You have developed a significant number of applications, debugged millions of lines of code, and tweaked a bunch of scripts to achieve op
 How do you parse and process HTML/XML in PHP?
Feb 07, 2025 am 11:57 AM
This tutorial demonstrates how to efficiently process XML documents using PHP. XML (eXtensible Markup Language) is a versatile text-based markup language designed for both human readability and machine parsing. It's commonly used for data storage an
 Explain JSON Web Tokens (JWT) and their use case in PHP APIs.
Apr 05, 2025 am 12:04 AM
JWT is an open standard based on JSON, used to securely transmit information between parties, mainly for identity authentication and information exchange. 1. JWT consists of three parts: Header, Payload and Signature. 2. The working principle of JWT includes three steps: generating JWT, verifying JWT and parsing Payload. 3. When using JWT for authentication in PHP, JWT can be generated and verified, and user role and permission information can be included in advanced usage. 4. Common errors include signature verification failure, token expiration, and payload oversized. Debugging skills include using debugging tools and logging. 5. Performance optimization and best practices include using appropriate signature algorithms, setting validity periods reasonably,
 PHP Program to Count Vowels in a String
Feb 07, 2025 pm 12:12 PM
A string is a sequence of characters, including letters, numbers, and symbols. This tutorial will learn how to calculate the number of vowels in a given string in PHP using different methods. The vowels in English are a, e, i, o, u, and they can be uppercase or lowercase. What is a vowel? Vowels are alphabetic characters that represent a specific pronunciation. There are five vowels in English, including uppercase and lowercase: a, e, i, o, u Example 1 Input: String = "Tutorialspoint" Output: 6 explain The vowels in the string "Tutorialspoint" are u, o, i, a, o, i. There are 6 yuan in total
 Explain late static binding in PHP (static::).
Apr 03, 2025 am 12:04 AM
Static binding (static::) implements late static binding (LSB) in PHP, allowing calling classes to be referenced in static contexts rather than defining classes. 1) The parsing process is performed at runtime, 2) Look up the call class in the inheritance relationship, 3) It may bring performance overhead.
 What are PHP magic methods (__construct, __destruct, __call, __get, __set, etc.) and provide use cases?
Apr 03, 2025 am 12:03 AM
What are the magic methods of PHP? PHP's magic methods include: 1.\_\_construct, used to initialize objects; 2.\_\_destruct, used to clean up resources; 3.\_\_call, handle non-existent method calls; 4.\_\_get, implement dynamic attribute access; 5.\_\_set, implement dynamic attribute settings. These methods are automatically called in certain situations, improving code flexibility and efficiency.


