How to install and configure PHP+Nginx on Linux
How to install and configure PHP Nginx on Linux: first install PHP; then install Nginx; then Nginx and PHP complete data requests through the 9000 port of the machine; and finally complete the test.

Linux installation and configuration method of PHP Nginx:
1. PHP installation
1. Install php7.0
Software download # wget http://cn2.php.net/distributions/php-7.0.4.tar.gz
Check and install dependent packages
[root@ser3 Desktop]# rpm -qa libjpeg libjpeg-devel libpng libpng-devel freetype freetype-devel libxml2 curl-devel libxslt-devel openssl-devel
[root@ser3 Desktop]# yum -y install libjpeg libjpeg-devel libpng libpng-devel freetype freetype-devel libxml2 libxslt-devel openssl-devel
[root@ser3 Desktop]# tar xf php-7.0.4.tar.gz
[root@ser3 Desktop]# cd php-7.0.4
[root@ser3 php-7.0.4]# ./configure --prefix=/usr/local/php7 --exec-prefix=/usr/local/php7 --with-config-file-path=/usr/local/php7/etc  --with-curl  --with-freetype-dir  --with-gd  --with-gettext  --with-iconv-dir  --with-kerberos  --with-libdir=lib64  --with-libxml-dir  --with-mysqli  --with-openssl  --with-pcre-regex  --with-pdo-mysql  --with-pdo-sqlite  --with-pear  --with-png-dir  --with-xmlrpc  --with-xsl  --with-zlib --with-zlib-dir --with-mhash --with-mcrypt --with-openssl-dir --with-jpeg-dir --enable-gd-jis-conv  --enable-fpm  --enable-bcmath  --enable-libxml  --enable-inline-optimization  --enable-gd-native-ttf  --enable-mbregex  --enable-mbstring  --enable-opcache  --enable-pcntl  --enable-shmop  --enable-soap  --enable-sockets  --enable-sysvsem  --enable-xml  --enable-zip
[root@ser3 php-7.0.4]# make
[root@ser3 php-7.0.4]# make  test
[root@ser3 php-7.0.4]# make install
2. Set up the configuration file
[root@ser3 php-7.0.4]# cp php.ini-production /usr/local/php7/etc/php.ini
php.ini-development Suitable for development Testing, such as local testing environment, php.ini-production has higher security settings, suitable for server online operation as a product. Generally, modify php.ini-production to php.ini, which is more secure and ensures that the test environment (local) and the official environment (online) are consistent
[root@ser3 php-7.0.4]# cp /usr/local/php7/etc/php-fpm.conf.default /usr/local/php7/etc/php-fpm.conf
[root@ser3 php-7.0.4]# cp /usr/local/php7/etc/php-fpm.d/www.conf.default /usr/local/php7/etc/php-fpm.d/www.conf
[root@ser3 php-7.0.4]# cp ./sapi/fpm/init.d.php-fpm /etc/init.d/php-fpm
3. Join the startup service
[root@ser3 php-7.0.4]# chmod +x /etc/init.d/php-fpm
[root@ser3 php-7.0.4]# chkconfig --add php-fpm
Note that the www.conf configuration file in php7 configures the port number and other information of phpfpm. If you modify the default 9000 port number, you need to change it here, and then change the nginx configuration
4. Start the php service
[root@ser3 php-7.0.4]# /etc/init.d/php-fpm start
[root@ser3 php-7.0.4]# ps -ef | grep php-fpm
2. Nginx installation
1 .Software download:
wget http://nginx.org/download/nginx-1.6.2.tar.gz Directly use the command to download on Linux
2. Install dependencies Package pcre and dependent software
Before installing nginx, make sure you have installed# rpm -qa gcc openssl-devel pcre zlib-develSoftware library
Installing the pcre library is to enable Nginx Supports HTTP Rewriter module. If pcre does not have this installation package by default, you need to download and install it manually.
3. Optimize the installation package before installation
(Compilation and installation process optimization) Reduce the size of the compiled nginx file. When compiling nginx, the default In debug mode, a lot of tracking and ASSERT information will be inserted. After the compilation is completed,
[root@svr1 nginx-1.6.2]# vim auto/cc/gcc
# debug
CFLAGS="$CFLAGS -g"
   注释或删除这两行,即可取消debug模式.
[root@svr1 nginx-1.6.2]# ./configure --prefix=/usr/local/nginx --with-http_stub_status_module --with-http_gzip_static_module --with-openssl=/usr/local/openssl
[root@svr1 nginx-1.6.2]# make && make install
[root@svr1 nginx-1.6.2]# ps -ef | grep nginx
[root@svr1 nginx-1.6.2]# /usr/local/nginx/sbin/nginx -c /usr/local/nginx/conf/nginx.conf
[root@svr1 nginx-1.6.2]# curl -i 127.0.0.1
......
<body>
<h1 id="Welcome-nbsp-to-nbsp-nginx">Welcome to nginx!</h1>
If you see this page, the nginx web server is successfully installed and
......
The test i page will show that there is no problem with the nginx installation
3. Integrate Nginx and PHP
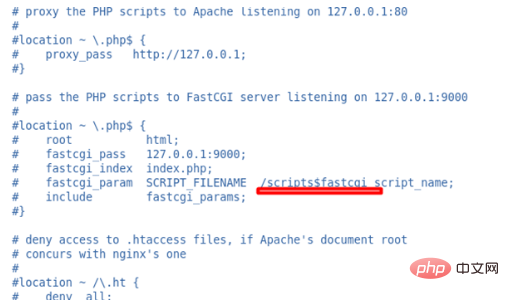
Nginx itself does not process requests for dynamic web pages, and Nginx transfers the dynamic requests to PHP. Nginx configuration file
# vim /usr/local/nginx/conf/nginx.conf //标的部分是我们后面要修改的

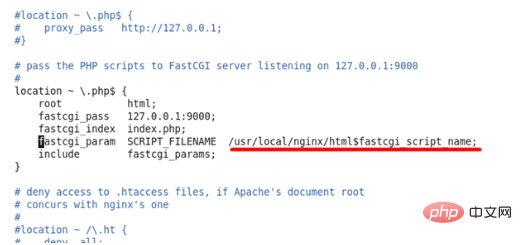
Looking at the picture above, Nginx already knows how to convey the request to PHP. When Nginx gets the *.php request, it will pass the request to PHP through port 9000. Now we can just remove these comments, as shown in the picture below

As shown in the picture above, we have seen before that Nginx requests PHP through the 9000 port of the machine. Forwarded to PHP, and in the picture above we can see that PHP listens to data from the 9000 port of the local machine, and Nginx and PHP complete the data request through the 9000 port of the local machine.
4. Test
We have defined the storage path of the PHP website in the nginx configuration file. The path is /usr /local/nginx/html
Let’s create a new PHP page test page in this directory. The file name is test.php and the content is as follows
<?php
     phpinfo();
?>
关闭php
killall php-fpm
php重启
/usr/local/php7/sbin/php-fpm &
关闭nginx
/usr/local/nginx/sbin/nginx -s stop       //关闭服务器
重启nginx
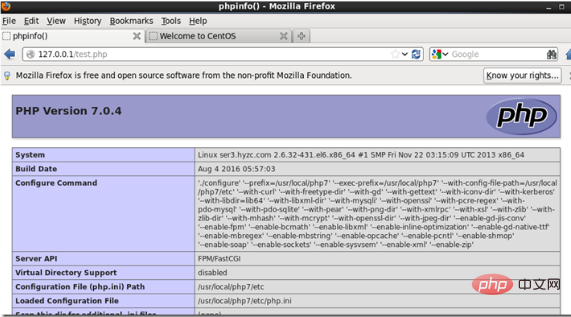
/usr/local/nginx/sbin/nginx 开启服务器After restarting PHP and nginx, we Enter http://localhost/test.php in the browser. If the following interface appears, it is considered successful.

Related learning recommendations: PHP programming from entry to proficiency
The above is the detailed content of How to install and configure PHP+Nginx on Linux. For more information, please follow other related articles on the PHP Chinese website!

Hot AI Tools

Undresser.AI Undress
AI-powered app for creating realistic nude photos

AI Clothes Remover
Online AI tool for removing clothes from photos.

Undress AI Tool
Undress images for free

Clothoff.io
AI clothes remover

AI Hentai Generator
Generate AI Hentai for free.

Hot Article

Hot Tools

Notepad++7.3.1
Easy-to-use and free code editor

SublimeText3 Chinese version
Chinese version, very easy to use

Zend Studio 13.0.1
Powerful PHP integrated development environment

Dreamweaver CS6
Visual web development tools

SublimeText3 Mac version
God-level code editing software (SublimeText3)

Hot Topics
 1385
1385
 52
52
 PHP: An Introduction to the Server-Side Scripting Language
Apr 16, 2025 am 12:18 AM
PHP is a server-side scripting language used for dynamic web development and server-side applications. 1.PHP is an interpreted language that does not require compilation and is suitable for rapid development. 2. PHP code is embedded in HTML, making it easy to develop web pages. 3. PHP processes server-side logic, generates HTML output, and supports user interaction and data processing. 4. PHP can interact with the database, process form submission, and execute server-side tasks.
 PHP and the Web: Exploring its Long-Term Impact
Apr 16, 2025 am 12:17 AM
PHP has shaped the network over the past few decades and will continue to play an important role in web development. 1) PHP originated in 1994 and has become the first choice for developers due to its ease of use and seamless integration with MySQL. 2) Its core functions include generating dynamic content and integrating with the database, allowing the website to be updated in real time and displayed in personalized manner. 3) The wide application and ecosystem of PHP have driven its long-term impact, but it also faces version updates and security challenges. 4) Performance improvements in recent years, such as the release of PHP7, enable it to compete with modern languages. 5) In the future, PHP needs to deal with new challenges such as containerization and microservices, but its flexibility and active community make it adaptable.
 What computer configuration is required for vscode
Apr 15, 2025 pm 09:48 PM
VS Code system requirements: Operating system: Windows 10 and above, macOS 10.12 and above, Linux distribution processor: minimum 1.6 GHz, recommended 2.0 GHz and above memory: minimum 512 MB, recommended 4 GB and above storage space: minimum 250 MB, recommended 1 GB and above other requirements: stable network connection, Xorg/Wayland (Linux)
 Why Use PHP? Advantages and Benefits Explained
Apr 16, 2025 am 12:16 AM
The core benefits of PHP include ease of learning, strong web development support, rich libraries and frameworks, high performance and scalability, cross-platform compatibility, and cost-effectiveness. 1) Easy to learn and use, suitable for beginners; 2) Good integration with web servers and supports multiple databases; 3) Have powerful frameworks such as Laravel; 4) High performance can be achieved through optimization; 5) Support multiple operating systems; 6) Open source to reduce development costs.
 What is vscode What is vscode for?
Apr 15, 2025 pm 06:45 PM
VS Code is the full name Visual Studio Code, which is a free and open source cross-platform code editor and development environment developed by Microsoft. It supports a wide range of programming languages and provides syntax highlighting, code automatic completion, code snippets and smart prompts to improve development efficiency. Through a rich extension ecosystem, users can add extensions to specific needs and languages, such as debuggers, code formatting tools, and Git integrations. VS Code also includes an intuitive debugger that helps quickly find and resolve bugs in your code.
 vscode cannot install extension
Apr 15, 2025 pm 07:18 PM
The reasons for the installation of VS Code extensions may be: network instability, insufficient permissions, system compatibility issues, VS Code version is too old, antivirus software or firewall interference. By checking network connections, permissions, log files, updating VS Code, disabling security software, and restarting VS Code or computers, you can gradually troubleshoot and resolve issues.
 PHP vs. Python: Use Cases and Applications
Apr 17, 2025 am 12:23 AM
PHP is suitable for web development and content management systems, and Python is suitable for data science, machine learning and automation scripts. 1.PHP performs well in building fast and scalable websites and applications and is commonly used in CMS such as WordPress. 2. Python has performed outstandingly in the fields of data science and machine learning, with rich libraries such as NumPy and TensorFlow.
 How to switch Chinese mode with vscode
Apr 15, 2025 pm 11:39 PM
VS Code To switch Chinese mode: Open the settings interface (Windows/Linux: Ctrl, macOS: Cmd,) Search for "Editor: Language" settings Select "Chinese" in the drop-down menu Save settings and restart VS Code


