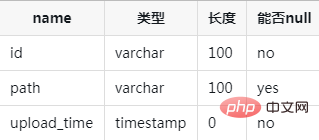

In order to test the image upload function and save the image path to the database, we must first create a new test table test_img.

CREATE TABLE test_img (
	id int(4) UNSIGNED NOT NULL AUTO_INCREMENT,
	path varchar(100) default NULL,
	upload_time  timestamp default CURRENT_TIMESTAMP,
	PRIMARY KEY(id)
)engine=myisam DEFAULT charset=utf8
sql command: Generate a unique number when inserting into the table. For example, if there is too much test data, the id will continue to increase by itself. If you want to Returning to step 1, you can try the following commands.
alter table test_img auto_increment = 1
Second, create a newimg.html file for selecting uploaded images
<!DOCTYPE html><html lang="utf-8"><head>
    <meta charset="UTF-8">
    <title>图片上传</title></head><body><form action="img.php" method="post" enctype="multipart/form-data">
    选择上传的图片: <input type="file" name="file" accept="image/*">
    <br><br>
<input type="submit" value="上传"></form>< ;form> The enctype in the tag controls whether to encode and send the form data. The default is application/x-www-form-urlencoded, which means all characters are encoded before sending.
| Value | Description |
|---|---|
| Encode all characters before sending (default) | |
| Do not encode characters. This value must be used when using a form that contains a file upload control | |
| Spaces are converted to " " plus signs, but special characters are not encoded |
accept in the tag limits the upload format.
img.php Used to accept and process images
Get the image file and add the specific file name to the data table test_img, move_uploaded_file Store the image file in the target folder, iconv perform character encoding to prevent garbled characters after uploading images with Chinese names. <div class="code" style="position:relative; padding:0px; margin:0px;"><pre class='brush:php;toolbar:false;'><?php
header("Content-Type: text/html;charset=utf-8");
$conn = new mysqli(&#39;localhost&#39;, &#39;root&#39;, &#39;&#39;, &#39;test&#39;);
if (!$conn) {
die("Connection failed: " . mysqli_connect_error());
}
$destination = &#39;../upload/image/&#39;;
$file = $_FILES[&#39;file&#39;]; // 获取上传的图片
$filename = $file[&#39;name&#39;];
$insert = "INSERT INTO test_img (path) VALUES (&#39;$filename&#39;)";
$test = move_uploaded_file($file[&#39;tmp_name&#39;], $destination . iconv("UTF-8", "gb2312", $filename));
if ($insert && $test) {
$conn->query($insert);
} else {
echo &#39;上传失败&#39; . &#39;<br>&#39;;
}
$select = &#39;SELECT path FROM test_img&#39;;
$result = $conn->query($select);
while ($row = $result->fetch_assoc()) {
echo "<img src="/static/imghw/default1.png" data-src=" . $destination . $row[&#39;path&#39;] . " class="lazy" alt="Teach you step by step how to use php to implement the image upload function" >";
}</pre><div class="contentsignin">Copy after login</div></div>print_r( $_FILES['file']); // Output the received uploaded image and get the following information <blockquote><p></p></blockquote>
<p><img src="/static/imghw/default1.png" data-src="https://img.php.cn/upload/article/000/000/053/744e6b0d5394a13101135b3e6038965e-0.jpg" class="lazy" alt="">After the image is successfully uploaded, pass the data table The picture information matches the pictures under </p>upload/image<p> and is displayed in a loop. The effect is as follows.<code>

The above is just a rough version of how to upload pictures in PHP. You can try to modify and improve some details yourself. If you want to learn well, you must learn it by yourself. Cloud learning can only scratch the surface. If my sharing can help If you have some inspiration, why not give me a like and encourage me? Of course, you don’t have to give it, I will also drive myself to learn~
Thank you everyone for reading, I hope you can gain something
Recommended tutorial: "
php tutorialThe above is the detailed content of Teach you step by step how to use php to implement the image upload function. For more information, please follow other related articles on the PHP Chinese website!