How to type the dotted line in the directory
How to create a dotted line in the table of contents: first click "Title 1" in the Home tab to set it as the title style; then click "Table of Contents" in the reference tab bar; then click "Insert Table of Contents" and enter the table of contents Detailed setting interface; finally check "Align page numbers right", click the option box behind the tab leader, and select a dotted line style.

The dotted line in the directory in word can be automatically generated by the system through [Reference]-[Insert Directory].
Recommended: "Word Tutorial"
The specific steps are as follows
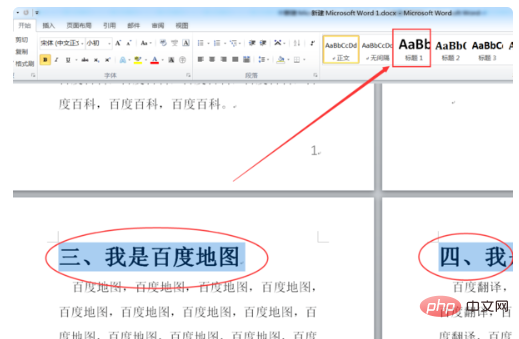
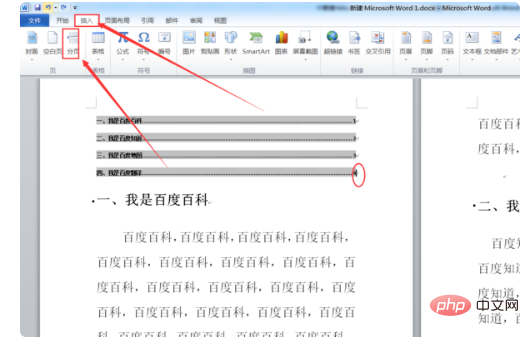
1. In the WORD document, select the relevant titles respectively. Table of contents text paragraph, click "Heading 1" in the Home tab to set it as a heading style.
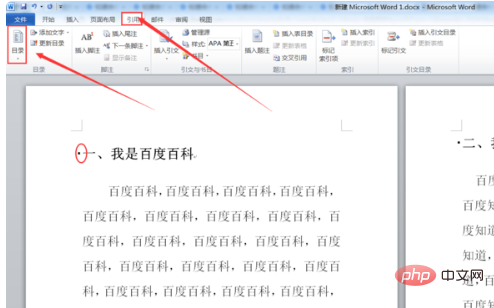
#2. At the top of the homepage, click "Table of Contents" in the reference tab bar.
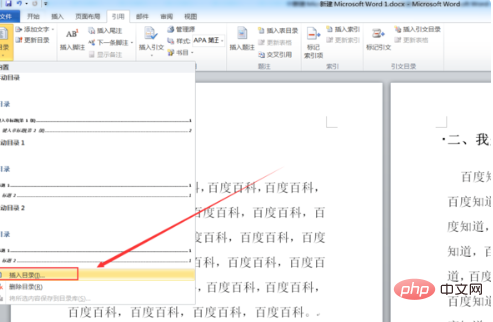
#3. In the pop-up drop-down options, click "Insert Directory" at the bottom to enter the directory details setting interface, and manually select and set related styles.
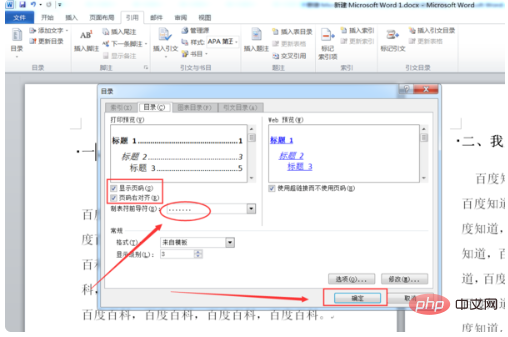
4. Check "Align page numbers right", then click the option box behind the tab leader, select a dotted line style, and click the OK button to complete the table of contents insertion. Can.
#5. Return to the main document and find that the dotted line of the table of contents in word has been automatically generated by the system.
The above is the detailed content of How to type the dotted line in the directory. For more information, please follow other related articles on the PHP Chinese website!

Hot AI Tools

Undresser.AI Undress
AI-powered app for creating realistic nude photos

AI Clothes Remover
Online AI tool for removing clothes from photos.

Undress AI Tool
Undress images for free

Clothoff.io
AI clothes remover

AI Hentai Generator
Generate AI Hentai for free.

Hot Article

Hot Tools

Notepad++7.3.1
Easy-to-use and free code editor

SublimeText3 Chinese version
Chinese version, very easy to use

Zend Studio 13.0.1
Powerful PHP integrated development environment

Dreamweaver CS6
Visual web development tools

SublimeText3 Mac version
God-level code editing software (SublimeText3)

Hot Topics
 1359
1359
 52
52
 How to insert a table of contents in Google Docs
Apr 13, 2023 pm 08:16 PM
Whether it is an article, paper or tutorial, the main highlight of any document is the title and of course the table of contents. It describes the outline structure of the document so that users can get to where and what they expect to read from the document. It's also a best practice to add a table of contents to most documents to make them look more professional. Today, everything happens online and people use Google Docs to create most documents. Many users are still not sure how to insert or add a table of contents in google docs. Therefore, we come up with this article to explain how to create or insert a table of contents in Google Docs. How to Insert a Table of Contents in Google Docs Step 1: Click here to visit Google Docs Online. Step 2: If
 How to draw a dotted line in word
Mar 19, 2024 pm 10:25 PM
Word is a software that we often use in our office. It has many functions that can facilitate our operations. For example, for a large article, we can use the search function inside to find out that a word in the full text is wrong, so we can directly replace it. Make changes one by one; when submitting the document to your superiors, you can beautify the document to make it look better, etc. Below, the editor will share with you the steps on how to draw a dotted line in Word. Let's learn together! 1. First, we open the word document on the computer, as shown in the figure below: 2. Then, enter a string of text in the document, as shown in the red circle in the figure below: 3. Next, press and hold [ctrl+A] Select all the text, as shown in the red circle in the figure below: 4. Click [Start] on the top of the menu bar
 Use java's File.isDirectory() function to determine whether the file exists and is a directory type
Jul 24, 2023 pm 06:57 PM
Use Java's File.isDirectory() function to determine whether a file exists and is of directory type. In Java programming, you often encounter situations where you need to determine whether a file exists and is of directory type. Java provides the File class to operate files and directories. The isDirectory() function can help us determine whether a file is a directory type. The File.isDirectory() function is a method in the File class. Its function is to determine the current File
 What should I do if the content behind the dotted line in Excel is not displayed when printing?
Mar 20, 2024 pm 12:55 PM
After we use excel office software to edit the form, we often need to print it. However, many novice friends find that the excel form is not fully printed, and the content behind a dotted line cannot be printed. What is the reason? In fact, this is because the printed content is outside the page margins and cannot be printed. As long as the dotted line is adjusted to be outside the content that needs to be printed, it can be printed. Below, let’s take a look together! 1. First, we create and open an excel form and enter some simple content for demonstration. 2. At this time, we can see that there is a dotted line in the excel table. At this time, if we want to print, the content on the right side of the dotted line will not be printed together with the previous content, resulting in paging out.
 The glob() function in PHP is used to find files or directories
Nov 18, 2023 pm 06:17 PM
The glob() function in PHP is used to find files or directories and is a powerful file operation function. It can return the path of a file or directory based on a specified pattern match. The syntax of the glob() function is as follows: glob(pattern, flags) where pattern represents the pattern string to be matched, which can be a wildcard expression, such as *.txt (matching files ending with .txt), or a specific file path. flags is an optional parameter used to control the function
 PHP function introduction—rename(): Rename a file or directory
Jul 25, 2023 pm 12:10 PM
PHP function introduction—rename(): Renaming files or directories Introduction: In PHP, the rename() function is used to rename files or directories. It provides an easy way to change the name of a file or directory. Whether it is a single file or an entire directory, you can use this function to perform a rename operation. The renaming process can be easily accomplished by specifying the name of the source file or directory and the target name. Syntax: boolrename(string$source,str
 How to check if a directory is empty in Linux
Mar 20, 2023 am 10:17 AM
How to check whether the directory is empty in Linux: 1. Enter the Linux terminal; 2. By executing "res=`ls -A $dir` if [ -z $res ]; then echo "$dir ..."else echo "$ The dir..."fi" method can determine whether the directory is empty.
 How to read the catalog when reading on WeChat How to view the catalog
Mar 30, 2024 pm 05:56 PM
The mobile version of WeChat Reading App is a very good reading software. This software provides a lot of books. You can read them anytime, anywhere with just one click to search and read them online. All of them are officially authorized and different types of books are neatly arranged. Sort and enjoy a comfortable and relaxing reading atmosphere. Switch the reading modes of different scenarios, update the latest book chapters continuously every day, support online login from multiple devices, and batch download to the bookshelf. You can read it with or without the Internet, so that everyone can discover more knowledge from it. Now the editor details it online Promote the method of viewing the catalog for WeChat reading partners. 1. Open the book you want to view the catalog and click in the middle of the book. 2. Click the three lines icon in the lower left corner. 3. In the pop-up window, view the book catalog


