

What are the three basic elements of PPT production?


#What are the three basic elements of PPT production?
1. A PPT only serves one type of people and produces different levels of content for different audiences;
2. PPT always serves the listeners;
3. The PPT only talks about one key point. Don’t try to talk about both technology and management in a certain PPT.
PPT Advantages
1. Get better results faster with Microsoft Office Fluent user interface.
The redesigned Office Fluent user interface appearance makes creating, presenting, and sharing presentations a simpler, more intuitive experience. A rich set of features and capabilities are packed into an improved, organized workspace that minimizes distractions and helps users get the results they need more quickly and easily.
2. Create powerful and dynamic SmartArt illustrations.
Easily create powerful and dynamic workflow, relationship or hierarchy diagrams in Office PowerPoint. You can even convert bulleted lists into SmartArt diagrams, or modify and update existing diagrams. A new contextual icon menu puts rich formatting options at your fingertips.
3. Easily reuse content through the Office PowerPoint slide library.
The PowerPoint Slide Library allows you to store presentations as individual slides on sites supported by Microsoft Office SharePoint Server 2007, and then easily reuse the content from Office PowerPoint 2007 later. Not only does this reduce the time it takes to create a presentation, but all slides you insert are kept in sync with the server version, ensuring content is always up to date.
4. Communicate with users across different platforms and devices.
Help ensure broad communication with your PowerPoint presentations by converting files to XPS and PDF files for sharing with users on any platform.
5. Create presentations faster with custom layouts.
In Office PowerPoint, you can define and save your own custom slide layouts, so you don’t have to waste valuable time cutting and pasting layouts into new slides or retrieving slides from slides that have the layout you want. Remove content from slides. With the PowerPoint Slide Library, you can easily share these customized slides with others to give your presentations a consistent and professional look.
6. Use Office PowerPoint and Office SharePoint Server to speed up the review process.
With the workflow capabilities built into Office SharePoint Server, you can initiate, manage, and track the review and approval process in Office PowerPoint, allowing users to accelerate the presentation review cycle across the organization without requiring users to learn new tool.
7. Use document themes to uniformly format presentations.
Document themes allow you to change the look of your entire presentation with just one click. Changing the theme of a presentation not only changes the background color, but also changes the color, style, and font of the diagrams, tables, charts, shapes, and text in the presentation. By applying a theme, you ensure a professional and consistent look throughout your presentation.
8. Dramatically modify shapes, text, and graphics with new SmartArt graphics tools and effects.
You can work with and use text, tables, charts, and other presentation elements in more ways than ever before.
9. Further improve the security of PowerPoint presentations.
You can add a digital signature to a PowerPoint presentation to help ensure that the content of the presentation has not been changed when distributed, or mark the presentation as "final" to prevent inadvertent changes. Using content controls, you can create and deploy structured PowerPoint templates that guide users into correct information while helping to protect and preserve information in the presentation that should not be changed.
10. Reduce document size and improve file recovery capabilities at the same time.
The new Microsoft Office PowerPoint XML compression format significantly reduces file size while also improving data recovery from damaged files. This new format offers significant savings in storage and bandwidth requirements and reduces IT cost burdens.
Recommended tutorial: "PHP"
The above is the detailed content of What are the three basic elements of PPT production?. For more information, please follow other related articles on the PHP Chinese website!

Hot AI Tools

Undresser.AI Undress
AI-powered app for creating realistic nude photos

AI Clothes Remover
Online AI tool for removing clothes from photos.

Undress AI Tool
Undress images for free

Clothoff.io
AI clothes remover

Video Face Swap
Swap faces in any video effortlessly with our completely free AI face swap tool!
Hot Article
Hot Tools

Notepad++7.3.1
Easy-to-use and free code editor

SublimeText3 Chinese version
Chinese version, very easy to use

Zend Studio 13.0.1
Powerful PHP integrated development environment

Dreamweaver CS6
Visual web development tools

SublimeText3 Mac version
God-level code editing software (SublimeText3)
Hot Topics


 Steps to adjust the format of pictures inserted in PPT tables
Mar 26, 2024 pm 04:16 PM
Steps to adjust the format of pictures inserted in PPT tables
Mar 26, 2024 pm 04:16 PM
1. Create a new PPT file and name it [PPT Tips] as an example. 2. Double-click [PPT Tips] to open the PPT file. 3. Insert a table with two rows and two columns as an example. 4. Double-click on the border of the table, and the [Design] option will appear on the upper toolbar. 5. Click the [Shading] option and click [Picture]. 6. Click [Picture] to pop up the fill options dialog box with the picture as the background. 7. Find the tray you want to insert in the directory and click OK to insert the picture. 8. Right-click on the table box to bring up the settings dialog box. 9. Click [Format Cells] and check [Tile images as shading]. 10. Set [Center], [Mirror] and other functions you need, and click OK. Note: The default is for pictures to be filled in the table
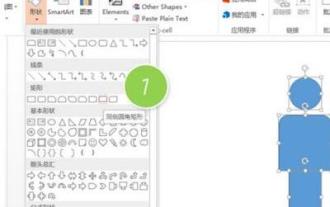 Introduction to the method of making a human icon in PPT
Mar 26, 2024 pm 04:21 PM
Introduction to the method of making a human icon in PPT
Mar 26, 2024 pm 04:21 PM
1. Create a new PPT page, insert a circle, a rounded rectangle on the same side (1 in the picture below) and a rectangle in the graphic, and then combine it to create a human-shaped graphic effect. Note that the circle (head) and rectangle (legs) are the same width, with the rounded rectangle slightly wider on the same side. Pay attention to the proportions between the human figures. 2. Next, select all three shapes, remove their outlines, change the color to gray, and use the shape [join] function (2 in the figure below) to turn the three shapes into a humanoid shape. 3. After zooming out, you can use the fast copy method of Ctrl+D for efficient copying. 4. Color the villain part. If there is no technical content in coloring them all, just change the color of the villain to green. 2. Color the human icon 1. Copy a little person separately. Then insert a [
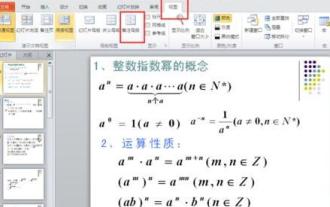 How to remove the date that appears automatically when printing from PPT handouts
Mar 26, 2024 pm 08:16 PM
How to remove the date that appears automatically when printing from PPT handouts
Mar 26, 2024 pm 08:16 PM
1. Let me first talk about the method I used at the beginning, maybe everyone is using it too. First, open [View]——]Remarks Template[. 2. A place where you can actually see the date after opening it. 3. Select it first and delete it. 4. After deleting, click [Close Master View]. 5. Open the print preview again and find that the date is still there. 6. In fact, this date was not deleted here. It should be in the [Handout Master]. Look at the picture below. 7. Delete the date after you find it. 8. Now when you open the preview and take a look, the date is no longer there. Note: In fact, this method is also very easy to remember, because the printed handouts are handouts, so you should look for the [Handout Master].
 Detailed steps to create text with chalk font effect in PPT
Mar 26, 2024 pm 04:50 PM
Detailed steps to create text with chalk font effect in PPT
Mar 26, 2024 pm 04:50 PM
1. If you want to get a good-looking effect, you can match the PPT with the corresponding [blackboard] background image. 2. First create the materials for [Chalk Lettering]. Draw a shape in [Insert]-[Shape], any shape can be used, fill it with black. 3. Copy the drawn shape and paste it as a [picture]. 4. Delete the drawn shape and set the [Artistic Effect] of the pasted picture to [Line Drawing]. 5. In [Artistic Effect]-[Artistic Effect Options], reduce [Transparency] and increase the value of [Pencil Size]. 6. [Picture Tools]-[Color]-[Set Transparent Color] Set the transparent color to black. 7. In】Set picture format【-】Picture color【Recolor picture】【. 8. In the ppt page, insert a [text box] and enter text. 9. Complex
 How to insert excel icons into PPT slides
Mar 26, 2024 pm 05:40 PM
How to insert excel icons into PPT slides
Mar 26, 2024 pm 05:40 PM
1. Open the PPT and turn the page to the page where you need to insert the excel icon. Click the Insert tab. 2. Click [Object]. 3. The following dialog box will pop up. 4. Click [Create from file] and click [Browse]. 5. Select the excel table to be inserted. 6. Click OK and the following page will pop up. 7. Check [Show as icon]. 8. Click OK.
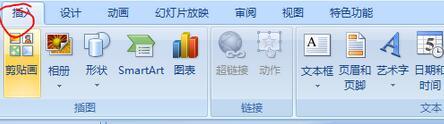
 Introduction to the method of inserting heptagons into PPT slides
Mar 26, 2024 pm 07:46 PM
Introduction to the method of inserting heptagons into PPT slides
Mar 26, 2024 pm 07:46 PM
1. Open the PPT slide document, and in the [Outline, Slide] column on the left side of the PPT, click to select the slide where you want to insert the basic [shape]. 2. After selecting, select the [Insert] menu in the function menu bar above the PPT and click. 3. After clicking the [Insert] menu, the [Insert] submenu bar pops up below the function menu bar. Select the [Shape] menu in the [Insert] submenu bar. 4. Click the [Shape] menu to pop up the preset shape type selection page. 5. In the shape type selection page, select the [Heptagon] shape and click. 6. After clicking, move the mouse to the slide editing interface, press the mouse to draw, and release the mouse after the drawing is completed. Complete the insertion of the [heptagon] shape.
 Detailed method of inserting formula effect flow chart into PPT
Mar 26, 2024 pm 04:36 PM
Detailed method of inserting formula effect flow chart into PPT
Mar 26, 2024 pm 04:36 PM
1. Open PPT, click the [Insert] tab, and click the [smartArt] button in the [Illustrations] group. 2. Click [Process] in the [Select smartArt graphics] dialog box that opens. 3. Select the [Formula] flow chart in the [Process] pane that opens. 4. Click [OK], and the [Formula] flow chart will be inserted into the slide pane. 5. Click [Text] in the [Type text here] column, or click [Text] on the graphic to enter content. 6. Select the shape in the graphic, click the [Design] tab of [smartArt Tools], and click the [Add Shape] button in the [Create Graphics] group to add a shape. 7. The shapes in the graphics can also be selected and deleted. Of course, you can also delete them in smar as needed.
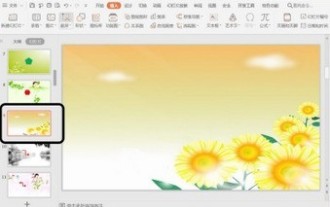
 How to deal with blanks when playing PPT slides
Mar 26, 2024 pm 07:51 PM
How to deal with blanks when playing PPT slides
Mar 26, 2024 pm 07:51 PM
1. Open the PPT file you created and select the second slide. 2. On the second slide, select one of the pictures, and then select [Animation] to add any animation effect. 3. In the start column of the animation bar, change [While Standalone] to [After Previous Animation], and you will see that the picture animation label [1] will change to [0]. Do the same for subsequent slides, and you can see the effect by playing the slide at the end.