Detailed explanation of Laravel's life cycle
The following is the tutorial column of Laravel to introduce you to the life cycle of Laravel. I hope it will be helpful to friends in need!

Laravel’s life cycle
Everything in the world has a life cycle, and we need to understand it when we use any tool It works, then it will be easy to use, and the same is true for application development. Once you understand its principles, you will be able to use it with ease.
Before understanding the life cycle of Laravel, let us first review the life cycle of PHP.
Life cycle of PHP
Operation mode of PHP
The two operating modes of PHP are WEB mode, CLI mode.
- When we type the php command in the terminal, we are using the CLI mode.
- When using Nginx or another web server as the host to process an incoming request, the WEB mode is used.
Life cycle
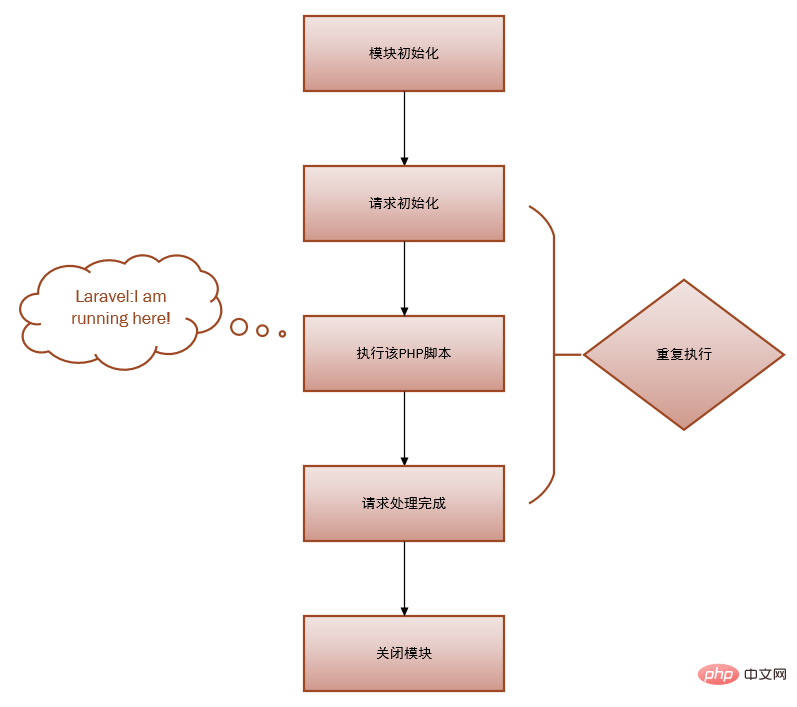
When we request a php file, PHP will undergo 5 stages in order to complete the request. Life cycle switching:
Module initialization (MINIT), that is, calling the extended initialization function specified in
php.inito perform initialization work, such asmysqlExtension.Request initialization (RINIT), that is, initialize the symbol table with variable names and variable value contents required to execute this script, such as
$_SESSIONvariables.Execute the PHP script.
After the request processing is completed (Request Shutdown), call the
RSHUTDOWNmethod of each module in sequence, and call theunsetfunction for each variable, such asunset $_SESSIONvariable.Closing the module (Module Shutdown), PHP calls the
MSHUTDOWNmethod of each extension. This is the last opportunity for each module to release memory. This means there is no next request.
WEB mode is very similar to CLI (command line) mode. The difference is:
- CLI mode will go through a complete 5 cycles each time the script is executed. , because there will be no next request after your script is executed;
- WEB mode may use multi-threading to cope with concurrency, so life cycles
1and5are possible It is only executed once, and the life cycle of2-4is repeated when the next request comes, thus saving the overhead caused by system module initialization.
It can be seen that the PHP life cycle is very symmetrical. Having said all this, it is just to locate where Laravel is running. Yes, Laravel only runs in the third stage:

PHP life cycle
Function
Understand these, you can optimize your Laravel code, and have a deeper understanding of Laravel's singleton (single case ). At least you know that at the end of each request, PHP's variables will be unset, and Laravel's singleton is only singleton during a certain request; you are in Laravel Static variables in cannot be shared between multiple requests, because each request will be unset at the end. Understanding these concepts is the first and most critical step to writing high-quality code. So remember, PHP is a scripting language, and all variables will only take effect in this request and will be reset on the next request, unlike Java static variables that have global effects.
Laravel’s life cycle
Overview
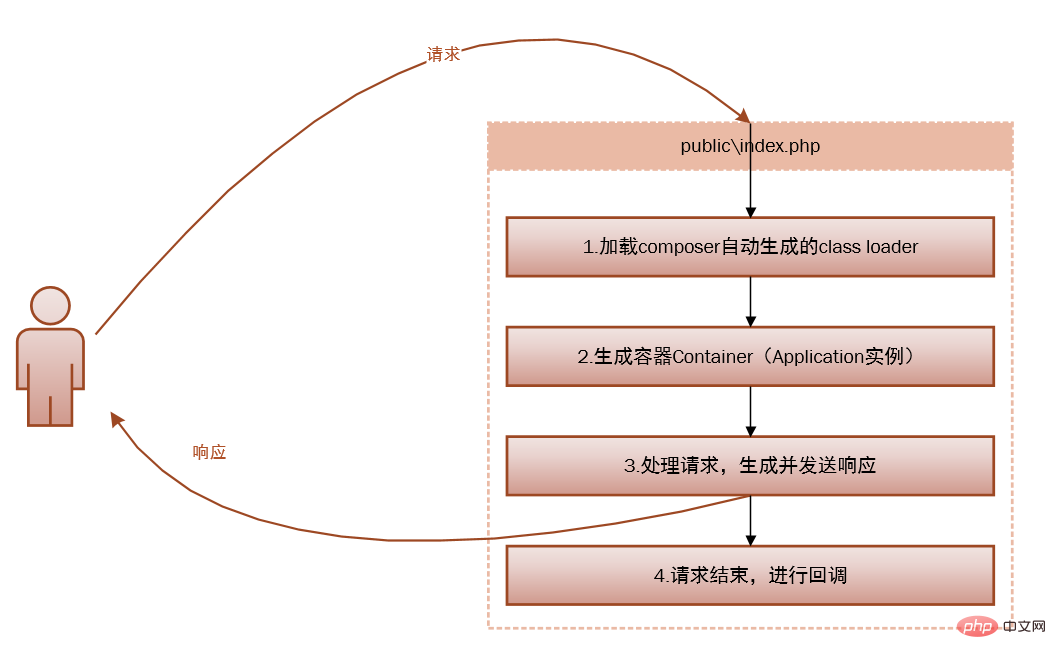
Laravel’s life cycle starts from public\index.phpStart and end with public\index.php.

Request process
The following is the full source code of public\index.php, which can be divided into Four steps:
1. require __DIR__.'/../bootstrap/autoload.php';

2. $app = require_once __DIR__.'/../bootstrap/app.php';
   $kernel = $app->make(Illuminate\Contracts\Http\Kernel::class);

3. $response = $kernel->handle(
      $request = Illuminate\Http\Request::capture()
   );
   $response->send();

4. $kernel->terminate($request, $response);The following is a detailed explanation of the four steps:
composer automatically loads the required classes
The file loads the auto-loading settings generated by composer, Include all your
composer requiredependencies.Generate container Container, Application instance, and register core components (HttpKernel, ConsoleKernel, ExceptionHandler) with the container (corresponding to code 2, the container is very important, and will be explained in detail later).
Process the request, generate and send the response (corresponding to code 3, it is no exaggeration to say that 99% of your code runs in this small handle method).
请求结束,进行回调(对应代码4,还记得可终止中间件吗?没错,就是在这里回调的)。

Laravel 的请求步骤
我们不妨在详细一点:
第一步:注册加载composer自动生成的class loader
就是加载初始化第三方依赖。
第二步:生成容器 Container
并向容器注册核心组件,是从 bootstrap/app.php 脚本获取 Laravel 应用实例,
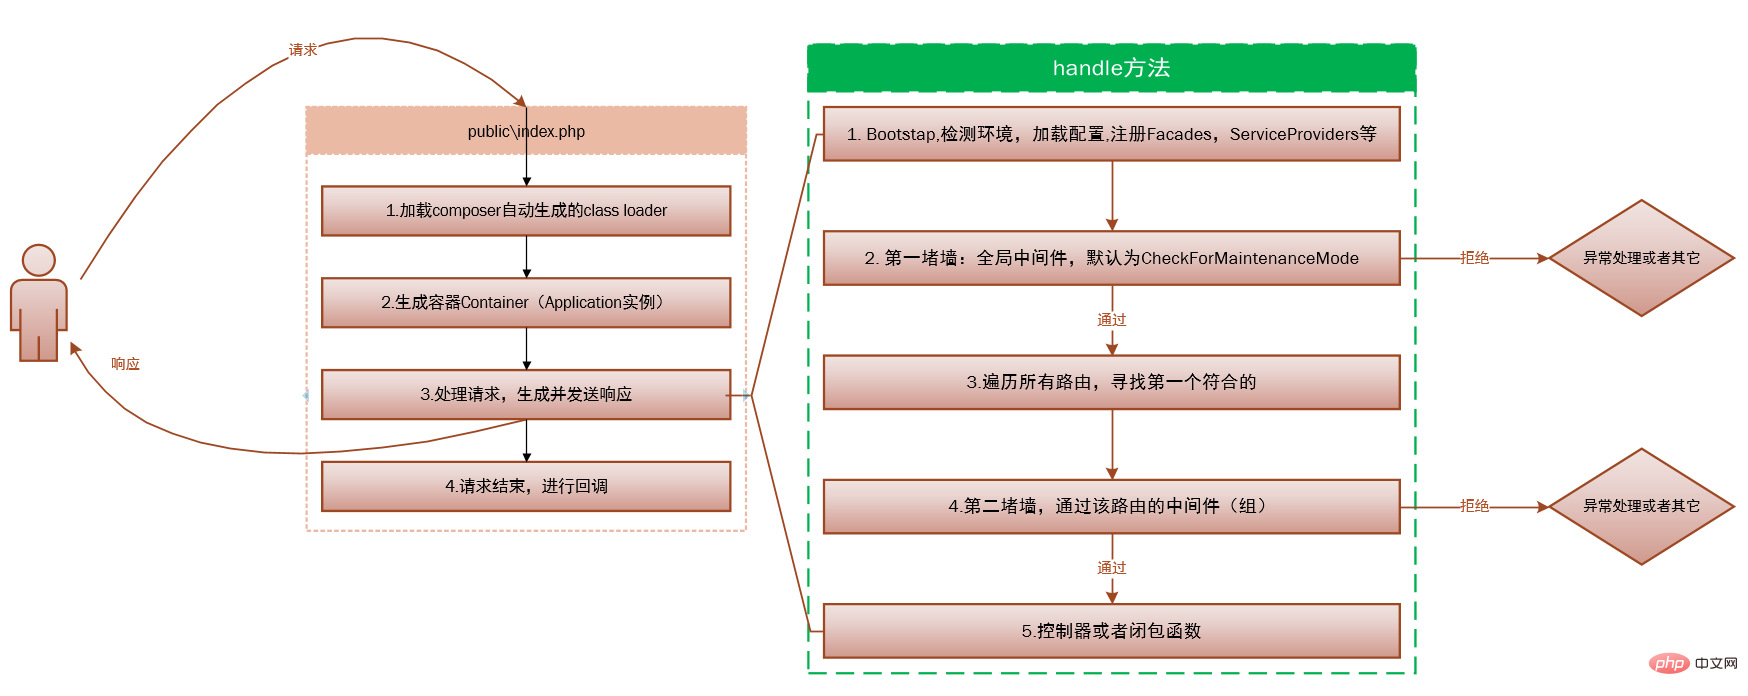
第三步:这一步是重点,处理请求,并生成发送响应。
请求被发送到 HTTP 内核或 Console 内核,这取决于进入应用的请求类型。
取决于是通过浏览器请求还是通过控制台请求。这里我们主要是通过浏览器请求。
HTTP 内核继承自 Illuminate\Foundation\Http\Kernel 类,该类定义了一个 bootstrappers 数组,这个数组中的类在请求被执行前运行,这些 bootstrappers 配置了错误处理、日志、检测应用环境以及其它在请求被处理前需要执行的任务。
protected $bootstrappers = [
        //注册系统环境配置 (.env)
        'Illuminate\Foundation\Bootstrap\DetectEnvironment',
        //注册系统配置(config)
        'Illuminate\Foundation\Bootstrap\LoadConfiguration',
        //注册日志配置
        'Illuminate\Foundation\Bootstrap\ConfigureLogging',
        //注册异常处理
        'Illuminate\Foundation\Bootstrap\HandleExceptions',
        //注册服务容器的门面,Facade 是个提供从容器访问对象的类。
        'Illuminate\Foundation\Bootstrap\RegisterFacades',
        //注册服务提供者
        'Illuminate\Foundation\Bootstrap\RegisterProviders',
        //注册服务提供者 `boot`
        'Illuminate\Foundation\Bootstrap\BootProviders',
];注意顺序:
Facades先于ServiceProviders,Facades也是重点,后面说,这里简单提一下,注册Facades就是注册config\app.php中的aliases数组,你使用的很多类,如Auth,Cache,DB等等都是Facades;而ServiceProviders的register方法永远先于boot方法执行,以免产生boot方法依赖某个实例而该实例还未注册的现象。
HTTP 内核还定义了一系列所有请求在处理前需要经过的 HTTP 中间件,这些中间件处理 HTTP 会话的读写、判断应用是否处于维护模式、验证 CSRF 令牌等等。
HTTP 内核的标志性方法 handle处理的逻辑相当简单:获取一个
Request,返回一个Response,把该内核想象作一个代表整个应用的大黑盒子,输入 HTTP 请求,返回 HTTP 响应。
第四步:将请求传递给路由。
在Laravel基础的服务启动之后,就要把请求传递给路由了。路由器将会分发请求到路由或控制器,同时运行所有路由指定的中间件。
传递给路由是通过 Pipeline(管道)来传递的,但是Pipeline有一堵墙,在传递给路由之前所有请求都要经过,这堵墙定义在app\Http\Kernel.php中的$middleware数组中,没错就是中间件,默认只有一个CheckForMaintenanceMode中间件,用来检测你的网站是否暂时关闭。这是一个全局中间件,所有请求都要经过,你也可以添加自己的全局中间件。
然后遍历所有注册的路由,找到最先符合的第一个路由,经过它的路由中间件,进入到控制器或者闭包函数,执行你的具体逻辑代码。
所以,当请求到达你写的代码之前,Laravel已经做了大量工作,请求也经过了千难万险,那些不符合或者恶意的的请求已被Laravel隔离在外。

Detailed explanation of Laravels life cycle
The above is the detailed content of Detailed explanation of Laravel's life cycle. For more information, please follow other related articles on the PHP Chinese website!

Hot AI Tools

Undresser.AI Undress
AI-powered app for creating realistic nude photos

AI Clothes Remover
Online AI tool for removing clothes from photos.

Undress AI Tool
Undress images for free

Clothoff.io
AI clothes remover

AI Hentai Generator
Generate AI Hentai for free.

Hot Article

Hot Tools

Notepad++7.3.1
Easy-to-use and free code editor

SublimeText3 Chinese version
Chinese version, very easy to use

Zend Studio 13.0.1
Powerful PHP integrated development environment

Dreamweaver CS6
Visual web development tools

SublimeText3 Mac version
God-level code editing software (SublimeText3)

Hot Topics
 PHP vs. Flutter: The best choice for mobile development
May 06, 2024 pm 10:45 PM
PHP and Flutter are popular technologies for mobile development. Flutter excels in cross-platform capabilities, performance and user interface, and is suitable for applications that require high performance, cross-platform and customized UI. PHP is suitable for server-side applications with lower performance and not cross-platform.
 How to use object-relational mapping (ORM) in PHP to simplify database operations?
May 07, 2024 am 08:39 AM
Database operations in PHP are simplified using ORM, which maps objects into relational databases. EloquentORM in Laravel allows you to interact with the database using object-oriented syntax. You can use ORM by defining model classes, using Eloquent methods, or building a blog system in practice.
 Laravel - Artisan Commands
Aug 27, 2024 am 10:51 AM
Laravel - Artisan Commands - Laravel 5.7 comes with new way of treating and testing new commands. It includes a new feature of testing artisan commands and the demonstration is mentioned below ?
 Analysis of the advantages and disadvantages of PHP unit testing tools
May 06, 2024 pm 10:51 PM
PHP unit testing tool analysis: PHPUnit: suitable for large projects, provides comprehensive functionality and is easy to install, but may be verbose and slow. PHPUnitWrapper: suitable for small projects, easy to use, optimized for Lumen/Laravel, but has limited functionality, does not provide code coverage analysis, and has limited community support.
 Comparison of the latest versions of Laravel and CodeIgniter
Jun 05, 2024 pm 05:29 PM
The latest versions of Laravel 9 and CodeIgniter 4 provide updated features and improvements. Laravel9 adopts MVC architecture and provides functions such as database migration, authentication and template engine. CodeIgniter4 uses HMVC architecture to provide routing, ORM and caching. In terms of performance, Laravel9's service provider-based design pattern and CodeIgniter4's lightweight framework give it excellent performance. In practical applications, Laravel9 is suitable for complex projects that require flexibility and powerful functions, while CodeIgniter4 is suitable for rapid development and small applications.
 How do the data processing capabilities in Laravel and CodeIgniter compare?
Jun 01, 2024 pm 01:34 PM
Compare the data processing capabilities of Laravel and CodeIgniter: ORM: Laravel uses EloquentORM, which provides class-object relational mapping, while CodeIgniter uses ActiveRecord to represent the database model as a subclass of PHP classes. Query builder: Laravel has a flexible chained query API, while CodeIgniter’s query builder is simpler and array-based. Data validation: Laravel provides a Validator class that supports custom validation rules, while CodeIgniter has less built-in validation functions and requires manual coding of custom rules. Practical case: User registration example shows Lar
 PHP code unit testing and integration testing
May 07, 2024 am 08:00 AM
PHP Unit and Integration Testing Guide Unit Testing: Focus on a single unit of code or function and use PHPUnit to create test case classes for verification. Integration testing: Pay attention to how multiple code units work together, and use PHPUnit's setUp() and tearDown() methods to set up and clean up the test environment. Practical case: Use PHPUnit to perform unit and integration testing in Laravel applications, including creating databases, starting servers, and writing test code.
 Laravel vs CodeIgniter: Which framework is better for large projects?
Jun 04, 2024 am 09:09 AM
When choosing a framework for large projects, Laravel and CodeIgniter each have their own advantages. Laravel is designed for enterprise-level applications, offering modular design, dependency injection, and a powerful feature set. CodeIgniter is a lightweight framework more suitable for small to medium-sized projects, emphasizing speed and ease of use. For large projects with complex requirements and a large number of users, Laravel's power and scalability are more suitable. For simple projects or situations with limited resources, CodeIgniter's lightweight and rapid development capabilities are more ideal.


