How to install php environment in windows2003
How to install PHP environment in windows2003: first install Fastcgi; then copy the downloaded "php-5.2.17-Win32-VC6-x86.zip" to the D drive; then configure PHP extension support; finally configure it iis is enough.

Recommended: "PHP Video Tutorial"
Environment setup: php-5.2.17 iis6 fcgisetup_1 .5_rtw_x64 ISAPI_Rewrite3_0112_x64
Installation package used: ISAPI_Rewrite3_0112_x64.zip Password: orct, php-5.2.17-Win32-VC6-x86.zip Password: op83, fcgisetup_1.5_rtw_x64.msi Password: 6900
Installation steps:
Fastcgi installation
Click on the installation file fcgisetup_1.5_rtw_x64.msi and go to the next step. After the installation is completed, there are 5 more files fcgiconfig.js, fcgiext.dll, fcgiext.ini, fcgilicense.rtf, fcgireadme.htm
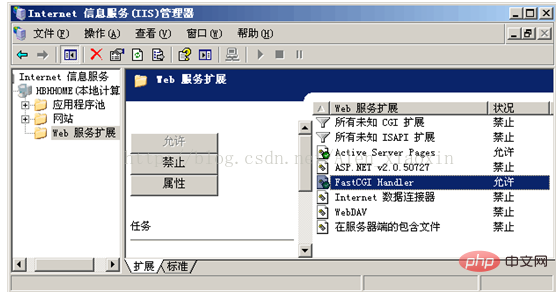
- # in the C:\WINDOWS\system32\inetsrv\ directory. ##At this time, there is an additional FastCGI Handler in the "WEB Service Extension" of IIS6

- ##Take the
D disk as an example, put the downloaded "php-5.2.17-Win32 -VC6-x86.zip”Copy to the D disk, then right-click to decompress php-5.2.0-win32 (assuming it is installed in this directory) directory;
-
#FastCGIModifications in the installation directory(RegisterPHP to FastCGI)Open
C:\WINDOWS\system32\inetsrv\fcgiext.ini file, Add the following three lines to the end of the file:[Types](This line is originally in the file and should be at the end of the file, in
[Types] Just add the following statements after them, all of them must be included otherwise an error will be reported. )
(Note:
php #php-cgi.exe in the installation directoryphp=PHP [PHP] ExePath=D:\ php-5.2.0-win32\php-cgi.ex
Copy after login
In D:/php
-5.2.0-# Find the "php.ini-dist" file in the ##Win32 folder and make a copy of it to facilitate restoration in the event of an error in the future. Then rename the copied file to "php.ini"; 用记事本打开“php.ini”文件,查找“extension_dir”,再将
extension_dir ="./" 改为 extension_dir ="D:/php-5.2.0-Win32/ext";(注:php的安装目录下的ext文件夹,这里应该用斜杠/而不是反斜杠)。如下图;
接着配置php扩展支持,在php.ini文件中查找到以下行: 前面的分号去掉,就表示php支持这些扩展功能了;将以下配置设置为“display_errors= Off”,“log_errors=
On”,“error_log= "D:\ php-5.2.0-Win32\kkeye_errors.log"”(指定位置);
保存并关闭php.ini文件;再将其复制到C:/Windows目录下;
在D:/php-5.2.0-Win32文件夹下找到名为php5ts.dll,libmysql.dll的文件,并将其复制到C:/windows/System32文件夹中
(注:IIS处理PHP 5和MYSQL需要该文件)。
php安装完毕。
Open iis, Right-click the left mouse button"InternetInformation Service" below"网站", then select" Attribute", or a familiar "websiteattribute"## will pop up # Panel, switch to the "Home Directory" tab, click the "Configuration", a "Application Configuration"# will pop up ## box, click the "Add" button below, and finally click ## in the pop-up box #"Executable file"Locate "C:\WINDOWS\system32\inetsrv\fcgiext. dll”, enter # in the text box of “Extension” ##“.php”(Note: Add a dot before the extension), click OK. As shown below; #Fill in the executable fileC:\WINDOWS\system32\inetsrv \fcgiext.dll Fill in the extension .php . Action> is limited to GET,HEAD,POST. The execution permissions in the home directory are as follows: ## Test php configurationCreate a new site under iis, and then create a new "test. php" file, write the sentence "echophpinfo();" into it, save and close. Then access it with a browser. If you can open this web page and the following screen appears, it means the configuration is successful.
Upload website code
##ISAPI_Rewrite, routing rewrite extension installation RegistrationCode= 2EAD-35GH-66NN-ZYBA I am on the test server I didn't see this during installation. After the installation is complete, you can use it without configuring anything: ISAPI_Rewrite After all installation is completed, open the website to test the following functions. 
“
;extension=php_curl.dll
”
“;extension=php_mysql.dll”
;
“
;extension=php_ldap.dll
”
“;extension=php_mysqli.dll”
;
“
;extension=php_exif.dll
”
“;extension=php_gd2.dll”
;
“;extension=php_mbstring.dll”
“
;extension=php_sockets.dll
”
“
;extension=php_xmlrpc.dll
”
Step 2: Configure iis

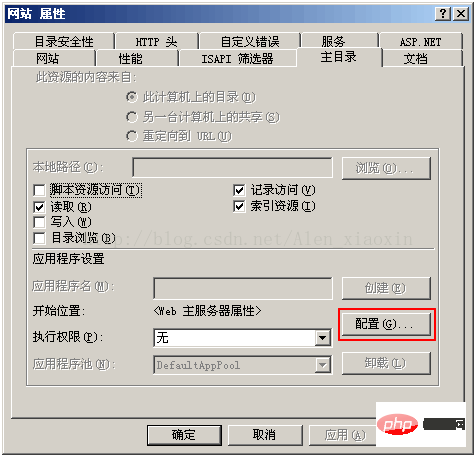
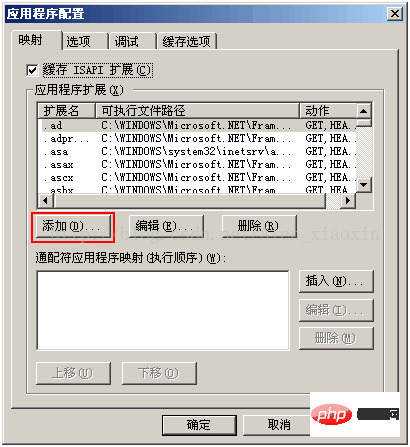
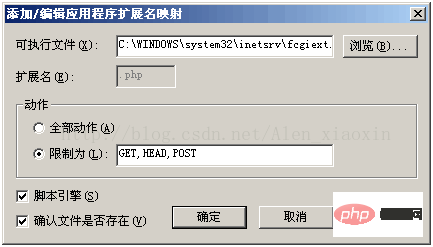
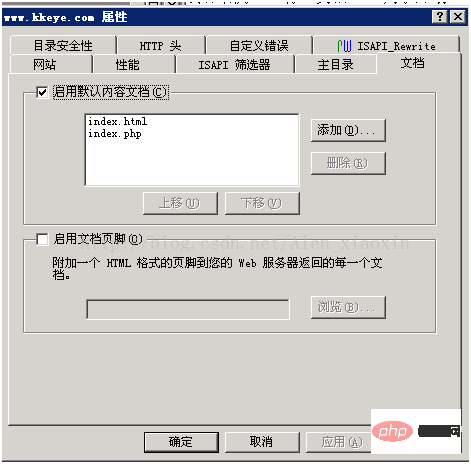
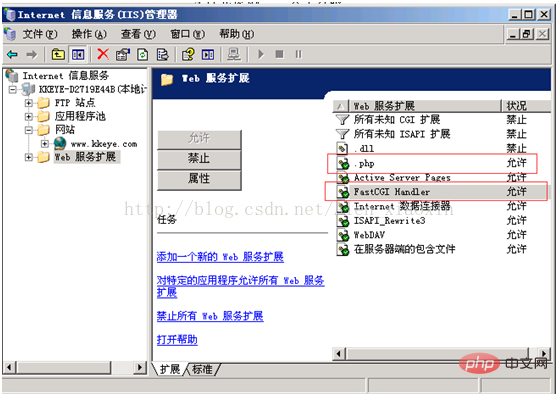
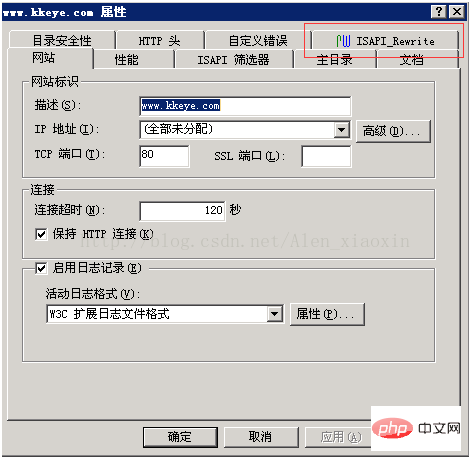
Unzip ISAPI_Rewrite3_0112_x64.zip and get the 20140729131718_34157 folder (containing cracked files and installation methods), ISAPI_Rewrite3_0112_x64.msi installation file;
The above is the detailed content of How to install php environment in windows2003. For more information, please follow other related articles on the PHP Chinese website!

Hot AI Tools

Undresser.AI Undress
AI-powered app for creating realistic nude photos

AI Clothes Remover
Online AI tool for removing clothes from photos.

Undress AI Tool
Undress images for free

Clothoff.io
AI clothes remover

AI Hentai Generator
Generate AI Hentai for free.

Hot Article

Hot Tools

Notepad++7.3.1
Easy-to-use and free code editor

SublimeText3 Chinese version
Chinese version, very easy to use

Zend Studio 13.0.1
Powerful PHP integrated development environment

Dreamweaver CS6
Visual web development tools

SublimeText3 Mac version
God-level code editing software (SublimeText3)

Hot Topics
 1385
1385
 52
52
 PHP 8.4 Installation and Upgrade guide for Ubuntu and Debian
Dec 24, 2024 pm 04:42 PM
PHP 8.4 brings several new features, security improvements, and performance improvements with healthy amounts of feature deprecations and removals. This guide explains how to install PHP 8.4 or upgrade to PHP 8.4 on Ubuntu, Debian, or their derivati
 How To Set Up Visual Studio Code (VS Code) for PHP Development
Dec 20, 2024 am 11:31 AM
Visual Studio Code, also known as VS Code, is a free source code editor — or integrated development environment (IDE) — available for all major operating systems. With a large collection of extensions for many programming languages, VS Code can be c
 7 PHP Functions I Regret I Didn't Know Before
Nov 13, 2024 am 09:42 AM
If you are an experienced PHP developer, you might have the feeling that you’ve been there and done that already.You have developed a significant number of applications, debugged millions of lines of code, and tweaked a bunch of scripts to achieve op
 How do you parse and process HTML/XML in PHP?
Feb 07, 2025 am 11:57 AM
This tutorial demonstrates how to efficiently process XML documents using PHP. XML (eXtensible Markup Language) is a versatile text-based markup language designed for both human readability and machine parsing. It's commonly used for data storage an
 Explain JSON Web Tokens (JWT) and their use case in PHP APIs.
Apr 05, 2025 am 12:04 AM
JWT is an open standard based on JSON, used to securely transmit information between parties, mainly for identity authentication and information exchange. 1. JWT consists of three parts: Header, Payload and Signature. 2. The working principle of JWT includes three steps: generating JWT, verifying JWT and parsing Payload. 3. When using JWT for authentication in PHP, JWT can be generated and verified, and user role and permission information can be included in advanced usage. 4. Common errors include signature verification failure, token expiration, and payload oversized. Debugging skills include using debugging tools and logging. 5. Performance optimization and best practices include using appropriate signature algorithms, setting validity periods reasonably,
 PHP Program to Count Vowels in a String
Feb 07, 2025 pm 12:12 PM
A string is a sequence of characters, including letters, numbers, and symbols. This tutorial will learn how to calculate the number of vowels in a given string in PHP using different methods. The vowels in English are a, e, i, o, u, and they can be uppercase or lowercase. What is a vowel? Vowels are alphabetic characters that represent a specific pronunciation. There are five vowels in English, including uppercase and lowercase: a, e, i, o, u Example 1 Input: String = "Tutorialspoint" Output: 6 explain The vowels in the string "Tutorialspoint" are u, o, i, a, o, i. There are 6 yuan in total
 Explain late static binding in PHP (static::).
Apr 03, 2025 am 12:04 AM
Static binding (static::) implements late static binding (LSB) in PHP, allowing calling classes to be referenced in static contexts rather than defining classes. 1) The parsing process is performed at runtime, 2) Look up the call class in the inheritance relationship, 3) It may bring performance overhead.
 What are PHP magic methods (__construct, __destruct, __call, __get, __set, etc.) and provide use cases?
Apr 03, 2025 am 12:03 AM
What are the magic methods of PHP? PHP's magic methods include: 1.\_\_construct, used to initialize objects; 2.\_\_destruct, used to clean up resources; 3.\_\_call, handle non-existent method calls; 4.\_\_get, implement dynamic attribute access; 5.\_\_set, implement dynamic attribute settings. These methods are automatically called in certain situations, improving code flexibility and efficiency.


