

How to adjust the table in word document to one page

How to adjust the table in the word document to one page: first adjust the line spacing and column spacing; then stretch the table and adjust it according to the window; then adjust the paper direction; finally, the adjusted table is centered That’s it.

How to adjust the table in the word document to one page:
1. Adjust the line spacing and columns Distance
There are two ways to adjust the row/column distance
①Manual adjustment: Select the one with a larger distance, place the mouse on the border line and double-click when a double line appears
②Automatic adjustment: Select the entire table, right-click the table properties/row/column and enter the specified value. It usually takes several attempts to get the appropriate value

2. Stretch the table
Select the table, and a small white box will appear in the lower right corner. Place the mouse on it and wait until a black cross appears to stretch the table in the upper left or lower right direction. Stretch the out-of-range table content to one page

3. Adjust the table according to the window
Select the entire table copied and pasted, right-click / Automatically adjust/adjust to a table based on the window content. The system automatically compresses the table content to one page according to the paper size

4. Adjust the paper direction
Some tables When there is too much horizontal and vertical content and the previous methods cannot solve it, you can consider adjusting the paper direction. The specific method is to insert a section break first, and then adjust the horizontal or vertical direction in the page layout/paper direction

5. Adjusted table centering settings
After adjusting to one page, the table format will change slightly and appropriate adjustments are required, mainly including table centering and table content centering.
①Center the table: select the entire table, start/paragraph/center
②Center the table content: select the entire table, right-click/center cell mode/center horizontally

Related learning recommendations: Word novice tutorial
The above is the detailed content of How to adjust the table in word document to one page. For more information, please follow other related articles on the PHP Chinese website!

Hot AI Tools

Undresser.AI Undress
AI-powered app for creating realistic nude photos

AI Clothes Remover
Online AI tool for removing clothes from photos.

Undress AI Tool
Undress images for free

Clothoff.io
AI clothes remover

Video Face Swap
Swap faces in any video effortlessly with our completely free AI face swap tool!

Hot Article
Hot Tools

Notepad++7.3.1
Easy-to-use and free code editor

SublimeText3 Chinese version
Chinese version, very easy to use

Zend Studio 13.0.1
Powerful PHP integrated development environment

Dreamweaver CS6
Visual web development tools

SublimeText3 Mac version
God-level code editing software (SublimeText3)
Hot Topics
 1386
1386
 52
52

 How to adjust screen brightness on Windows 11
Jan 02, 2024 pm 03:17 PM
How to adjust screen brightness on Windows 11
Jan 02, 2024 pm 03:17 PM
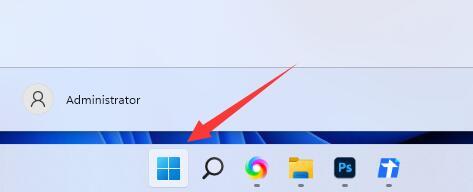
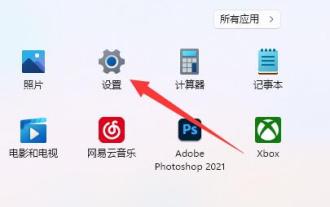
In win11, if the screen brightness is too dark, you will not be able to see the picture clearly, and if it is too bright, it will dazzle your eyes. So how do you adjust the screen brightness in win11? In fact, you can adjust it in the display settings, which is very convenient. How to adjust the screen brightness in win11: 1. First open the "Start Menu" below 2. Then click "Settings" above 3. After opening, enter the "Display" settings on the right. 4. After opening, slide the brightness slider to adjust the screen brightness.
 How to change web page zoom ratio in Edge browser
Jan 29, 2024 pm 09:06 PM
How to change web page zoom ratio in Edge browser
Jan 29, 2024 pm 09:06 PM
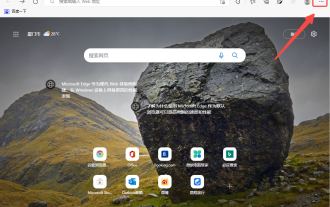
How to adjust the web page display ratio of the Edge browser? When we use the edge browser, if we want to adjust the web page display ratio, how should we adjust it? Let’s introduce it below! When we use the edge browser to browse the web, the text on some web pages is relatively small. In this case, we can adjust the web page proportion to enlarge the entire page so that we can clearly see the text. So what is the specific operation? Let me introduce it below! If not, let’s read on! Tips for adjusting the display ratio of Edge browser web pages: 1. After using Edge browser to open the web page that needs to be enlarged, click the "Settings and Others" icon consisting of three dots in the upper right corner of the browser. 2. Then find the “Zoom” option in the Edge browser menu window that pops up below.
 How to adjust mouse dpi in win11
Dec 29, 2023 pm 04:34 PM
How to adjust mouse dpi in win11
Dec 29, 2023 pm 04:34 PM
For gamers, mouse dpi is very important and affects the operating feel. So how to adjust mouse dpi in win11? In fact, the adjustment method may be different depending on the mouse model we use. How to adjust mouse dpi in win11 Method 1: (General) 1. First, open the "Settings" application and click on "Bluetooth and other devices" on the left. 2. Then click to enter the "Mouse" setting option on the right. 3. Finally, click on this page to modify the mouse speed dpi. Method 2: (Professional equipment) 1. Professional mice usually come with a dpi adjustment button. 2. If not, download a professional driver software and adjust the dpi in it.
 How to solve the problem of missing 1920x1080 resolution in Win10
Jan 06, 2024 am 09:08 AM
How to solve the problem of missing 1920x1080 resolution in Win10
Jan 06, 2024 am 09:08 AM
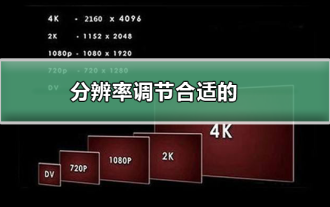
The win10 system is a very excellent system, and its strong stability is the most powerful part of the system. Today, the editor brings you a solution to the problem that the win10 resolution does not have 1920x1080! Let's take a look together if necessary. Solution to the problem that the resolution of win10 system is not 1920x1080: Note: The problem that the resolution of win10 is not 1920x1080 is caused by the graphics card driver! So I just need to update the graphics card driver. (The specific steps are as follows) 1. Right-click the computer and select Manage to open. 2. Find the device manager from the left side of the opened management interface. 3. Continue to find the display adapter from the left side in the opened device manager interface and open it. 4. Finally, right-click and select
 How to adjust Win11 mouse DPI?
Jun 30, 2023 pm 12:53 PM
How to adjust Win11 mouse DPI?
Jun 30, 2023 pm 12:53 PM
How to adjust mouse dpi in Win11? The mouse is an essential device for using a computer. For some players who like to play games, the higher the DPI value of the mouse, the higher the sensitivity. However, some friends using the Win11 system want to modify the DPI value but do not know. How to operate, let’s take a look at how to modify the mouse dpi value in Win11 system with the editor. Detailed steps for adjusting mouse dpi in Win11 1. First, let’s talk about a general method, open the system settings. 2. After opening it, enter Bluetooth and other devices on the left. 3. Then enter the mouse settings on the right. 4. Finally, you can modify the mouse speed dpi. The above is [How to adjust mouse dpi in Win11-Win11 adjustment
 How to edit photos on iPhone using iOS 17
Nov 30, 2023 pm 11:39 PM
How to edit photos on iPhone using iOS 17
Nov 30, 2023 pm 11:39 PM
Mobile photography has fundamentally changed the way we capture and share life’s moments. The advent of smartphones, especially the iPhone, played a key role in this shift. Known for its advanced camera technology and user-friendly editing features, iPhone has become the first choice for amateur and experienced photographers alike. The launch of iOS 17 marks an important milestone in this journey. Apple's latest update brings an enhanced set of photo editing features, giving users a more powerful toolkit to turn their everyday snapshots into visually engaging and artistically rich images. This technological development not only simplifies the photography process but also opens up new avenues for creative expression, allowing users to effortlessly inject a professional touch into their photos
 How to adjust the subtitles of National K-song
Feb 23, 2024 pm 07:16 PM
How to adjust the subtitles of National K-song
Feb 23, 2024 pm 07:16 PM
How to adjust the subtitles of karaoke? The subtitles of lyrics can be adjusted in the National Karaoke APP, but many users do not know how to adjust the subtitles of Karaoke moments. The latest solutions to the problems will be continuously sorted out below. Next is the National Karaoke that the editor brings to users. Here is a graphic tutorial on how to adjust subtitles. Interested users can take a look together! Tutorial on the use of National Karaoke. How to adjust the subtitles of National Karaoke. 1. First open the Universal Karaoke APP, switch to the [Voice Sing] section on the main page, select your favorite song and click [K Song]; 2. Then switch to the Karaoke page, Click the red button [Start Singing] at the bottom; 3. Then on the latest page, click the [three dots] function in the upper right corner; 4. Finally, expand the function bar at the bottom and select [Font Size] to adjust
 How to fix inappropriate resolution issues
Jan 08, 2024 pm 03:25 PM
How to fix inappropriate resolution issues
Jan 08, 2024 pm 03:25 PM
After reinstalling the system, we may not have the resolution we want, and some resolutions may look very uncomfortable. The reason may be that the graphics card driver is not installed or the driver version is out of date. After installing a driver, the problem will appear after opening it. You will be prompted for the drivers you need to install. After all are installed, restart the computer. Generally, it can automatically match the resolution suitable for your monitor. If it still doesn't work, we need to customize one. Let's take a look at the details. There is no suitable solution for the resolution. 1. Install driver life, update all drivers according to the prompts, and then restart the computer; 2. Right-click the computer desktop and select NVIDIA Control Panel to open. If not, click the start menu program in the lower left corner of the computer. 3. Select <Change Resolution>→<Customize>
