Chrome+Puppeteer+Node.js website crawling tutorial sharing
Aug 20, 2020 am 10:23 AM
What will we learn?
In this tutorial, you will learn how to use JavaScript to automate and clean the web. To do this we will use Puppeteer. Puppeteer is a Node library API that allows us to control headless Chrome. Headless Chrome is a way to run the Chrome browser without actually running Chrome.
【Video Tutorial Recommendation: nodejs Tutorial】
If none of this makes sense, what you really need to know is that we are going to write JavaScript code that makes Google Chrome automates.
Before you begin
Before you begin, you need to have Node 8 installed on your computer. You can install it here. Make sure to select the "current" version 8 version.
If you have never used Node before and want to learn, check out: Learn Node JS 3 Best Online Node JS Courses.
After installing Node, create a new project folder and install Puppeteer. Puppeteer comes with the latest version of Chromium that can be used with the API:
npm install --save puppeteer
Example #1 — Screenshot
After installing Puppeteer, we will start with a simple example. This example is from the Puppeteer documentation (with minor changes). We will step by step through the code how to take a screenshot of the website you visit.
First, create a file called test.js and copy the following code:
const puppeteer = require('puppeteer');

async function getPic() {
  const browser = await puppeteer.launch();
  const page = await browser.newPage();
  await page.goto('https://google.com');
  await page.screenshot({path: 'google.png'});

  await browser.close();
}

getPic();Let’s go through this example line by line.
- Line 1: We need the Puppeteer dependencies we installed earlier
-
Lines 3-10: Here are our Main function
getPic(). This function will hold all our automation code. -
Line 12: On line 12, we call the
getPic()function.
It should be noted that the getPic() function is an asynchronous function and takes advantage of the new ES 2017async/awaitFunction. Since this function is asynchronous, it returns a Promise when called. When the Async function finally returns a value, the Promise will be resolved (or Reject if there is an error).
Since we are using an async function, we can use a await expression, which will pause function execution and wait for Promise Parse before continuing. If all of this doesn't make sense now, that's okay. It will become clearer as we continue through the tutorial.
Now that we have an overview of the main function, let’s dive into its internal functionality:
- Line 4:
const browser = await puppeteer.launch();
This is where we actually start the puppeteer. Essentially, we're launching an instance of Chrome and setting it equal to our newly created browser variable. Since we used the await keyword, the function will pause here until the Promise resolves (until we successfully create the Chrome instance or an error occurs).
- Line 5:
const page = await browser.newPage();
Here we create a new page in the automatic browser. We wait for the new page to open and save it to our page variable.
- Line 6:
await page.goto('https://google.com'); Using the page we created in the last line of code, we can now tell page Navigate to URL. In this example, navigate to google. Our code will pause until the page has loaded.
- Line 7:
await page.screenshot({path: 'google.png'});Now, we tell Puppeteer to take a screenshot of the current page. The screenshot() method takes the custom .png object of the save location of the screenshot as a parameter. Again, we used the await keyword so our code pauses while the action is being performed.
- Line 9:
await browser.close();
Finally, we reach the end of the getPic() function and close browser.
Run the example
You can run the above example code using Node:
node test.js
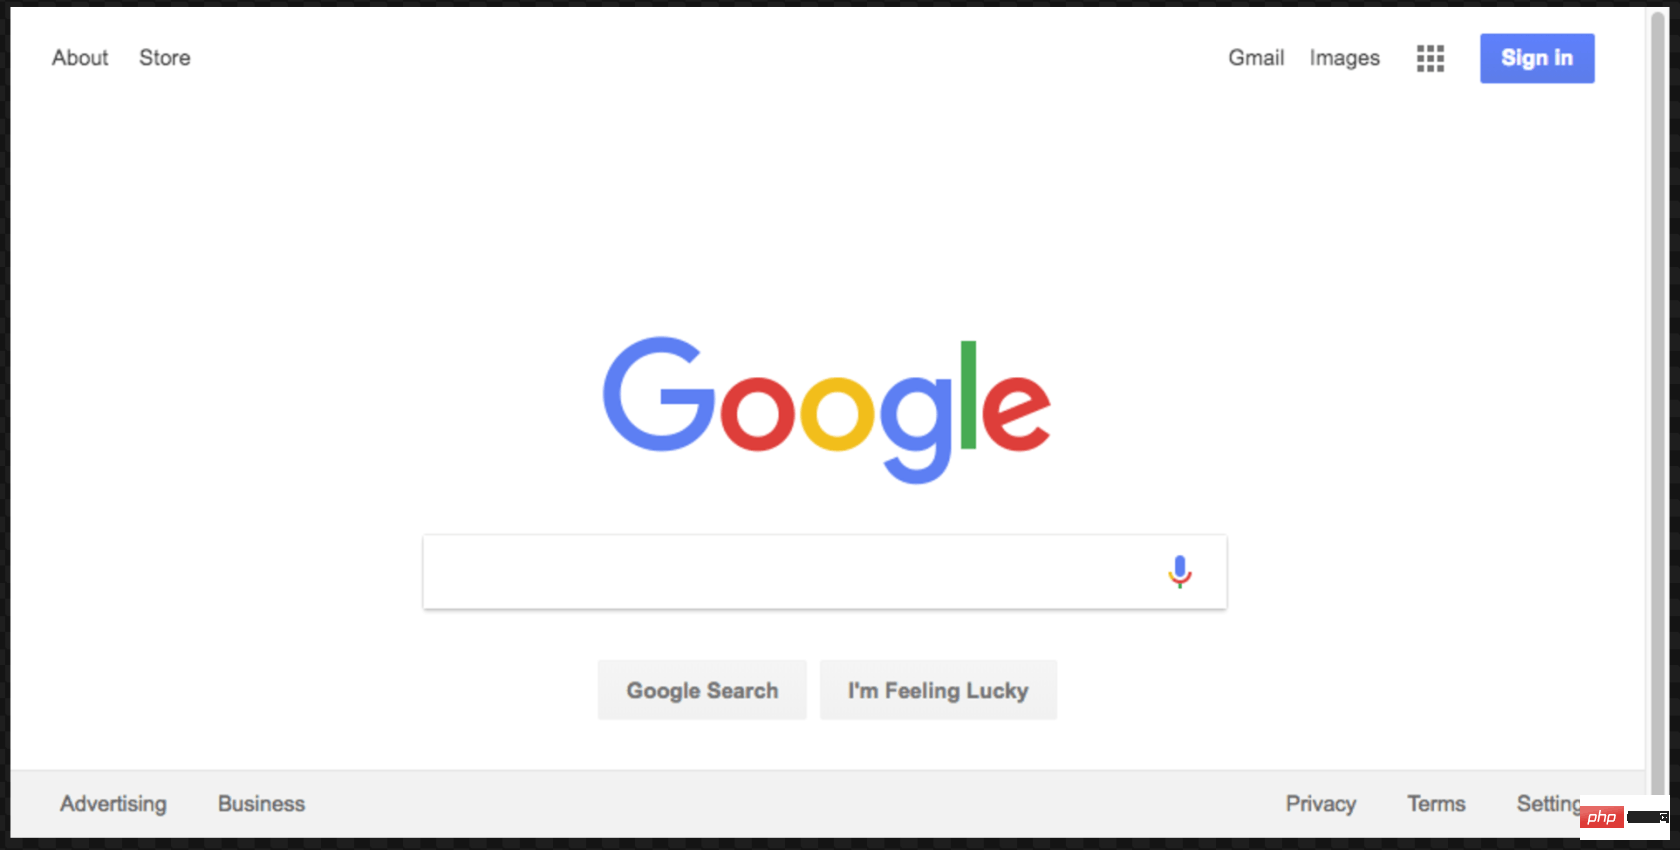
This is the resulting screenshot:

marvelous! For added fun (and easier debugging) we can run the code without running it headless.
What does this mean? Try it yourself and see. Change line 4 of the code from:
const browser = await puppeteer.launch();
to:
const browser = await puppeteer.launch({headless: false});Then run it again using Node:
node test.js
So cool, right? You can actually see Google Chrome working according to your code when we run it with {headless: false}.
Before we continue, we will do one last thing to this code. Remember our screenshot was a little off-center? That's because our page is a bit small. We can change the size of the page by adding the following lines of code:
await page.setViewport({width: 1000, height: 500})这个屏幕截图更好看点:
这是本示例的最终代码:
const puppeteer = require('puppeteer');

async function getPic() {
  const browser = await puppeteer.launch({headless: false});
  const page = await browser.newPage();
  await page.goto('https://google.com');
  await page.setViewport({width: 1000, height: 500})
  await page.screenshot({path: 'google.png'});

  await browser.close();
}

getPic();示例 #2-让我们抓取一些数据
既然您已经了解了 Headless Chrome 和 Puppeteer 的工作原理,那么让我们看一个更复杂的示例,在该示例中我们事实上可以抓取一些数据。
首先, 在此处查看 Puppeteer 的 API 文档。 如您所见,我们有很多方法可以使用, 不仅可以点击网站,还可以填写表格,输入内容和读取数据。
在本教程中,我们将抓取 Books To Scrape ,这是一家专门设置的假书店,旨在帮助人们练习抓取。
在同一目录中,创建一个名为scrape.js的文件,并插入以下样板代码:
const puppeteer = require('puppeteer');

let scrape = async () => {
  // 实际的抓取从这里开始...

  // 返回值
};

scrape().then((value) => {
    console.log(value); // 成功!
});理想情况下,在看完第一个示例之后,上面的代码对您有意义。如果没有,那没关系!
我们上面所做的需要以前安装的puppeteer依赖关系。然后我们有scraping()函数,我们将在其中填入抓取代码。此函数将返回值。最后,我们调用scraping函数并处理返回值(将其记录到控制台)。
我们可以通过在scrape函数中添加一行代码来测试以上代码。试试看:
let scrape = async () => {
  return 'test';
};现在,在控制台中运行node scrape.js。您应该返回test!完美,我们返回的值正在记录到控制台。现在我们可以开始补充我们的scrape函数。
步骤1:设置
我们需要做的第一件事是创建浏览器实例,打开一个新页面,然后导航到URL。我们的操作方法如下:
let scrape = async () => {
  const browser = await puppeteer.launch({headless: false});
  const page = await browser.newPage();
  await page.goto('http://books.toscrape.com/');
  await page.waitFor(1000); // Scrape browser.close();
return result;};太棒了!让我们逐行学习它:
首先,我们创建浏览器,并将headless模式设置为false。这使我们可以准确地观察发生了什么:
const browser = await puppeteer.launch({headless: false});然后,我们在浏览器中创建一个新页面:
const page = await browser.newPage();
接下来,我们转到books.toscrape.com URL:
await page.goto('http://books.toscrape.com/');我选择性地添加了1000毫秒的延迟。尽管通常没有必要,但这将确保页面上的所有内容都加载:
await page.waitFor(1000);
最后,完成所有操作后,我们将关闭浏览器并返回结果。
browser.close();
return result;
步骤2:抓取
正如您现在可能已经确定的那样,Books to Scrape 拥有大量的真实书籍和这些书籍的伪造数据。我们要做的是选择页面上的第一本书,然后返回该书的标题和价格。这是要抓取的图书的主页。我有兴趣点第一本书(下面红色标记)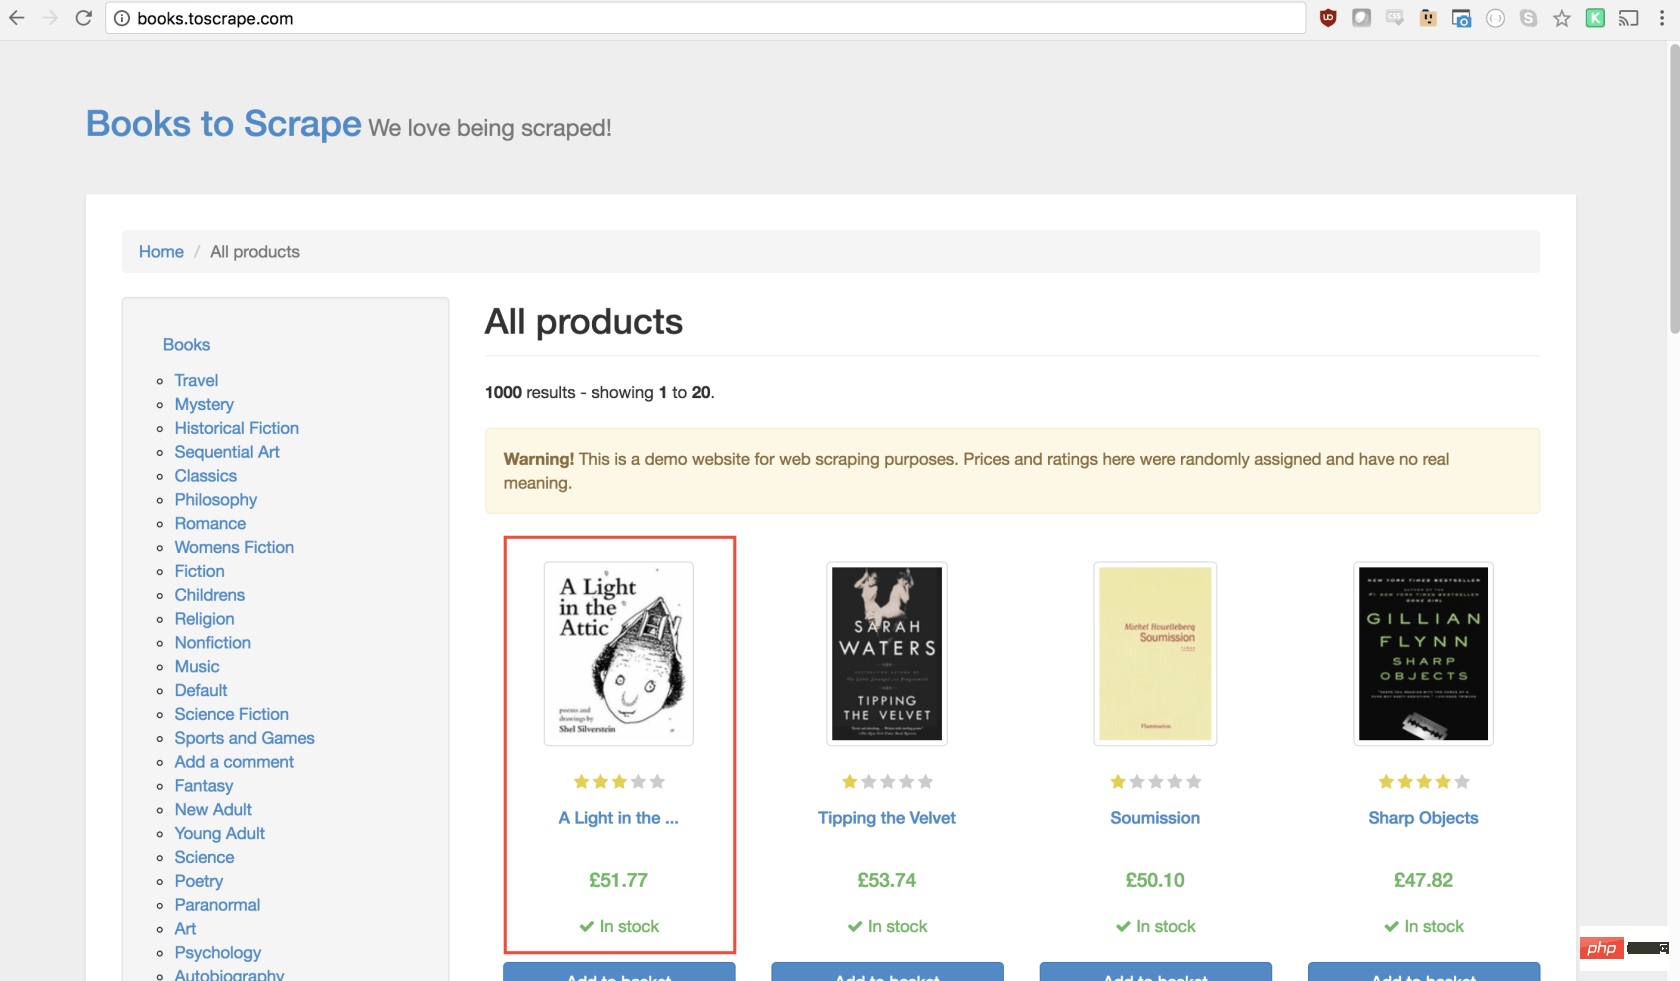
查看 Puppeteer API,我们可以找到单击页面的方法:
page.click(selector[, options])
-
selector用于选择要单击的元素的选择器,如果有多个满足选择器的元素,则将单击第一个。
幸运的是,使用 Google Chrome 开发者工具可以非常轻松地确定特定元素的选择器。只需右键单击图像并选择检查: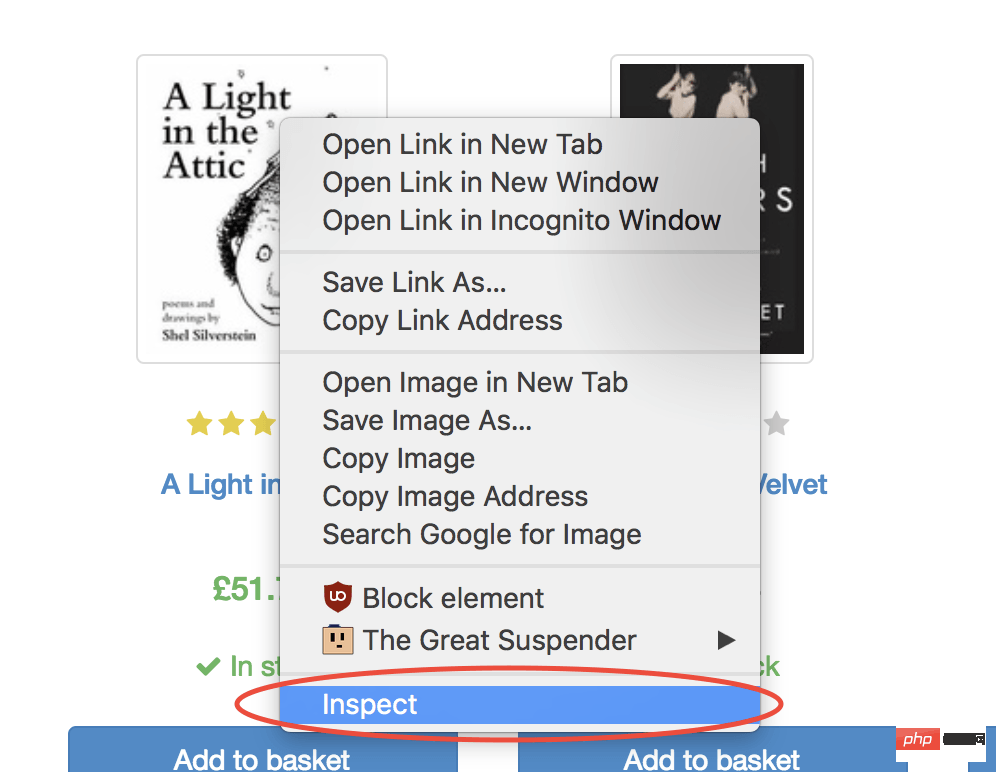
这将打开元素面板,突出显示该元素。现在,您可以单击左侧的三个点,选择复制,然后选择复制选择器:
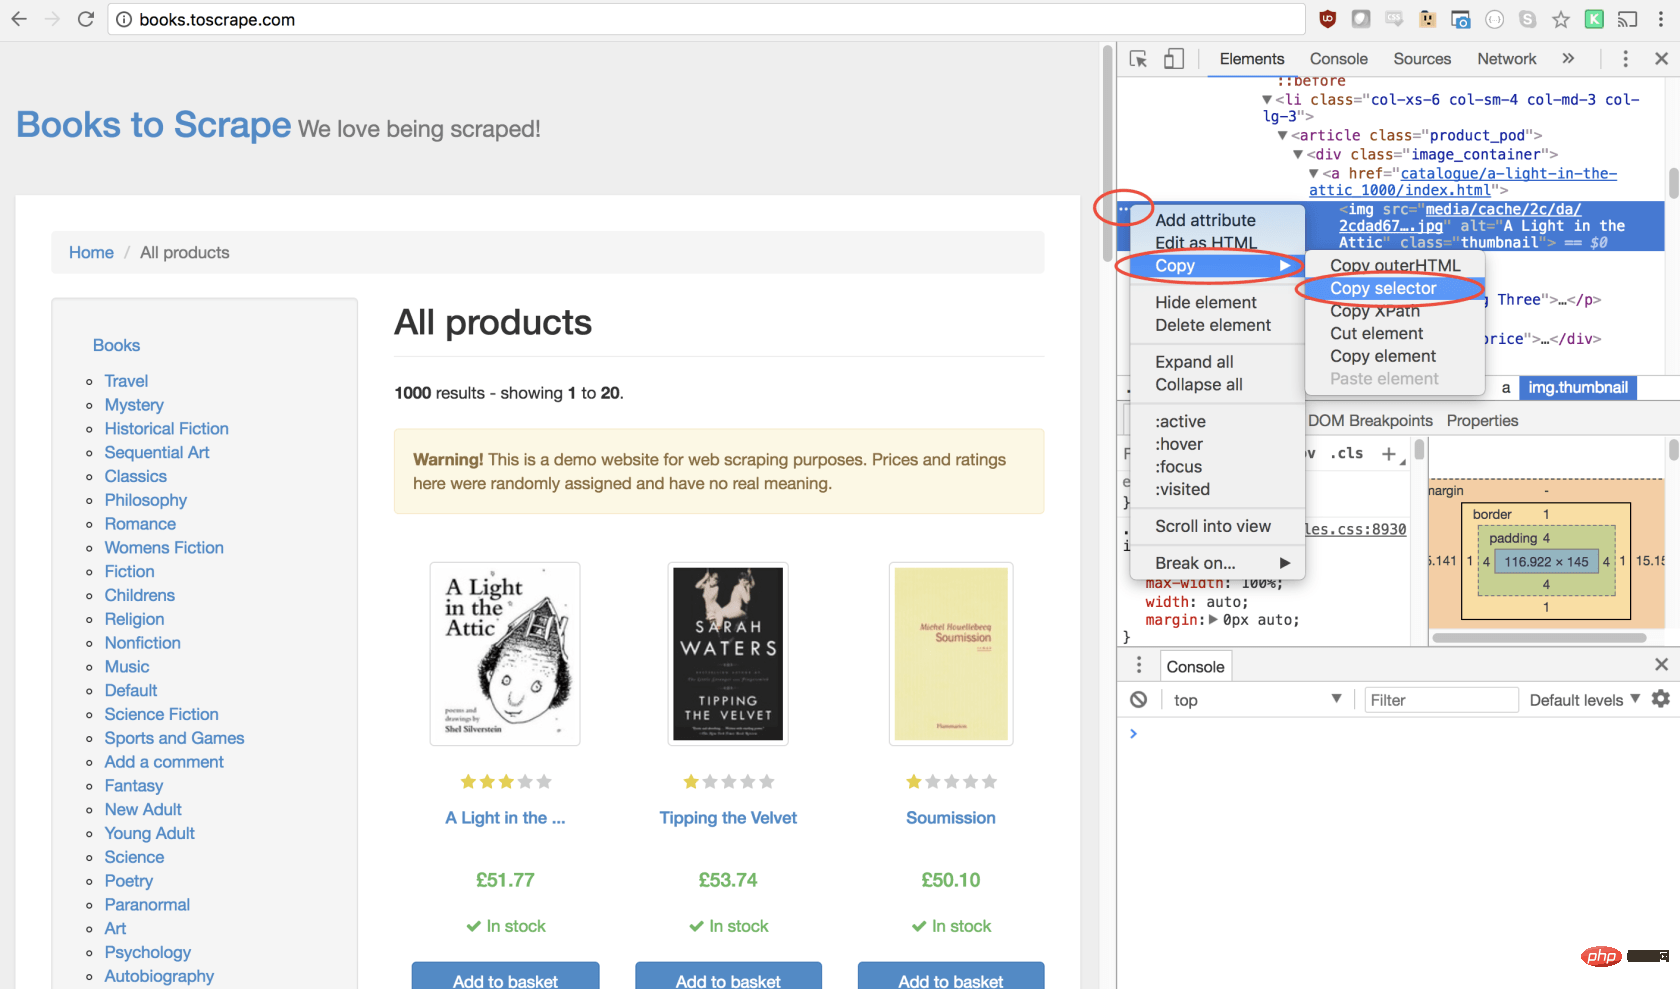
太棒了!现在,我们复制了选择器,并且可以将click方法插入程序。像这样:
await page.click('#default > p > p > p > p > section > p:nth-child(2) > ol > li:nth-child(1) > article > p.image_container > a > img');我们的窗口将单击第一个产品图像并导航到该产品页面!
在新页面上,我们对商品名称和商品价格均感兴趣(以下以红色概述)
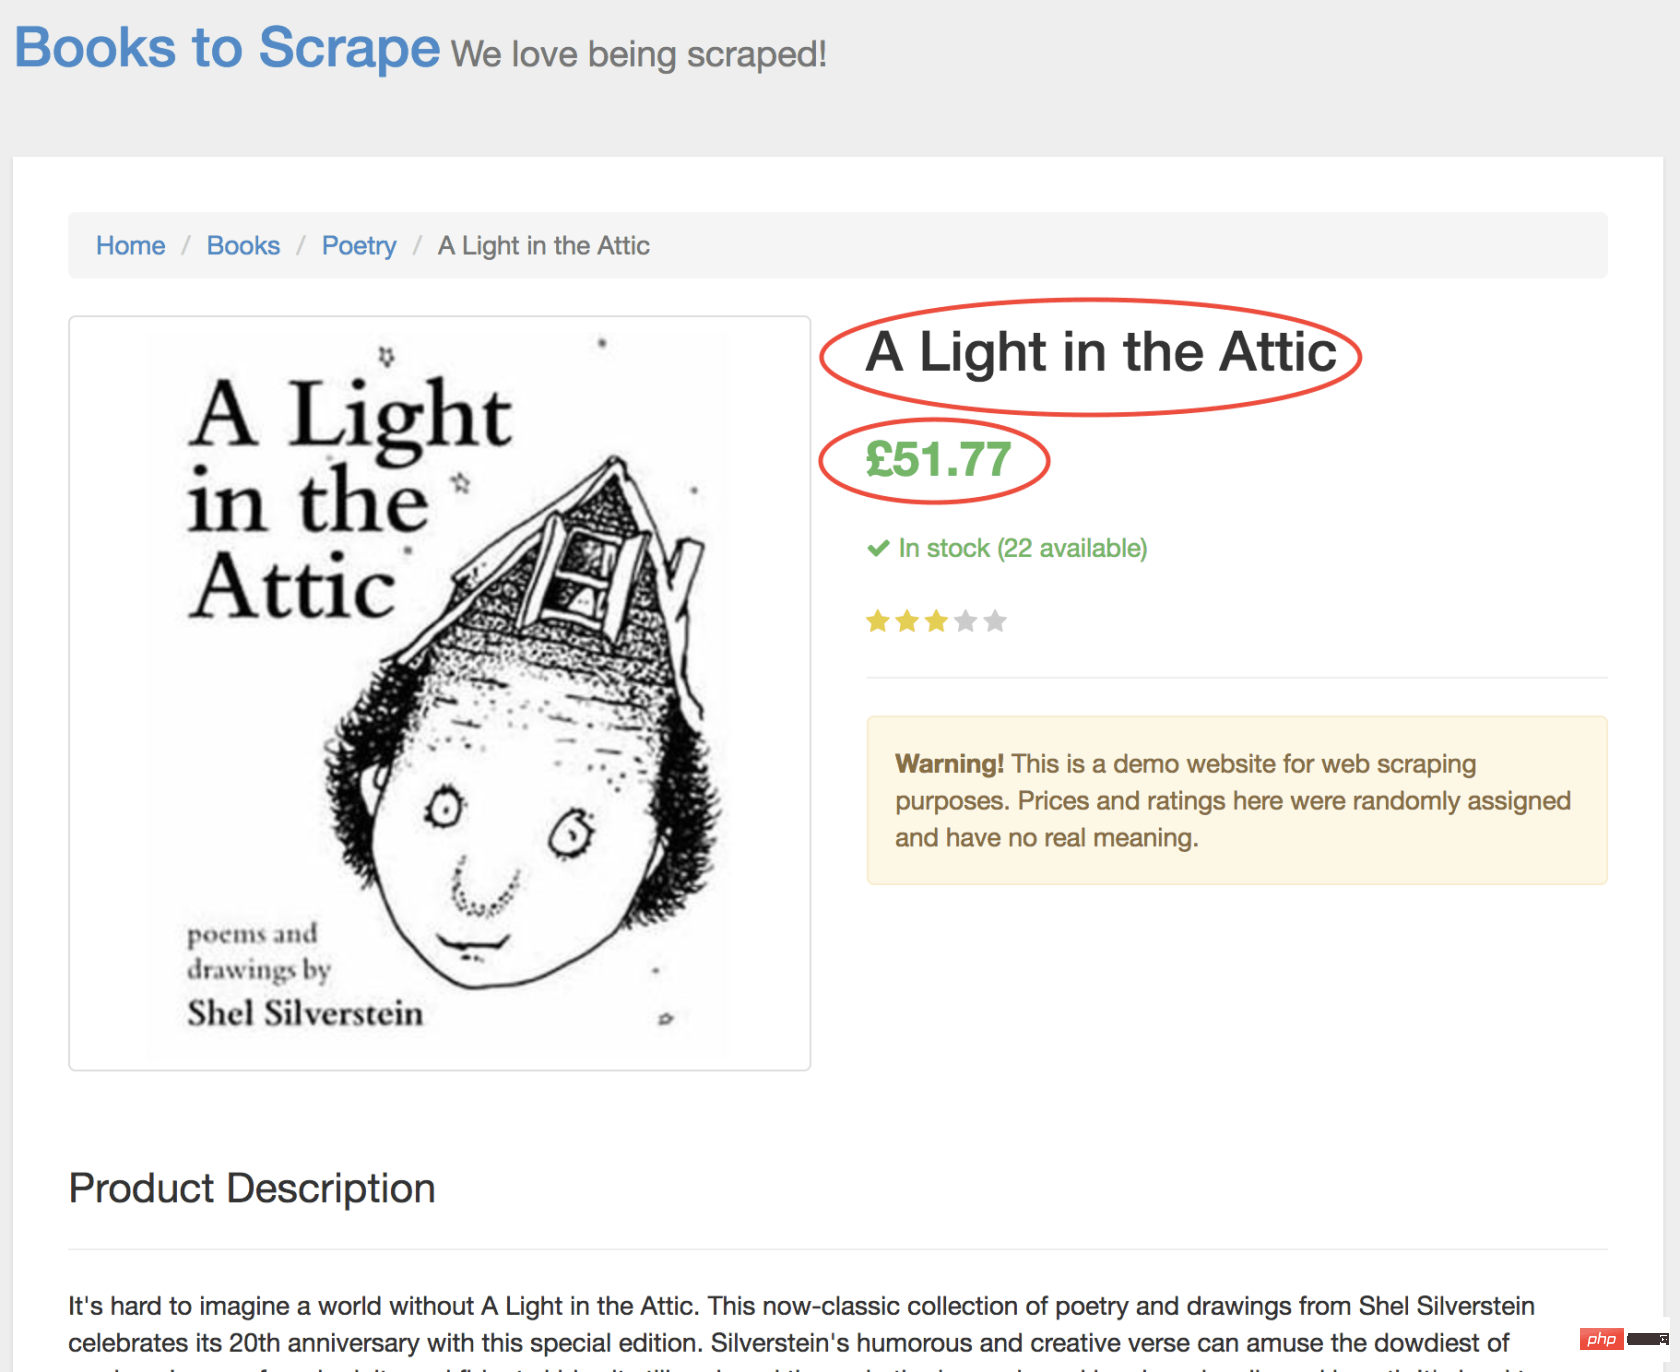
为了检索这些值,我们将使用page.evaluate()方法。此方法使我们可以使用内置的 DOM 选择器,例如querySelector()。
我们要做的第一件事是创建page.evaluate()函数,并将返回值保存到变量result中:
const result = await page.evaluate(() => {// return something});在函数里,我们可以选择所需的元素。我们将使用 Google Developers 工具再次解决这一问题。右键单击标题,然后选择检查:

正如您将在 elements 面板中看到的那样,标题只是一个h1元素。我们可以使用以下代码选择此元素:
let title = document.querySelector('h1');由于我们希望文本包含在此元素中,因此我们需要添加.innerText-最终代码如下所示:
let title = document.querySelector('h1').innerText;同样,我们可以通过单击右键检查元素来选择价格:
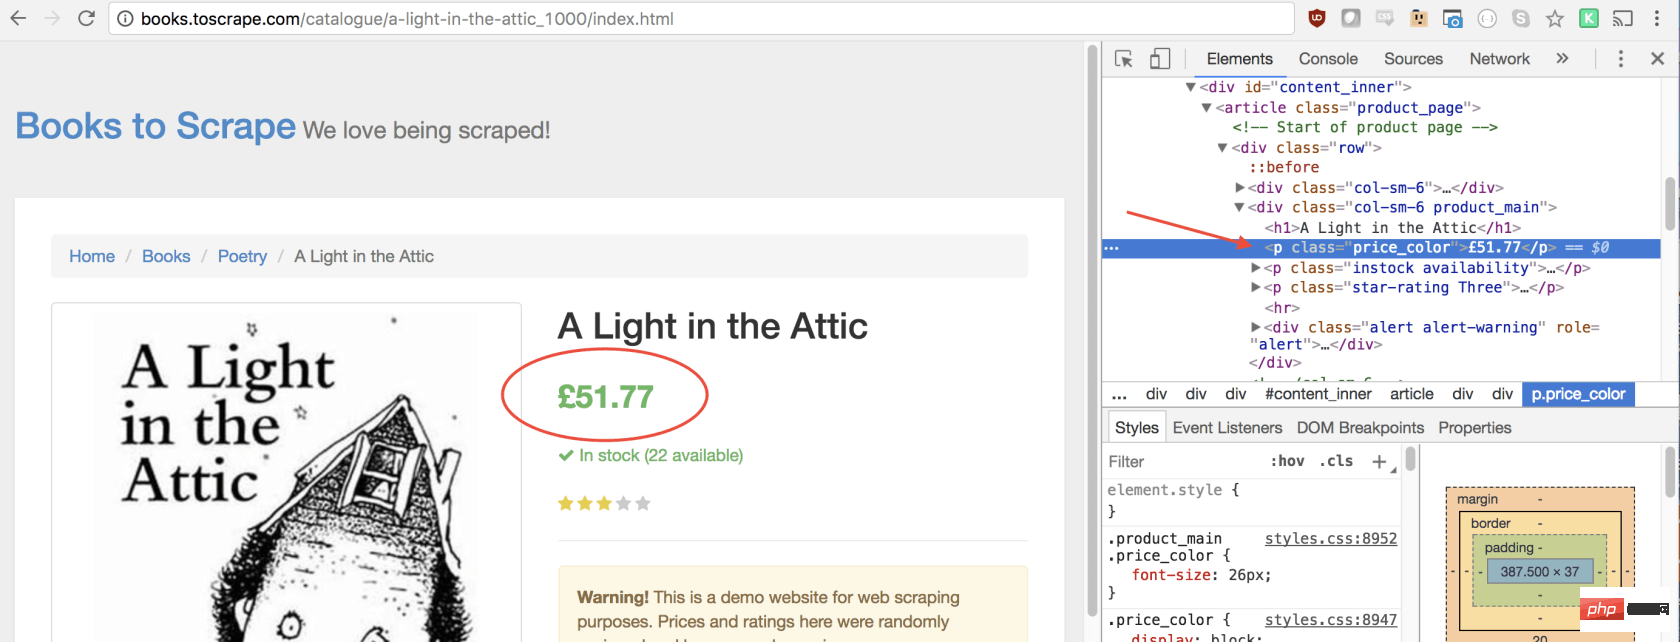
如您所见,我们的价格有price_color类,我们可以使用此类选择元素及其内部文本。这是代码:
let price = document.querySelector('.price_color').innerText;现在我们有了所需的文本,可以将其返回到一个对象中:
return {
  title,
  price
}太棒了!我们选择标题和价格,将其保存到一个对象中,然后将该对象的值返回给result变量。放在一起是这样的:
const result = await page.evaluate(() => {
  let title = document.querySelector('h1').innerText;
  let price = document.querySelector('.price_color').innerText;
  return {
     title,
     price
}});剩下要做的唯一一件事就是返回result,以便可以将其记录到控制台:
return result;
您的最终代码应如下所示:
const puppeteer = require('puppeteer');

let scrape = async () => {
    const browser = await puppeteer.launch({headless: false});
    const page = await browser.newPage();

    await page.goto('http://books.toscrape.com/');
    await page.click('#default > p > p > p > p > section > p:nth-child(2) > ol > li:nth-child(1) > article > p.image_container > a > img');
    await page.waitFor(1000);

    const result = await page.evaluate(() => {
        let title = document.querySelector('h1').innerText;
        let price = document.querySelector('.price_color').innerText;

        return {
            title,
            price
        }

    });

    browser.close();
    return result;
};

scrape().then((value) => {
    console.log(value); // 成功!
});您可以通过在控制台中键入以下内容来运行 Node 文件:
node scrape.js // { 书名: 'A Light in the Attic', 价格: '£51.77' }您应该看到所选图书的标题和价格返回到屏幕上!您刚刚抓取了网页!
示例 #3 ——完善它
现在您可能会问自己,当标题和价格都显示在主页上时,为什么我们要点击书?为什么不从那里抓取呢?而在我们尝试时,为什么不抓紧所有书籍的标题和价格呢?
因为有很多方法可以抓取网站! (此外,如果我们留在首页上,我们的标题将被删掉)。但是,这为您提供了练习新的抓取技能的绝好机会!
挑战
目标 ——从首页抓取所有书名和价格,并以数组形式返回。这是我最终的输出结果:
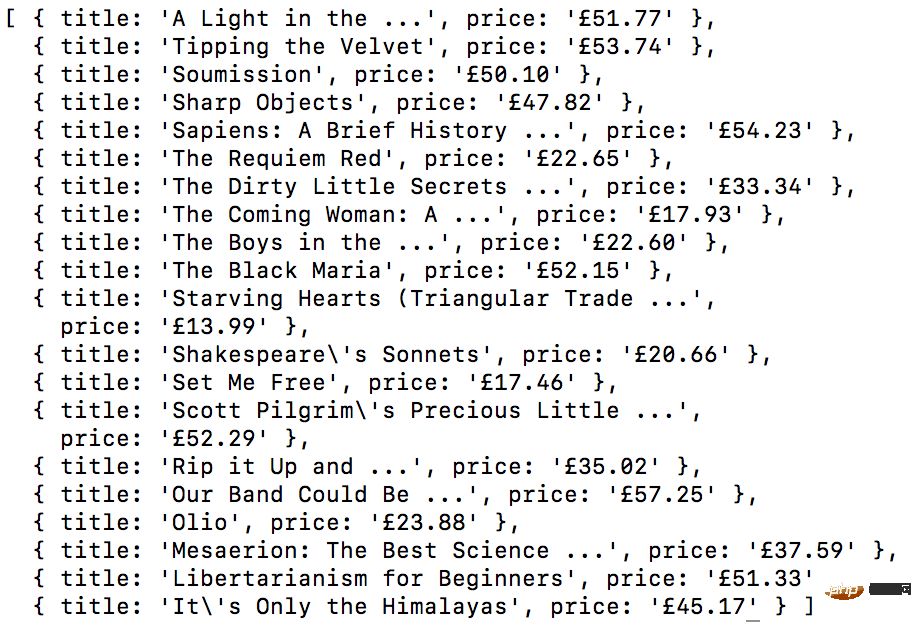
开始!看看您是否可以自己完成此任务。与我们刚创建的上述程序非常相似,如果卡住,请向下滚动…
GO! See if you can accomplish this on your own. It’s very similar to the above program we just created. Scroll down if you get stuck…
提示:
此挑战与上一个示例之间的主要区别是需要遍历大量结果。您可以按照以下方法设置代码来做到这一点:
const result = await page.evaluate(() => {
  let data = []; // 创建一个空数组
  let elements = document.querySelectorAll('xxx'); // 选择全部
    // 遍历每一个产品
    // 选择标题
    // 选择价格
    data.push({title, price}); // 将数据放到数组里, 返回数据;
    // 返回数据数组
});如果您不明白,没事!这是一个棘手的问题…… 这是一种可能的解决方案。在以后的文章中,我将深入研究此代码及其工作方式,我们还将介绍更高级的抓取技术。如果您想收到通知,请务必 在此处输入您的电子邮件 。
方案:
const puppeteer = require('puppeteer');

let scrape = async () => {
    const browser = await puppeteer.launch({headless: false});
    const page = await browser.newPage();

    await page.goto('http://books.toscrape.com/');

    const result = await page.evaluate(() => {
        let data = []; // 创建一个空数组, 用来存储数据
        let elements = document.querySelectorAll('.product_pod'); // 选择所有产品

        for (var element of elements){ // 遍历每个产品
            let title = element.childNodes[5].innerText; // 选择标题
            let price = element.childNodes[7].children[0].innerText; // 选择价格

            data.push({title, price}); // 将对象放进数组 data
        }

        return data; // 返回数组 data
    });

    browser.close();
    return result; //  返回数据
};

scrape().then((value) => {
    console.log(value); // 成功!
});结束语:
感谢您的阅读!
原文地址:https://codeburst.io/a-guide-to-automati...
译文地址:https://learnku.com/nodejs/t/44845
更多编程相关知识,可访问:编程入门!!
The above is the detailed content of Chrome+Puppeteer+Node.js website crawling tutorial sharing. For more information, please follow other related articles on the PHP Chinese website!

Hot Article

Hot tools Tags

Hot Article

Hot Article Tags

Notepad++7.3.1
Easy-to-use and free code editor

SublimeText3 Chinese version
Chinese version, very easy to use

Zend Studio 13.0.1
Powerful PHP integrated development environment

Dreamweaver CS6
Visual web development tools

SublimeText3 Mac version
God-level code editing software (SublimeText3)

Hot Topics
 What is Updater.exe in Windows 11/10? Is this the Chrome process?
Mar 21, 2024 pm 05:36 PM
What is Updater.exe in Windows 11/10? Is this the Chrome process?
 What to do if chrome cannot load plugins
Nov 06, 2023 pm 02:22 PM
What to do if chrome cannot load plugins
 How to solve the problem that Google Chrome cannot open web pages
Jan 04, 2024 pm 10:18 PM
How to solve the problem that Google Chrome cannot open web pages
 What is the Chrome plug-in extension installation directory?
Mar 08, 2024 am 08:55 AM
What is the Chrome plug-in extension installation directory?
 An article about memory control in Node
Apr 26, 2023 pm 05:37 PM
An article about memory control in Node
 Detailed graphic explanation of the memory and GC of the Node V8 engine
Mar 29, 2023 pm 06:02 PM
Detailed graphic explanation of the memory and GC of the Node V8 engine
 How to search for text across all tabs in Chrome and Edge
Feb 19, 2024 am 11:30 AM
How to search for text across all tabs in Chrome and Edge


