

Detailed explanation of Python photo synthesis method


【Related learning recommendations: python tutorial】
Article directory
- Foreword
- Github
- Effect
- Implementation process
- Overall code
Preface
When I was watching a movie, I found a photo wall function. I thought it was fun to generate photos in this way, so I started to do it with Python and thought it would be useful. It might be a good idea to take a photo as a souvenir.
P: Later I learned that the function I want to do is called montage puzzle, so I will keep this blog record for now. I will take a look at the algorithm of montage puzzle when I have time
Github
https://github.com/jiandi1027/photo.git
Effect
Implementation process
1. Get the number N of pictures in the picture folder, split the base image into XY blocks, and make X * Y
	# 打开图片
	base = Image.open(baseImgPath)
    base = base.convert('RGBA')
    # 获取图片文件夹图片并打乱顺序
    files = glob.glob(imagesPath + '/*.*')
    random.shuffle(files)
    # 图片数量
    num = len(files)
	# 底图大小
    x = base.size[0]
    y = base.size[1]
    # 每张图片数量 这个公式是为了xNum * yNum 的总图片数量<num又成比例的最大整数
    yNum = int((num / (y / x)) ** 0.5)
    if yNum == 0:
        yNum = 1
    xNum = int(num / yNum)
    # 图片大小 因为像素没有小数点 为防止黑边所以+1
    xSize = int(x / xNum) + 1
    ySize = int(y / yNum) + 1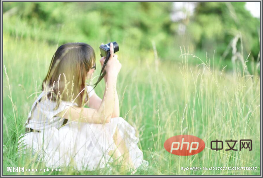
2. Traverse the pictures in the folder and fill them in order to generate the final composite picture
for file in files:
        fromImage = Image.open(file)
        i = int(num % xNum)
        j = int(num / xNum)
        out = fromImage.resize((xSize, ySize), Image.ANTIALIAS).convert('RGBA')
        toImage.paste(out, (i * xSize, j * ySize))
        toImage = toImage.convert('RGBA')
        img = Image.blend(base, toImage, 0.3)
        # 显示图片
        photo = ImageTk.PhotoImage(img)
        showLabel.config(image=photo)
        showLabel.image = photo
        if num < xNum * yNum:
num = num + 13. Save the image after generation
toImage.save('generator.png')
img.save("final.png")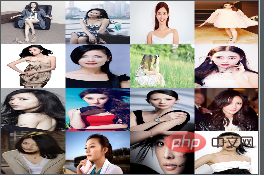

4.Establish a visual interface
5.Pyinstaller generates exe executable file
Install the pyinstaller module and execute the command to generate exe file
pyinstaller -F -w test.py (-w就是取消窗口)
Overall code
I haven’t learned Python’s syntax and design specifications yet, so code specifications, code reuse, etc. may not be in place. This blog post is mainly a record of ideas and the overall process.
Subsequently, some special effects were optimized, such as using random positions for composite pictures, adding black and white, fleeting and other display special effects, and optional transparency, etc.
import PIL.Image as Image
import glob
import random
import tkinter.filedialog
from tkinter.filedialog import askdirectory, Label, Button, Radiobutton, Entry
import threading
import numpy as np
from PIL import ImageTk
alpha = 0.3
imagesPath = ''
# 滑动条回调 修改透明度
def resize(ev=None):
global alpha
alpha = scale.get() / 100
# 黑白
def blackWithe(image):
# r,g,b = r*0.299+g*0.587+b*0.114
im = np.asarray(image.convert('RGB'))
trans = np.array([[0.299, 0.587, 0.114], [0.299, 0.587, 0.114], [0.299, 0.587, 0.114]]).transpose()
im = np.dot(im, trans)
return Image.fromarray(np.array(im).astype('uint8'))
# 流年
def fleeting(image, params=12):
im = np.asarray(image.convert('RGB'))
im1 = np.sqrt(im * [1.0, 0.0, 0.0]) * params
im2 = im * [0.0, 1.0, 1.0]
im = im1 + im2
return Image.fromarray(np.array(im).astype('uint8'))
# 旧电影
def oldFilm(image):
im = np.asarray(image.convert('RGB'))
# r=r*0.393+g*0.769+b*0.189 g=r*0.349+g*0.686+b*0.168 b=r*0.272+g*0.534b*0.131
trans = np.array([[0.393, 0.769, 0.189], [0.349, 0.686, 0.168], [0.272, 0.534, 0.131]]).transpose()
# clip 超过255的颜色置为255
im = np.dot(im, trans).clip(max=255)
return Image.fromarray(np.array(im).astype('uint8'))
# 反色
def reverse(image):
im = 255 - np.asarray(image.convert('RGB'))
return Image.fromarray(np.array(im).astype('uint8'))
def chooseBaseImagePath():
name = tkinter.filedialog.askopenfilename()
if name != '':
global baseImgPath
baseImgPath = name
baseImageLabel.config(text=name)
baseImg = Image.open(baseImgPath)
widthEntry.delete(0, tkinter.END)
heightEntry.delete(0, tkinter.END)
widthEntry.insert(0, baseImg.size[0])
heightEntry.insert(0, baseImg.size[1])
else:
baseImageLabel.config(text="您没有选择任何文件")
def chooseImagesPath():
name = askdirectory()
if name != '':
global imagesPath
imagesPath = name
ImagesLabel.config(text=name)
else:
ImagesLabel.config(text="您没有选择任何文件")
def thread_it(func, *args):
# 创建
t = threading.Thread(target=func, args=args)
# 守护 !!!
t.setDaemon(True)
# 启动
t.start()
def test():
MyThread(1, "Thread-1", 1).start()
baseImgPath = ''
def generator():
baseImg = Image.open(baseImgPath)
baseImg = baseImg.convert('RGBA')
files = glob.glob(imagesPath + '/*.*') # 获取图片
random.shuffle(files)
num = len(files)
# 模板图片大小
x = baseImg.size[0]
y = baseImg.size[1]
# 每张图片数量 这个公式是为了xNum * yNum 的总图片数量<num又成比例的最大整数
yNum = int((num / (y / x)) ** 0.5)
if yNum == 0:
yNum = 1
xNum = int(num / yNum)
# 图片大小 因为像素没有小数点 为防止黑边所以+1
xSize = int(x / xNum) + 1
ySize = int(y / yNum) + 1
# 生成数量的随机列表 用于随机位置合成图片
l = [n for n in range(0, xNum * yNum)]
random.shuffle(l)
toImage = Image.new('RGB', (x, y))
num = 1
for file in files:
if num <= xNum * yNum:
num = num + 1
else:
break
fromImage = Image.open(file)
temp = l.pop()
i = int(temp % xNum)
j = int(temp / xNum)
out = fromImage.resize((xSize, ySize), Image.ANTIALIAS).convert('RGBA')
toImage.paste(out, (i * xSize, j * ySize))
toImage = toImage.convert('RGBA')
img = Image.blend(baseImg, toImage, alpha)
# 特效 但是会读取像素会降低效率
choose = v.get()
if choose == 1:
img = blackWithe(img)
elif choose == 2:
img = fleeting(img)
elif choose == 3:
img = oldFilm(img)
elif choose == 4:
img = reverse(img)
resize = img.resize((300, 300), Image.ANTIALIAS).convert('RGBA')
# 显示图片
photo = ImageTk.PhotoImage(resize)
showLabel.config(image=photo)
showLabel.image = photo
toImage.save('generator.png')
img = img.resize((int(widthEntry.get()),int(heightEntry.get())), Image.ANTIALIAS).convert('RGBA')
img.save("final.png")
resize.save("resize.png")
class MyThread(threading.Thread): # 继承父类threading.Thread
def __init__(self, threadID, name, counter):
threading.Thread.__init__(self)
self.threadID = threadID
self.name = name
self.counter = counter
def run(self): # 把要执行的代码写到run函数里面 线程在创建后会直接运行run函数
generator()
root = tkinter.Tk()
root.title('generator')
root.geometry('500x550')
baseImageLabel = Label(root, text='')
baseImageLabel.place(x=10, y=10)
baseImageBtn = Button(root, text="选择底图", command=chooseBaseImagePath).place(x=10, y=30)
ImagesLabel = Label(root, text='')
ImagesLabel.place(x=10, y=60)
ImagesBtn = Button(root, text="选择合成图文件夹", command=chooseImagesPath).place(x=10, y=80)
v = tkinter.IntVar()
v.set(0)
Radiobutton(root, variable=v, text='默认', value=0, ).place(x=10, y=120)
Radiobutton(root, variable=v, text='黑白', value=1, ).place(x=110, y=120)
Radiobutton(root, variable=v, text='流年', value=2, ).place(x=210, y=120)
Radiobutton(root, variable=v, text='旧电影', value=3, ).place(x=310, y=120)
Radiobutton(root, variable=v, text='反色', value=4, ).place(x=410, y=120)
scaleLabel = Label(root, text='透明度').place(x=10, y=170)
scale = tkinter.Scale(root, from_=0, to=100, orient=tkinter.HORIZONTAL, command=resize)
scale.set(30) # 设置初始值
scale.pack(fill=tkinter.X, expand=1)
scale.place(x=70, y=150)
Label(root, text='宽(像素)').place(x=180, y=170)
widthEntry = Entry(root, bd=1)
widthEntry.place(x=230, y=173, width=100)
Label(root, text='高(像素)').place(x=320, y=170)
heightEntry = Entry(root, bd=1)
heightEntry.place(x=370, y=173, width=100)
generatorBtn = Button(root, text="生成", command=test).place(x=10, y=220)
showLabel = Label(root)
showLabel.place(x=100, y=220)
root.mainloop()If you want to learn more about programming, please pay attention to the php training column!
The above is the detailed content of Detailed explanation of Python photo synthesis method. For more information, please follow other related articles on the PHP Chinese website!

Hot AI Tools

Undresser.AI Undress
AI-powered app for creating realistic nude photos

AI Clothes Remover
Online AI tool for removing clothes from photos.

Undress AI Tool
Undress images for free

Clothoff.io
AI clothes remover

AI Hentai Generator
Generate AI Hentai for free.

Hot Article
Hot Tools

Notepad++7.3.1
Easy-to-use and free code editor

SublimeText3 Chinese version
Chinese version, very easy to use

Zend Studio 13.0.1
Powerful PHP integrated development environment

Dreamweaver CS6
Visual web development tools

SublimeText3 Mac version
God-level code editing software (SublimeText3)
Hot Topics
 1385
1385
 52
52

 PHP and Python: Code Examples and Comparison
Apr 15, 2025 am 12:07 AM
PHP and Python: Code Examples and Comparison
Apr 15, 2025 am 12:07 AM
PHP and Python have their own advantages and disadvantages, and the choice depends on project needs and personal preferences. 1.PHP is suitable for rapid development and maintenance of large-scale web applications. 2. Python dominates the field of data science and machine learning.
 Python vs. JavaScript: Community, Libraries, and Resources
Apr 15, 2025 am 12:16 AM
Python vs. JavaScript: Community, Libraries, and Resources
Apr 15, 2025 am 12:16 AM
Python and JavaScript have their own advantages and disadvantages in terms of community, libraries and resources. 1) The Python community is friendly and suitable for beginners, but the front-end development resources are not as rich as JavaScript. 2) Python is powerful in data science and machine learning libraries, while JavaScript is better in front-end development libraries and frameworks. 3) Both have rich learning resources, but Python is suitable for starting with official documents, while JavaScript is better with MDNWebDocs. The choice should be based on project needs and personal interests.
 Detailed explanation of docker principle
Apr 14, 2025 pm 11:57 PM
Detailed explanation of docker principle
Apr 14, 2025 pm 11:57 PM
Docker uses Linux kernel features to provide an efficient and isolated application running environment. Its working principle is as follows: 1. The mirror is used as a read-only template, which contains everything you need to run the application; 2. The Union File System (UnionFS) stacks multiple file systems, only storing the differences, saving space and speeding up; 3. The daemon manages the mirrors and containers, and the client uses them for interaction; 4. Namespaces and cgroups implement container isolation and resource limitations; 5. Multiple network modes support container interconnection. Only by understanding these core concepts can you better utilize Docker.
 Python: Automation, Scripting, and Task Management
Apr 16, 2025 am 12:14 AM
Python: Automation, Scripting, and Task Management
Apr 16, 2025 am 12:14 AM
Python excels in automation, scripting, and task management. 1) Automation: File backup is realized through standard libraries such as os and shutil. 2) Script writing: Use the psutil library to monitor system resources. 3) Task management: Use the schedule library to schedule tasks. Python's ease of use and rich library support makes it the preferred tool in these areas.
 How to run programs in terminal vscode
Apr 15, 2025 pm 06:42 PM
How to run programs in terminal vscode
Apr 15, 2025 pm 06:42 PM
In VS Code, you can run the program in the terminal through the following steps: Prepare the code and open the integrated terminal to ensure that the code directory is consistent with the terminal working directory. Select the run command according to the programming language (such as Python's python your_file_name.py) to check whether it runs successfully and resolve errors. Use the debugger to improve debugging efficiency.
 What is vscode What is vscode for?
Apr 15, 2025 pm 06:45 PM
What is vscode What is vscode for?
Apr 15, 2025 pm 06:45 PM
VS Code is the full name Visual Studio Code, which is a free and open source cross-platform code editor and development environment developed by Microsoft. It supports a wide range of programming languages and provides syntax highlighting, code automatic completion, code snippets and smart prompts to improve development efficiency. Through a rich extension ecosystem, users can add extensions to specific needs and languages, such as debuggers, code formatting tools, and Git integrations. VS Code also includes an intuitive debugger that helps quickly find and resolve bugs in your code.
 Can visual studio code be used in python
Apr 15, 2025 pm 08:18 PM
Can visual studio code be used in python
Apr 15, 2025 pm 08:18 PM
VS Code can be used to write Python and provides many features that make it an ideal tool for developing Python applications. It allows users to: install Python extensions to get functions such as code completion, syntax highlighting, and debugging. Use the debugger to track code step by step, find and fix errors. Integrate Git for version control. Use code formatting tools to maintain code consistency. Use the Linting tool to spot potential problems ahead of time.
 Is the vscode extension malicious?
Apr 15, 2025 pm 07:57 PM
Is the vscode extension malicious?
Apr 15, 2025 pm 07:57 PM
VS Code extensions pose malicious risks, such as hiding malicious code, exploiting vulnerabilities, and masturbating as legitimate extensions. Methods to identify malicious extensions include: checking publishers, reading comments, checking code, and installing with caution. Security measures also include: security awareness, good habits, regular updates and antivirus software.
