How to quickly build an API server with Node.js?

Node.js can be intimidating to beginners, with its flexible structure and lack of strict specifications making it seem complex. [Video tutorial recommendation: node js tutorial]
This tutorial is a quick guide to Node.js, Express framework and MongoDB, focusing on basic REST routing and basic database interaction. You'll build a simple API framework template that can then be used in any application.
This tutorial is for : You should have a basic understanding of REST API and CRUD operations, as well as basic JavaScript knowledge. I'm using ES6 (mostly arrow functions), but it's not very complicated.
In this tutorial, we will create the backend skeleton of a web note-taking application - similar to Google Keep, capable of performing all four CRUD operations: create, read, Updates and deletions.
Configuration
If you do not have Node installed, See here.
Create a new directory, run npm init, then follow the prompts and name your application "notable" (or something else you might prefer).
npm init
Once completed, there will be a package.json file in your directory. You can start installing the dependencies required for your project.
We will use Express as our framework, MongoDB as our database, and a package called body-parser to help with JSON requests.
npm install --save express mongodb@2.2.16 body-parser
I also highly recommend installing Nodemon as a dev dependency. This is a very simple little package that automatically restarts the server when a file is changed.
If you run:
npm install --save-dev nodemon
then add the following script to package.json:
// package.json
  "scripts": {
    "dev": "nodemon server.js"
},complete package.json It should look like this:
// package.json
{
  "name": "notable",
  "version": "1.0.0",
  "description": "",
  "main": "server.js",
  "scripts": {
    "dev": "nodemon server.js"
  },
  "author": "",
  "license": "ISC",
  "dependencies": {
    "body-parser": "^1.15.2",
    "express": "^4.14.0",
    "mongodb": "^2.2.16"
  },
  "devDependencies": {
    "nodemon": "^1.11.0"
  }
}Now you can create the server.js file and build the API.
Our server
Start by importing all dependencies in server.js.
// server.js
const express        = require('express');
const MongoClient    = require('mongodb').MongoClient;
const bodyParser     = require('body-parser');
const app            = express();
We will use MongoClient to interact with the database. The app is also initialized as an instance of the Express framework.
The last thing to do is tell your program to start listening for requests.
You can specify a port and start listening like this:
// server.js
const port = 8000;
app.listen(port, () => {
  console.log('We are live on ' + port);
});Now, if you run npm run dev (or node server.js, if you have not installed Nodemon), you should see the prompt "We are live on port 8000" in the terminal.
Your server has been started. But it can't do anything yet.
Let’s solve this problem next.
CRUD Routing
For this example, you want to build 4 routes; create note, read note, update note and delete note.
This will give you an idea of how to build almost any basic route using Node.
However, to test your API, you also need to imitate the client to make requests. To do this we will use an excellent app called Postman. It allows you to make simple HTTP requests with custom headers and parameters.
Install Postman and let’s start setting up routing.
Project Structure
Most Node.js tutorials (and many real-life examples) put all routes in one big routes.js file. This makes me a little uncomfortable. In contrast, splitting files into separate folders improves readability and makes large applications easier to manage.
Although we are not doing large-scale applications now, we can still do this. Create the following directory: a app folder, which contains a routes folder, which contains index.js and note_routes.js files.
mkdir app
cd app
mkdir routes
cd routes
touch index.js
touch note_routes.js
These directories may seem overkill for your simple little program, but it always makes sense to get it right from the start.
Your First Route
Let’s start with the C in CRUD. How would you create a note?
So, before you start, you must first lay the foundation. In Express, the route is contained in a function that takes the Express instance and database as parameters.
Like this:
// routes/note_routes.js
module.exports = function(app, db) {
};Then, you can export this function via index.js:
// routes/index.js
const noteRoutes = require('./note_routes');
module.exports = function(app, db) {
  noteRoutes(app, db);
  // Other route groups could go here, in the future
};Then import it for use in server Used in .js:
// server.js
const express        = require('express');
const MongoClient    = require('mongodb').MongoClient;
const bodyParser     = require('body-parser');
const app            = express();
const port = 8000;
require('./app/routes')(app, {});
app.listen(port, () => {
  console.log('We are live on ' + port);
});Please note that since the database has not been set up, just pass in an empty object.
Okay, Now you can make your own CREATE route.
The syntax is simple:
// note_routes.js
module.exports = function(app, db) {
  app.post('/notes', (req, res) => {
    // You'll create your note here.
    res.send('Hello')
  });
};When the application receives a post request for the '/notes' path, it will execute the code inside the callback - the request object (contains the request parameters or JSON) and the response object.
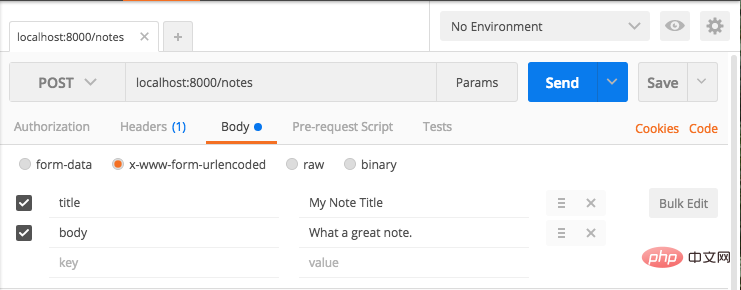
You can use Postman to send a POST request to localhost:8000/notes to test.

你应该得到回复:'Hello'。
太好了!你创建了第一个真正的路由。
下一步是在你的请求中添加一些参数并在 API 中处理它们,最后添加到你的数据库中。
请求参数
在 Postman 中,在选择 x-www-form-urlencoded 单选按钮后,转到 Body 选项卡并添加一些键值对。
这会将编码后的表单数据添加到你的请求中,你可以使用 API ??处理该请求。

你可以去尝试更多的设置项。
现在在你的 note_routes.js 中,让我们输出 body 的内容。
// note_routes.js
module.exports = function(app, db) {
  app.post('/notes', (req, res) => {
    console.log(req.body)
    res.send('Hello')
  });
};用 Postman 发送请求,你会看到……undefined。
不幸的是,Express 无法自行处理 URL 编码的表单。虽然你确实安装了这个 body-parser 包......
// server.
const express        = require('express');
const MongoClient    = require('mongodb').MongoClient;
const bodyParser     = require('body-parser');
const app            = express();
const port = 8000;
app.use(bodyParser.urlencoded({ extended: true }));
require('./app/routes')(app, {});
app.listen(port, () => {
  console.log('We are live on ' + port);
});Now you should see the body as an object in the terminal.
现在你应该将 body 视为终端中的对象。
{ title: 'My Note Title', body: 'What a great note.' }第一个路由的最后一步:设置数据库,然后添加数据。
最简单方法是通过 mLab 设置 Mongo 数据库的:它是最小的而且是免费的,设置的速度非常快。
创建帐户和 MongoDB 部署后,将用户的用户名和密码添加到数据库:

然后复制这里第二个 URL:

在项目根目录的目录配置中,创建一个db.js文件。
mkdir config
cd config
touch db.js
在里面,添加刚才的URL:
module.exports = {
  url : YOUR URL HERE
};别忘了把你的用户名和密码(来自数据库用户的密码,而不是你的 mLab 帐户)添加到URL中。 (如果你要将此项目提交到 Github 上,请确保包含 .gitignore 文件 像这样, ,不要与任何人分享你的密码。)
现在在你的 server.js 中,可以用 MongoClient 连接到数据库了,使用它来包装你的应用程序设置:
// server.js
const express        = require('express');
const MongoClient    = require('mongodb').MongoClient;
const bodyParser     = require('body-parser');
const db             = require('./config/db');
const app            = express();
const port = 8000;
app.use(bodyParser.urlencoded({ extended: true }));
MongoClient.connect(db.url, (err, database) => {
  if (err) return console.log(err)
  require('./app/routes')(app, database);
  app.listen(port, () => {
    console.log('We are live on ' + port);
  });
})如果你用的是最新版本的 MongoDB(3.0+),请将其修改为:
// server.js
const express        = require('express');
const MongoClient    = require('mongodb').MongoClient;
const bodyParser     = require('body-parser');
const db             = require('./config/db');
const app            = express();
const port = 8000;
app.use(bodyParser.urlencoded({ extended: true }));
MongoClient.connect(db.url, (err, database) => {
  if (err) return console.log(err)

  // Make sure you add the database name and not the collection name
  const database = database.db("note-api")
  require('./app/routes')(app, database);
  app.listen(port, () => {
    console.log('We are live on ' + port);
  });
})这是你的基础架构的最后一个设置!
添加到你的数据库
MongoDB将数据存储在 collections 中。在你的项目中,你希望将笔记存储在一个名为 notes 的 collection 中。
由于将数据库作为路径中的 db 参数传入,因此可以像这样访问它:
db.collection('notes')
创建笔记就像在集合上调用 insert 一样简单:
const note = { text: req.body.body, title: req.body.title}
  db.collection('notes').insert(note, (err, results) => {
}插入完成后(或由于某种原因失败),要么返回错误或反回新创建的笔记对象。这是完整的 note_routes.js 代码:
// note_routes.js
module.exports = function(app, db) {
  const collection =
  app.post('/notes', (req, res) => {
    const note = { text: req.body.body, title: req.body.title };
    db.collection('notes').insert(note, (err, result) => {
      if (err) {
        res.send({ 'error': 'An error has occurred' });
      } else {
        res.send(result.ops[0]);
      }
    });
  });
};试试看!使用 Postman 发送 x-www-form-urlencoded POST 请求,在 Body 选项卡下设置 title 和 body。
响应应如下所示:

如果你登录mLab,你还应该能够在数据库中看到创建的笔记。
READ 路由
现在可以稍微加快步伐。
假设你希望通过导航到 localhost:8000/notes/{id} 来获取刚创建的笔记。这是链接应该是localhost:8000/notes/585182bd42ac5b07a9755ea3。(如果你没有得到其中笔记的 ID,可以通过检查 mLab 或创建一个新的笔记)。
以下是 note_routes.js 中的内容:
// note_routes.js
module.exports = function(app, db) {
  app.get('/notes/:id', (req, res) => {

  });
  app.post('/notes', (req, res) => {
    const note = { text: req.body.body, title: req.body.title };
    db.collection('notes').insert(note, (err, result) => {
      if (err) {
        res.send({ 'error': 'An error has occurred' });
      } else {
        res.send(result.ops[0]);
      }
    });
  });
};就像以前一样,你将在数据库 collection 中调用一个方法。在这里,它被恰当地命名为 findOne。
// note_routes.js
module.exports = function(app, db) {
app.get('/notes/:id', (req, res) => {
const details = { '_id': <ID GOES HERE> };
db.collection('notes').findOne(details, (err, item) => {
if (err) {
res.send({'error':'An error has occurred'});
} else {
res.send(item);
}
});
});
app.post('/notes', (req, res) => {
const note = { text: req.body.body, title: req.body.title };
db.collection('notes').insert(note, (err, result) => {
if (err) {
res.send({ 'error': 'An error has occurred' });
} else {
res.send(result.ops[0]);
}
});
});
};你可以通过 req.params.id 从 URL 参数中获取 id。但是,如果你试图将字符串插入上面的 <ID GOES HERE> 位置,它将无法正常工作。
MongoDB 不仅要求 ID 为字符串,还要求 ID 是一个对象,它们被之为 ObjectID。
别担心,这很容易解决。这是完整的代码:
// note_routes.js
var ObjectID = require('mongodb').ObjectID;
module.exports = function(app, db) {
  app.get('/notes/:id', (req, res) => {
    const id = req.params.id;
    const details = { '_id': new ObjectID(id) };
    db.collection('notes').findOne(details, (err, item) => {
      if (err) {
        res.send({'error':'An error has occurred'});
      } else {
        res.send(item);
      }
    });
  });
app.post('/notes', (req, res) => {
    const note = { text: req.body.body, title: req.body.title };
    db.collection('notes').insert(note, (err, result) => {
      if (err) {
        res.send({ 'error': 'An error has occurred' });
      } else {
        res.send(result.ops[0]);
      }
    });
  });
};尝试使用一个笔记 ID,它应如下所示:

DELETE 路由
实际上删除对象与查找对象几乎相同。你只需用 remove 函数替换 findOne 即可。这是完整的代码:
// note_routes.js
// ...
  app.delete('/notes/:id', (req, res) => {
    const id = req.params.id;
    const details = { '_id': new ObjectID(id) };
    db.collection('notes').remove(details, (err, item) => {
      if (err) {
        res.send({'error':'An error has occurred'});
      } else {
        res.send('Note ' + id + ' deleted!');
      }
    });
  });
// ...UPDATE 路由
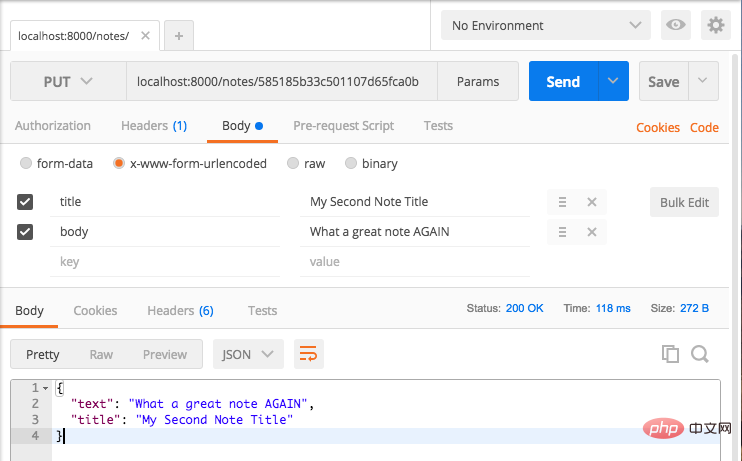
最后一个! PUT 方法基本上是 READ 和 CREATE 的混合体。你找到该对象,然后更新它。如果刚才你删除了数据库中唯一的笔记,那就再创建一个!
代码:
// note_routes.js
// ...
  app.put('/notes/:id', (req, res) => {
    const id = req.params.id;
    const details = { '_id': new ObjectID(id) };
    const note = { text: req.body.body, title: req.body.title };
    db.collection('notes').update(details, note, (err, result) => {
      if (err) {
          res.send({'error':'An error has occurred'});
      } else {
          res.send(note);
      }
    });
  });
// ...现在你可以更新任何笔记,如下所示:

请注意这些代码还不完美 —— 比如你没有提供正文或标题,PUT 请求将会使数据库中的笔记上的那些字段无效。
API 完成
就这么简单!你完成了可以进行 CRUD 操作的 Node API。
本教程的目的是让你熟悉 Express、Node 和 MongoDB —— 你可以用简单的程序作为进军更复杂项目的跳板。
将来我将会编写系列教程,用不同的语言和框架创建更简单的API。如果你有兴趣,请点击关注!
更多编程相关知识,可访问:编程教学!!
The above is the detailed content of How to quickly build an API server with Node.js?. For more information, please follow other related articles on the PHP Chinese website!

Hot AI Tools

Undresser.AI Undress
AI-powered app for creating realistic nude photos

AI Clothes Remover
Online AI tool for removing clothes from photos.

Undress AI Tool
Undress images for free

Clothoff.io
AI clothes remover

AI Hentai Generator
Generate AI Hentai for free.

Hot Article

Hot Tools

Notepad++7.3.1
Easy-to-use and free code editor

SublimeText3 Chinese version
Chinese version, very easy to use

Zend Studio 13.0.1
Powerful PHP integrated development environment

Dreamweaver CS6
Visual web development tools

SublimeText3 Mac version
God-level code editing software (SublimeText3)

Hot Topics
 1385
1385
 52
52
 An article about memory control in Node
Apr 26, 2023 pm 05:37 PM
The Node service built based on non-blocking and event-driven has the advantage of low memory consumption and is very suitable for handling massive network requests. Under the premise of massive requests, issues related to "memory control" need to be considered. 1. V8’s garbage collection mechanism and memory limitations Js is controlled by the garbage collection machine
 Detailed graphic explanation of the memory and GC of the Node V8 engine
Mar 29, 2023 pm 06:02 PM
This article will give you an in-depth understanding of the memory and garbage collector (GC) of the NodeJS V8 engine. I hope it will be helpful to you!
 Let's talk about how to choose the best Node.js Docker image?
Dec 13, 2022 pm 08:00 PM
Choosing a Docker image for Node may seem like a trivial matter, but the size and potential vulnerabilities of the image can have a significant impact on your CI/CD process and security. So how do we choose the best Node.js Docker image?
 Let's talk in depth about the File module in Node
Apr 24, 2023 pm 05:49 PM
The file module is an encapsulation of underlying file operations, such as file reading/writing/opening/closing/delete adding, etc. The biggest feature of the file module is that all methods provide two versions of **synchronous** and **asynchronous**, with Methods with the sync suffix are all synchronization methods, and those without are all heterogeneous methods.
 Node.js 19 is officially released, let's talk about its 6 major features!
Nov 16, 2022 pm 08:34 PM
Node 19 has been officially released. This article will give you a detailed explanation of the 6 major features of Node.js 19. I hope it will be helpful to you!
 Let's talk about the GC (garbage collection) mechanism in Node.js
Nov 29, 2022 pm 08:44 PM
How does Node.js do GC (garbage collection)? The following article will take you through it.
 Let's talk about the event loop in Node
Apr 11, 2023 pm 07:08 PM
The event loop is a fundamental part of Node.js and enables asynchronous programming by ensuring that the main thread is not blocked. Understanding the event loop is crucial to building efficient applications. The following article will give you an in-depth understanding of the event loop in Node. I hope it will be helpful to you!
 What should I do if node cannot use npm command?
Feb 08, 2023 am 10:09 AM
The reason why node cannot use the npm command is because the environment variables are not configured correctly. The solution is: 1. Open "System Properties"; 2. Find "Environment Variables" -> "System Variables", and then edit the environment variables; 3. Find the location of nodejs folder; 4. Click "OK".


