Build your own blockchain using Python

[Related learning recommendations: python tutorial]
Are you, like me, very interested in the underlying blockchain technology of encrypted digital currencies? Interested, especially want to know how they operate.
But learning blockchain technology is not easy. I have watched a lot of video tutorials and various courses. The final feeling is that there are too few practical courses that are actually available.
I like to learn in practice, especially I like to understand the entire working mechanism based on one code. If you like this way of learning as much as I do, by the time you finish this tutorial, you will know how blockchain technology works.
WRITE BEFORE YOU BEGIN
Remember, a blockchain is an immutable, ordered chain of records called blocks. They can contain transactions, Build your own blockchain using Pythons, or any data you like. But the important thing is that they are linked together using hash.
If you are not familiar with hashes, here is an explanation.
What is the purpose of this guide?
You can feel comfortable reading and writing basic Python since we will be discussing working with blockchain over HTTP, so you Also understand how HTTP works.
What do I need to prepare?
Make sure Python 3.6 (and pip) is installed. You also need to install Flask and Requests libraries:
pip install Flask==0.12.2 requests==2.18.4
By the way, you also need a client that supports HTTP, such as Postman or cURL, others are also acceptable.
Where is the source code?
You can click here
Step 1: Create a blockchain
Open your favorite text editor Or IDE, I personally prefer PyCharm. Create a new Build your own blockchain using Python named blockchain.py. We'll just use this one Build your own blockchain using Python. But if you are still not sure, you can also refer to the source code.
Describe the blockchain
We are going to create a Blockchain class, and its constructor creates a An empty list to initialize (to store our blockchain), and another to store transactions. The following is an example of our class:
blockchain.py
class Blockchain(object):
    def __init__(self):
        self.chain = []
        self.current_transactions = []

    def new_block(self):
        # Creates a new Block and adds it to the chain
        pass

    def new_transaction(self):
        # Adds a new transaction to the list of transactions
        pass

    @staticmethod
    def hash(block):
        # Hashes a Block
        pass

    @property
    def last_block(self):
        # Returns the last Block in the chain
        pass
Our Blockchain class is responsible for managing chained data, it will store transactions And there are methods for adding new blocks to chained data. Let's start expanding with more Methods.
What does a block look like?
Each block has an index, a timestamp (Unix timestamp) , a Transaction list , a checksum (more on this later) and the hash of the previous block .
Here is an example of a Block:
blockchain.py
block = {
    'index': 1,
    'timestamp': 1506057125.900785,
    'transactions': [
        {
            'sender': "8527147fe1f5426f9dd545de4b27ee00",
            'recipient': "a77f5cdfa2934df3954a5c7c7da5df1f",
            'amount': 5,
        }
    ],
    'proof': 324984774000,
    'previous_hash': "2cf24dba5fb0a30e26e83b2ac5b9e29e1b161e5c1fa7425e73043362938b9824"
}At this point, a Blockchain The concept should be obvious - each new block contains the hash of the previous block within it. This is crucial because this is what makes blockchain immutable: if an attacker corrupts an earlier block in blockchain, all subsequent blocks will contain no Correct hash value.
Does this make sense? If you haven’t figured it out yet, take a moment to think about it – this is the core idea behind blockchain.
Add transactions to the block
We will need a way to add transactions to the block. The responsibility of our new_transaction() method is this, and it is very simple:
blockchain.py
class Blockchain(object):
    ...

    def new_transaction(self, sender, recipient, amount):
        """
        Creates a new transaction to go into the next mined Block
        :param sender: <str> Address of the Sender
        :param recipient: <str> Address of the Recipient
        :param amount: <int> Amount
        :return: <int> The index of the Block that will hold this transaction
        """

        self.current_transactions.append({
            'sender': sender,
            'recipient': recipient,
            'amount': amount,
        })

return self.last_block['index'] + 1</int></int></str></str> new_transaction( ) method adds a transaction to the list, it returns the index of the block to which the transaction will be added --- Talk about mining the next pair to submit the transaction later useful to users.
Create a new block
When our Blockchain is instantiated, we need to Genesis block (one without a leading area block of blocks) added in. We also need to add a proof to our origin block, which is the result of mining (or proof of work). We will discuss mining in detail later.
In addition to creating the genesis block in the constructor, we will also complete new_block() , new_transaction() and hash() Function:
blockchain.py
import hashlib
import json
from time import time

class Blockchain(object):
    def __init__(self):
        self.current_transactions = []
        self.chain = []

        # 创建创世区块
        self.new_block(previous_hash=1, proof=100)

    def new_block(self, proof, previous_hash=None):
        """
        创建一个新的区块到区块链中
        :param proof: <int> 由工作证明算法生成的证明
        :param previous_hash: (Optional) <str> 前一个区块的 hash 值
        :return: <dict> 新区块
        """

        block = {
            'index': len(self.chain) + 1,
            'timestamp': time(),
            'transactions': self.current_transactions,
            'proof': proof,
            'previous_hash': previous_hash or self.hash(self.chain[-1]),
        }

        # 重置当前交易记录
        self.current_transactions = []

        self.chain.append(block)
        return block

    def new_transaction(self, sender, recipient, amount):
        """
        创建一笔新的交易到下一个被挖掘的区块中
        :param sender: <str> 发送人的地址
        :param recipient: <str> 接收人的地址
        :param amount: <int> 金额
        :return: <int> 持有本次交易的区块索引
        """
        self.current_transactions.append({
            'sender': sender,
            'recipient': recipient,
            'amount': amount,
        })

        return self.last_block['index'] + 1

    @property
    def last_block(self):
        return self.chain[-1]

    @staticmethod
    def hash(block):
        """
        给一个区块生成 SHA-256 值
        :param block: <dict> Block
        :return: <str>
        """

        # 我们必须确保这个字典(区块)是经过排序的,否则我们将会得到不一致的散列
        block_string = json.dumps(block, sort_keys=True).encode()
return hashlib.sha256(block_string).hexdigest()</str></dict></int></int></str></str></dict></str></int>The above code should be straightforward --- To make the code clear, I added Some comments and documentation. We are almost done with our blockchain. But at this point you must be wondering how new blocks are created, forged or mined.
Proof-of-Work Algorithm
Use the Proof-of-Work (PoW) algorithm to prove how new blocks are created or mined on the blockchain. The goal of PoW is to calculate a number that meets certain conditions, which must be computationally difficult for everyone to verify, but easy to verify. This is the core idea behind proof of work.
We will see a simple example to help you understand:
假设一个整数 x 乘以另一个整数 y 的积的 Hash 值必须以 0 结尾,即 hash(x * y) = ac23dc...0。设 x = 5,求y 。
用 Python 实现:
from hashlib import sha256
x = 5
y = 0  # We don't know what y should be yet...
while sha256(f'{x*y}'.encode()).hexdigest()[-1] != "0":
    y += 1
print(f'The solution is y = {y}')结果是:y = 21。因为,生成的 Hash 值结尾必须为 0。
hash(5 * 21) = 1253e9373e...5e3600155e860
在比特币中,工作量证明算法被称为 Hashcash ,它和上面的问题很相似,只不过计算难度非常大。这就是矿工们为了争夺创建区块的权利而争相计算的问题。 通常,计算难度与目标字符串需要满足的特定字符的数量成正比,矿工算出结果后,就会获得一定数量的比特币奖励(通过交易)。
验证结果,当然非常容易。
实现工作量证明
让我们来实现一个相似 PoW 算法。规则类似上面的例子:
找到一个数字 P ,使得它与前一个区块的 Proof 拼接成的字符串的 Hash 值以 4 个零开头。
blockchain.py
import hashlib
import json

from time import time
from uuid import uuid4

class Blockchain(object):
    ...

    def proof_of_work(self, last_proof):
        """
        Simple Proof of Work Algorithm:
         - Find a number p' such that hash(pp') contains leading 4 zeroes, where p is the previous p'
         - p is the previous proof, and p' is the new proof
        :param last_proof: <int>
        :return: <int>
        """

        proof = 0
        while self.valid_proof(last_proof, proof) is False:
            proof += 1

        return proof

    @staticmethod
    def valid_proof(last_proof, proof):
        """
        Validates the Proof: Does hash(last_proof, proof) contain 4 leading zeroes?
        :param last_proof: <int> Previous Proof
        :param proof: <int> Current Proof
        :return: <bool> True if correct, False if not.
        """

        guess = f'{last_proof}{proof}'.encode()
        guess_hash = hashlib.sha256(guess).hexdigest()
return guess_hash[:4] == "0000"</bool></int></int></int></int>衡量算法复杂度的办法是修改零开头的个数。使用 4 个来用于演示,你会发现多一个零都会大大增加计算出结果所需的时间。
现在 Blockchain 类基本已经完成了,接下来使用 HTTP Requests 来进行交互。
Step 2: Blockchain 作为 API 接口
我们将使用 Python Flask 框架,这是一个轻量 Web 应用框架,它方便将网络请求映射到 Python 函数,现在我们来让 Blockchain 运行在基于 Flask web 上。
我们将创建三个接口:
-
/transactions/new创建一个交易并添加到区块 -
/mine告诉服务器去挖掘新的区块 -
/chain返回整个区块链
创建节点
我们的 Flask 服务器 将扮演区块链网络中的一个节点。我们先添加一些框架代码:
blockchain.py
import hashlib
import json
from textwrap import dedent
from time import time
from uuid import uuid4

from flask import Flask

class Blockchain(object):
    ...

# Instantiate our Node(实例化我们的节点)
app = Flask(__name__)

# Generate a globally unique address for this node(为这个节点生成一个全球唯一的地址)
node_identifier = str(uuid4()).replace('-', '')

# Instantiate the Blockchain(实例化 Blockchain类)
blockchain = Blockchain()

@app.route('/mine', methods=['GET'])
def mine():
    return "We'll mine a new Block"

@app.route('/transactions/new', methods=['POST'])
def new_transaction():
    return "We'll add a new transaction"

@app.route('/chain', methods=['GET'])
def full_chain():
    response = {
        'chain': blockchain.chain,
        'length': len(blockchain.chain),
    }
    return jsonify(response), 200

if __name__ == '__main__':
app.run(host='0.0.0.0', port=5000)简单的说明一下以上代码:
- 第 15 行:实例化节点。阅读更多关于 Flask 内容。
- 第 18 行:为节点创建一个随机的名称。.
- 第 21 行:实例化 Blockchain 类。
- 第 24--26 行:创建 /mine 接口,GET 方式请求。
- 第 28--30 行:创建 /transactions/new 接口,POST 方式请求,可以给接口发送交易数据。
- 第 32--38 行:创建 /chain 接口,返回整个区块链。
- 第 40--41 行:服务器运行端口 5000 。
发送交易
发送到节点的交易数据结构如下:
{
 "sender": "my address",
 "recipient": "someone else's address",
 "amount": 5
}因为我们已经有了添加交易的方法,所以基于接口来添加交易就很简单了。让我们为添加事务写函数:
blockchain.py
import hashlib
import json
from textwrap import dedent
from time import time
from uuid import uuid4

from flask import Flask, jsonify, request

...

@app.route('/transactions/new', methods=['POST'])
def new_transaction():
    values = request.get_json()

    # Check that the required fields are in the POST'ed data
    required = ['sender', 'recipient', 'amount']
    if not all(k in values for k in required):
        return 'Missing values', 400

    # Create a new Transaction
    index = blockchain.new_transaction(values['sender'], values['recipient'], values['amount'])

    response = {'message': f'Transaction will be added to Block {index}'}
return jsonify(response), 201挖矿
挖矿正是神奇所在,它很简单,做了一下三件事:
- 计算工作量证明 PoW
- 通过新增一个交易授予矿工(自己)一个币
- 构造新区块并将其添加到链中
blockchain.py
import hashlib
import json

from time import time
from uuid import uuid4

from flask import Flask, jsonify, request

...

@app.route('/mine', methods=['GET'])
def mine():
    # We run the proof of work algorithm to get the next proof...
    last_block = blockchain.last_block
    last_proof = last_block['proof']
    proof = blockchain.proof_of_work(last_proof)

    # We must receive a reward for finding the proof.
    # The sender is "0" to signify that this node has mined a new coin.
    blockchain.new_transaction(
        sender="0",
        recipient=node_identifier,
        amount=1,
    )

    # Forge the new Block by adding it to the chain
    previous_hash = blockchain.hash(last_block)
    block = blockchain.new_block(proof, previous_hash)

    response = {
        'message': "New Block Forged",
        'index': block['index'],
        'transactions': block['transactions'],
        'proof': block['proof'],
        'previous_hash': block['previous_hash'],
    }
return jsonify(response), 200注意交易的接收者是我们自己的服务器节点,我们做的大部分工作都只是围绕 Blockchain 类方法进行交互。到此,我们的区块链就算完成了,我们来实际运行下。
Step 3: 运行区块链
你可以使用 cURL 或 Postman 去和 API 进行交互
启动 Server:
$ python blockchain.py
* Running on http://127.0.0.1:5000/ (Press CTRL+C to quit)
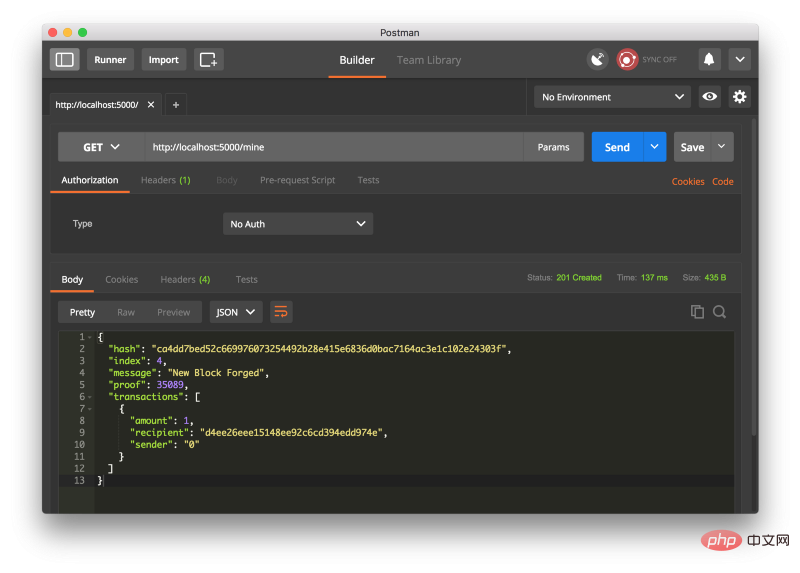
让我们通过请求 http://localhost:5000/mine ( GET )来进行挖矿:

用 Postman 发起一个 GET 请求.
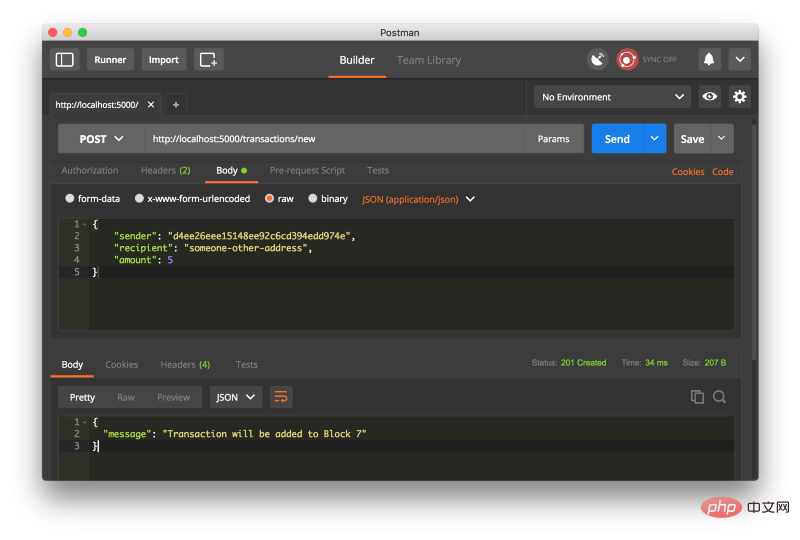
创建一个交易请求,请求 http://localhost:5000/transactions/new (POST),如图

如果不是使用 Postman,则用一下的 cURL 语句也是一样的:
$ curl -X POST -H "Content-Type: application/json" -d '{
 "sender": "d4ee26eee15148ee92c6cd394edd974e",
 "recipient": "someone-other-address",
 "amount": 5
}' "http://localhost:5000/transactions/new"在挖了两次矿之后,就有 3 个块了,通过请求 http://localhost:5000/chain 可以得到所有的块信息
{
  "chain": [
    {
      "index": 1,
      "previous_hash": 1,
      "proof": 100,
      "timestamp": 1506280650.770839,
      "transactions": []
    },
    {
      "index": 2,
      "previous_hash": "c099bc...bfb7",
      "proof": 35293,
      "timestamp": 1506280664.717925,
      "transactions": [
        {
          "amount": 1,
          "recipient": "8bbcb347e0634905b0cac7955bae152b",
          "sender": "0"
        }
      ]
    },
    {
      "index": 3,
      "previous_hash": "eff91a...10f2",
      "proof": 35089,
      "timestamp": 1506280666.1086972,
      "transactions": [
        {
          "amount": 1,
          "recipient": "8bbcb347e0634905b0cac7955bae152b",
          "sender": "0"
        }
      ]
    }
  ],
  "length": 3
}Step 4: 一致性(共识)
我们已经有了一个基本的区块链可以接受交易和挖矿。但是区块链系统应该是分布式的。既然是分布式的,那么我们究竟拿什么保证所有节点有同样的链呢?这就是一致性问题,我们要想在网络上有多个节点,就必须实现一个一致性的算法。
注册节点
在实现一致性算法之前,我们需要找到一种方式让一个节点知道它相邻的节点。每个节点都需要保存一份包含网络中其它节点的记录。因此让我们新增几个接口:
-
/nodes/register接收 URL 形式的新节点列表. -
/nodes/resolve执行一致性算法,解决任何冲突,确保节点拥有正确的链.
我们修改下 Blockchain 的 init 函数并提供一个注册节点方法:
blockchain.py
...
from urllib.parse import urlparse
...

class Blockchain(object):
    def __init__(self):
        ...
        self.nodes = set()
        ...

    def register_node(self, address):
        """
        Add a new node to the list of nodes
        :param address: <str> Address of node. Eg. 'http://192.168.0.5:5000'
        :return: None
        """

        parsed_url = urlparse(address)
        self.nodes.add(parsed_url.netloc)</str>
我们用 set 来储存节点,这是一种避免重复添加节点的简单方法.
实现共识算法
就像先前讲的那样,当一个节点与另一个节点有不同的链时,就会产生冲突。 为了解决这个问题,我们将制定最长的有效链条是最权威的规则。换句话说就是:在这个网络里最长的链就是最权威的。 我们将使用这个算法,在网络中的节点之间达成共识。
blockchain.py
...
import requests

class Blockchain(object)
    ...

    def valid_chain(self, chain):
        """
        Determine if a given blockchain is valid
        :param chain: <list> A blockchain
        :return: <bool> True if valid, False if not
        """

        last_block = chain[0]
        current_index = 1

        while current_index  True if our chain was replaced, False if not
        """

        neighbours = self.nodes
        new_chain = None

        # We're only looking for chains longer than ours
        max_length = len(self.chain)

        # Grab and verify the chains from all the nodes in our network
        for node in neighbours:
            response = requests.get(f'http://{node}/chain')

            if response.status_code == 200:
                length = response.json()['length']
                chain = response.json()['chain']

                # Check if the length is longer and the chain is valid
                if length > max_length and self.valid_chain(chain):
                    max_length = length
                    new_chain = chain

        # Replace our chain if we discovered a new, valid chain longer than ours
        if new_chain:
            self.chain = new_chain
            return True

return False</bool></list>第一个方法 valid_chain() 负责检查一个链是否有效,方法是遍历每个块并验证散列和证明。
resolve_conflicts() 是一个遍历我们所有邻居节点的方法,下载它们的链并使用上面的方法验证它们。 如果找到一个长度大于我们的有效链条,我们就取代我们的链条。
我们将两个端点注册到我们的API中,一个用于添加相邻节点,另一个用于解决冲突:
blockchain.py
@app.route('/nodes/register', methods=['POST'])
def register_nodes():
    values = request.get_json()

    nodes = values.get('nodes')
    if nodes is None:
        return "Error: Please supply a valid list of nodes", 400

    for node in nodes:
        blockchain.register_node(node)

    response = {
        'message': 'New nodes have been added',
        'total_nodes': list(blockchain.nodes),
    }
    return jsonify(response), 201

@app.route('/nodes/resolve', methods=['GET'])
def consensus():
    replaced = blockchain.resolve_conflicts()

    if replaced:
        response = {
            'message': 'Our chain was replaced',
            'new_chain': blockchain.chain
        }
    else:
        response = {
            'message': 'Our chain is authoritative',
            'chain': blockchain.chain
        }

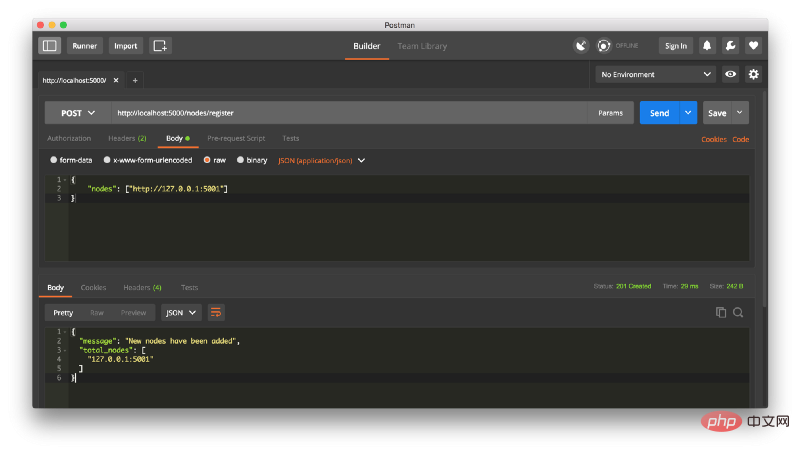
return jsonify(response), 200在这一点上,如果你喜欢,你可以使用一台不同的机器,并在你的网络上启动不同的节点。 或者使用同一台机器上的不同端口启动进程。 我在我的机器上,不同的端口上创建了另一个节点,并将其注册到当前节点。 因此,我有两个节点:http://localhost:5000 和 http://localhost:5001。 注册一个新节点:

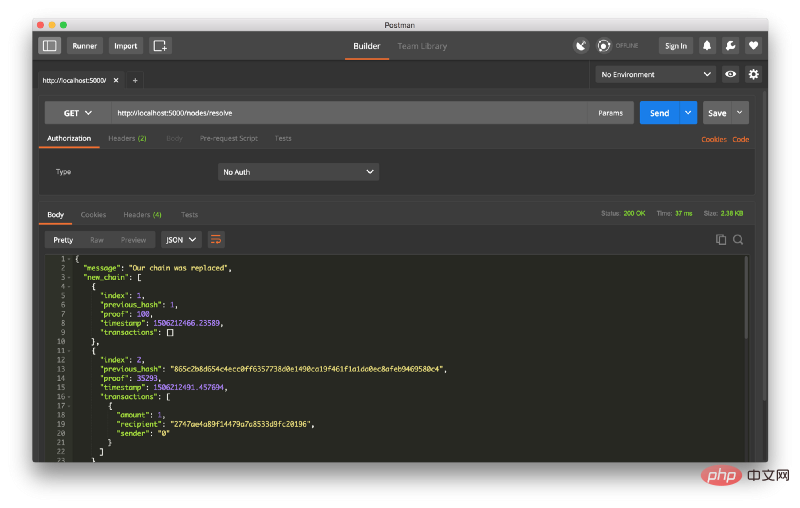
然后我在节点 2 上挖掘了一些新的块,以确保链条更长。 之后,我在节点1上调用 GET /nodes/resolve,其中链由一致性算法取代:

这是一个包,去找一些朋友一起,以帮助测试你的区块链。
我希望本文能激励你创造更多新东西。我之所以对数字货币入迷,是因为我相信区块链会很快改变我们看待事物的方式,包括经济、政府、档案管理等。
更新:我计划在接下来的第2部分中继续讨论区块链交易验证机制,并讨论一些可以让区块链进行生产的方法。
相关推荐:编程视频课程
The above is the detailed content of Build your own blockchain using Python. For more information, please follow other related articles on the PHP Chinese website!

Hot AI Tools

Undresser.AI Undress
AI-powered app for creating realistic nude photos

AI Clothes Remover
Online AI tool for removing clothes from photos.

Undress AI Tool
Undress images for free

Clothoff.io
AI clothes remover

AI Hentai Generator
Generate AI Hentai for free.

Hot Article

Hot Tools

Notepad++7.3.1
Easy-to-use and free code editor

SublimeText3 Chinese version
Chinese version, very easy to use

Zend Studio 13.0.1
Powerful PHP integrated development environment

Dreamweaver CS6
Visual web development tools

SublimeText3 Mac version
God-level code editing software (SublimeText3)

Hot Topics
 Can the Python interpreter be deleted in Linux system?
Apr 02, 2025 am 07:00 AM
Regarding the problem of removing the Python interpreter that comes with Linux systems, many Linux distributions will preinstall the Python interpreter when installed, and it does not use the package manager...
 How to solve the problem of Pylance type detection of custom decorators in Python?
Apr 02, 2025 am 06:42 AM
Pylance type detection problem solution when using custom decorator In Python programming, decorator is a powerful tool that can be used to add rows...
 Python asyncio Telnet connection is disconnected immediately: How to solve server-side blocking problem?
Apr 02, 2025 am 06:30 AM
About Pythonasyncio...
 How to solve permission issues when using python --version command in Linux terminal?
Apr 02, 2025 am 06:36 AM
Using python in Linux terminal...
 Python 3.6 loading pickle file error ModuleNotFoundError: What should I do if I load pickle file '__builtin__'?
Apr 02, 2025 am 06:27 AM
Loading pickle file in Python 3.6 environment error: ModuleNotFoundError:Nomodulenamed...
 Do FastAPI and aiohttp share the same global event loop?
Apr 02, 2025 am 06:12 AM
Compatibility issues between Python asynchronous libraries In Python, asynchronous programming has become the process of high concurrency and I/O...
 What should I do if the '__builtin__' module is not found when loading the Pickle file in Python 3.6?
Apr 02, 2025 am 07:12 AM
Error loading Pickle file in Python 3.6 environment: ModuleNotFoundError:Nomodulenamed...
 How to ensure that the child process also terminates after killing the parent process via signal in Python?
Apr 02, 2025 am 06:39 AM
The problem and solution of the child process continuing to run when using signals to kill the parent process. In Python programming, after killing the parent process through signals, the child process still...


