
Related learning recommendations: python tutorial
In most cases, the interface developed is not for developing this interface People use it, so if there is no interface document, others will not know which interfaces can be called. Even if you know the URL of the interface, it is difficult to know what parameters the interface requires. Even if you know these parameters, you may not be able to understand the meaning of these parameters. . Therefore, the interface document should be an essential configuration for the project.
There are many ways to write interface documents. The simplest and most direct way is to open a notepad or word document and write down the detailed information and usage of the interface. Others can refer to this document to call the interface. Although this is simple, the disadvantages are also obvious: first, it requires writing a lot of description text, which is very boring, but in fact, this information has been reflected in the code, which is a bit like using natural language to write the code again; second, once When the interface is updated, the interface document must be manually updated simultaneously. Developers can easily forget this, resulting in inconsistency between the content of the interface document and the actual function of the interface.
Because a lot of interface information is actually reflected in the code, people naturally think about whether they can automatically extract relevant information directly from the written code to generate documents. In this way, if the code is changed, the interface documents will also be automatically Update, the two problems mentioned above can be solved.
Of course, writing interface documents is not literary creation. In order to automatically extract information directly from the written code to generate documents, there must be a standard document format, otherwise the tool will not know what to extract from the code. After extracting the information, I don’t know how to organize it.
Through everyone's efforts, there are now many mature interface document standards and generation tools. Among them, OpenAPI Specification is a widely accepted and used standard. The document automation tool used by our blog interface will also be based on The OpenAPI standard extracts documentation information from the code and organizes it into OpenAPI's standard format.
Tips:
The more familiar term related to OpenAPI is swagger. Swagger provides a series of free and open source OpenAPI-related tools. The company behind them is SMARTBEAR, known as the leader in the code quality tools development industry.
The interface document is not a literary work, and the content it requires is basically fixed. For example, for a RESTful interface, you only need to know the following key information to complete the call. In turn, this information can define a complete RESTful style interface:
OpenAPI standardized the above information and proposed the OpenAPI specification. As long as the document content meets this standard, OpenAPI tools can process it. For example, the visual document tool can read the document content and generate Document in HTML format.
Note:
The latest version of OpenAPI specification is currently 3, but most tools currently support 2 best, and the library used in the tutorial only supports 2.
drf-yasg is a third-party application for django that can automatically extract interface information from code written in the django-rest-framework framework to generate documents that comply with OpenAPI standards . We will use it to generate interface documentation for the blogging application.
The first step is of course to install drf-yasg, enter the project root directory, run the command:
Linux/macOS
$ pipenv install drf-yasg复制代码
Windows
...\> pipenv install drf-yasg复制代码
Then add drf-yasg to INSTALLED_APPS In the configuration item:
# filename="blogproject/settings/common.py"INSTALLED_APPS = [    # 其它已添加的应用...
        "pure_pagination",  # 分页
    "haystack",  # 搜索
"drf_yasg", # 文档]复制代码Then use the function provided by drf_yasg to create a django view. This view will return the document content in HTML format, so that we can view the blog's interface document directly in the browser :
# filename="blogproject/urls.py"from django.urls import include, path, re_pathfrom drf_yasg import openapifrom drf_yasg.views import get_schema_viewfrom rest_framework import permissions, routers


schema_view = get_schema_view(
    openapi.Info(
        title="HelloDjango REST framework tutorial API",
        default_version="v1",
        description="HelloDjango REST framework tutorial AP",
        terms_of_service="",
        contact=openapi.Contact(email="zmrenwu@163.com"),
        license=openapi.License(name="GPLv3 License"),
    ),
    public=True,
    permission_classes=(permissions.AllowAny,),
)

urlpatterns = [    # 其它已注册的 URL 模式...

    # 文档
    re_path(        r"swagger(?P<format>\.json|\.yaml)",
        schema_view.without_ui(cache_timeout=0),
        name="schema-json",
    ),
    path(        "swagger/",
        schema_view.with_ui("swagger", cache_timeout=0),
        name="schema-swagger-ui",
    ),
    path("redoc/", schema_view.with_ui("redoc", cache_timeout=0), name="schema-redoc"),
]复制代码 Just use get_schema_view to generate a document view, and then we map this view function to 4 URLs.
Now enter the project root directory and start the development server:
Linux/macOS
$ pipenv run python manage.py runserver复制代码
Windows
...\> pipenv run python manage.py runserver复制代码
Then visit http://127.0.0.1:8000/swagger/ or http:// 127.0.0.1:8000/redoc/, you can see the interface document in HTML format automatically generated by drf-yasg. If you visit http://127.0.0.1:8000/swagger.json or http://127.0.0.1:8000/swagger.yaml, you can see the original OpenAPI standard document. Both swagger and redoc are generated based on this standard document. Visual UI interface.
drf-yasg 毕竟不是使用人工智能开发的,即使是使用人工智能,也很难做到 100% 的正确,毕竟由人类写的代码可能是千变万化的,工具无法预料到所有可能的情况,一旦它遇到无法处理的地方,自动生成的文档就可能出错,或者生成的内容不符合我们的预期。
我们不妨访问 http://127.0.0.1:8000/swagger/ 先来看看没做任何定制化之前生成的效果。可以看到内容大体上是正确的,接口基本上都罗列了出来,但是仔细检查各个接口的内容,就会发现一些问题:
接下来我们就一个个地来解决上面的问题,只需要稍加改变一下 drf-yasg 的默认行为,就能够生成我们预期的文档内容。
首先将第 1 点和第 7 点提到的不需要的接口从自动生成的文档中隐藏。
对于 GET /api-version/test/ 这个接口,它对应的视图集是 ApiVersionTestViewSet,给这个视图集添加一个 swagger_schema 类属性,将值设为 None,这样 drf-yasg 就知道忽略这个视图集对应的接口了。
# filename="blog/views.py"class ApiVersionTestViewSet(viewsets.ViewSet):  # pragma: no cover
swagger_schema = None复制代码隐藏 GET /search/{id}/ 接口的方式稍微有点不同,因为对应的视图集 PostSearchView 不只这一个接口,上面的处理方式会把整个视图集的接口都隐藏,我们需要想办法隐藏指定 action 对应的接口。
drf-yasg 提供了一个 swagger_auto_schema 装饰器来装饰视图,只需要为装饰器设置 auto_shema=None 就可以让 drf-yasg 忽略掉被装饰的视图,具体用法如下:
# filename="blog/views.py"from django.utils.decorators import method_decoratorfrom drf_yasg.utils import swagger_auto_schema@method_decorator(
    name="retrieve",
    decorator=swagger_auto_schema(
        auto_schema=None,
    ),
)class PostSearchView(HaystackViewSet):
    index_models = [Post]
    serializer_class = PostHaystackSerializer
throttle_classes = [PostSearchAnonRateThrottle]复制代码需要隐藏的接口对应 retrieve 这个 action,因此我们装饰的是这个方法。因为 PostSearchView 继承自 HaystackViewSet,在代码中并没有显示地定义 retrieve 这个方法,而是从父类继承而来,所以我们借助 django 提供的辅助函数 method_decorator 非侵入式地为类的某个方法添加装饰器。
现在访问接口文档地址,可以看到不需要的接口已经从文档中隐藏了。
接下来解决第 2 个问题,为接口添加必要的功能描述。drf-yasg 支持从视图的 docstring 解析接口对应的描述信息,只要符合指定的格式即可。
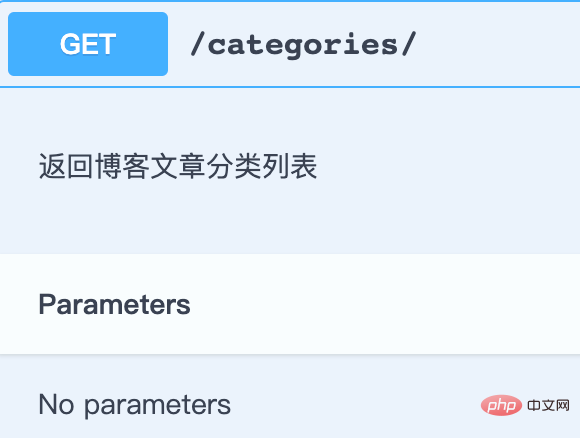
先来一个简单例子,为 GET /categories/ 这个接口添加描述信息,找到 CategoryViewSet 视图集,添加格式化的 docstring:
# filename="blog/views.py"class CategoryViewSet(mixins.ListModelMixin, viewsets.GenericViewSet):
    """
    博客文章分类视图集

    list:
    返回博客文章分类列表
"""复制代码CategoryViewSet 视图集就一个接口,对应的 action 是 list,因此 docstring 的格式就像上面那样,文档中的效果如下:

可以看到接口请求 URL 下方多出了我们写的描述内容。其它一些简单的接口都可以用这种方式来添加功能描述信息,留作练习的内容交给你自己了。
tip 描述的内容还支持 Markdown 格式,这样我们可以根据需要写出格式丰富的内容。
对于稍微复杂一点视图集,例如 PostViewSet,这个视图集含有多个 action 对应多个接口,功能描述信息的格式差不多是一样的,关键点是指明每个 action 对应的内容:
# filename="blog/views.py"class PostViewSet(
    mixins.ListModelMixin, mixins.RetrieveModelMixin, viewsets.GenericViewSet):
    """
    博客文章视图集

    list:
    返回博客文章列表

    retrieve:
    返回博客文章详情

    list_comments:
    返回博客文章下的评论列表

    list_archive_dates:
    返回博客文章归档日期列表
"""复制代码接着我们来完善接口的参数说明文档。通过查看自动生成的文档中各个接口的参数,发现主要有这么几个问题:
例如我们可以看到 GET /posts/{id}/ 这个接口的响应参数,其中大部分有中文信息的描述,我们可以推断,这些说明都是 drf-yasg 自动从定义在 Post 模型各字段的 verbose_name 参数的值提取的。其中 toc 和 body_html 因为不是 Post 中定义的字段,所以 drf-yasg 无法知道关于这两个字段的说明。
drf-yasg 是如何知道这个接口会返回哪些响应参数的呢?原理是 drf-yasg 会尝试去解析接口对应的序列化器(Serializer),从序列化器中提取出对应的请求和响应字段(如果序列化器中找不到,它会进一步去序列化器关联的模型中找),因此我们就可以给序列化器中定义的字段添加说明信息。例如我们来给 toc 和 body_html 添加 label 参数:
# filename="blog/views.py"class PostRetrieveSerializer(serializers.ModelSerializer):
    toc = serializers.CharField(label="文章目录")
body_html = serializers.CharField(label="文章内容")复制代码访问接口文档地址,找到对应的接口,可以看到文档中这两个字段添加了对应的说明信息,还可以通过 help_text(Model 中的字段也支持这个参数)来添加更为详细的描述,例如:
# filename="blog/serializers.py"class PostRetrieveSerializer(serializers.ModelSerializer):
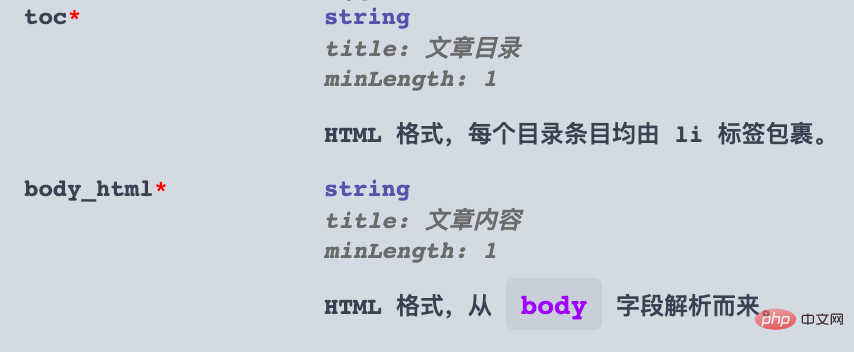
    toc = serializers.CharField(label="文章目录", help_text="HTML 格式,每个目录条目均由 li 标签包裹。")
    body_html = serializers.CharField(
        label="文章内容", help_text="HTML 格式,从 `body` 字段解析而来。"
)复制代码这样两个字段的含义就非常清晰了,效果如下:

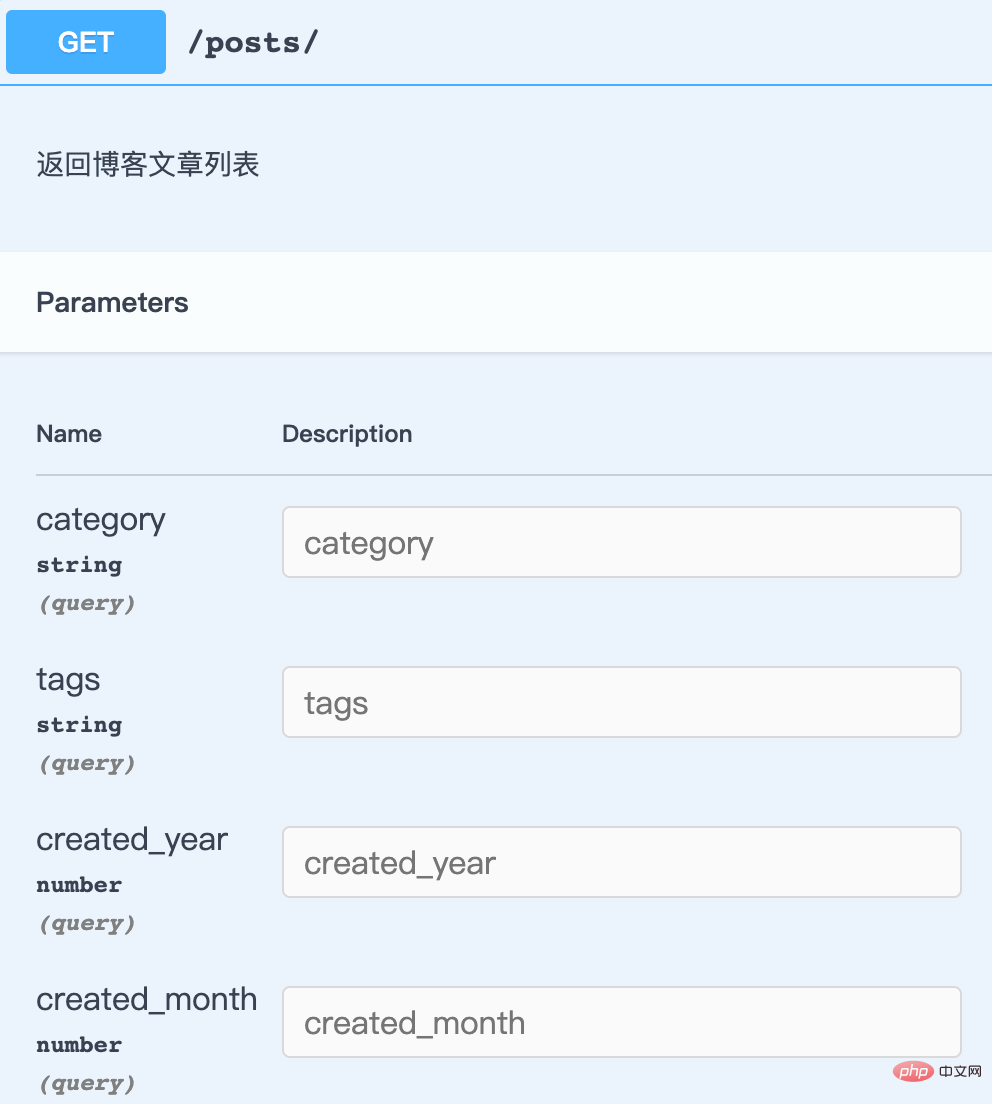
其它一些没有说明信息的字段都可以根据这种方式来添加,只需要找到文档中的参数在代码中对应的来源字段就可以了。除了在序列化器(Serializer)、模型(Model)里面添加。查询过滤参数也是可以这样设置的,例如先来看一下 GET /posts/ 的参数:

可以看到用来过滤文章列表的参数都没有说明,这些字段都定义在 PostFilter 中,我们来改一下代码,添加必要的说明信息后再去文档中看看效果吧!
# filename="blog/filters.py"from .models import Category, Post, Tagclass PostFilter(drf_filters.FilterSet):
    created_year = drf_filters.NumberFilter(
        field_name="created_time", lookup_expr="year", help_text="根据文章发表年份过滤文章列表"
    )
    created_month = drf_filters.NumberFilter(
        field_name="created_time", lookup_expr="month", help_text="根据文章发表月份过滤文章列表"
    )
    category = drf_filters.ModelChoiceFilter(
        queryset=Category.objects.all(),
        help_text="根据分类过滤文章列表",
    )
    tags = drf_filters.ModelMultipleChoiceFilter(
        queryset=Tag.objects.all(),
        help_text="根据标签过滤文章列表",
    )    class Meta:
        model = Post
fields = ["category", "tags", "created_year", "created_month"]复制代码接着我们来看 GET /posts/archive/dates/ 和 GET /posts/{id}/comments/ 这两个接口。前者文档中显示了一些错误的参数,后者本应该有分页参数,但是文档却没有列出。
先来看 GET /posts/archive/dates/,它对应的 action 是 list_archive_dates,由于 action 默认会从它所在的视图集中继承一些属性,而 drf-yasg 会从这些属性去解析接口支持的参数,例如视图集设置了 filterset_class = PostFilter 和 pagination_class=PageNumberPagination(虽然不在视图集中显示定义,但在全局进行了配置),在解析 list_archive_dates 的参数时,drf-yasg 错误地解析到了从视图集继承来的 PostFilter 和 PageNumberPagination,所以就把这两个类中定义的参数也包含进文档了。
知道了原因,解决方法也就有了,在 list_archive_dates action 中把这两个属性设为 None,覆盖掉视图集中的默认设置:
# filename="blog/views.py"class PostViewSet(
    mixins.ListModelMixin, mixins.RetrieveModelMixin, viewsets.GenericViewSet):  @action(
        # ...
        filter_backends=None, # 将 filter_backends 设为 None,filterset_class 也就不起作用了。
        pagination_class=None,
    )    def list_archive_dates(self, request, *args, **kwargs):
# ...复制代码再来看看这个接口,就没有那些错误的参数了。
接着处理 GET /posts/{id}/comments/ 接口,我们需要文档列出分页参数。这个接口对应的 action 是 list_comment。从上面的分析来看,这个 action 明明已经指定了 pagination_class=LimitOffsetPagination,为什么 drf-yasg 无法自动检测到分页参数呢?原因是这个 action 设置了 detail=True。当 detial=True 时,drf-yasg 会将这个 action 对应的接口看做获取单个资源的接口,因此它认为分页是不需要的。但实际上我们对这个接口进行了定制,它返回的其实是评论列表。解决办法是应该告诉 drf-yasg,这个接口返回的是列表结果,请去解析列表接口相关的一些参数:
# filename="blog/views.py"class PostViewSet(
    mixins.ListModelMixin, mixins.RetrieveModelMixin, viewsets.GenericViewSet):    @action(
        methods=["GET"],
        detail=True,        # ...
        suffix="List",  # 将这个 action 返回的结果标记为列表,否则 drf-yasg 会根据 detail=True 误判为这是返回单个资源的接口
        pagination_class=LimitOffsetPagination,
        serializer_class=CommentSerializer,
    )    def list_comments(self, request, *args, **kwargs):
# ...复制代码但是 drf-yasg 还是不够聪明,当它去解析列表接口可能的参数时,顺便又把 PostFilter 中的字段也一并解析了,这是用来过滤博客文章的,显然不能用于过滤评论列表,我们需要将这些无关参数移除,解决方法在处理 GET /posts/archive/dates/ 接口时就讲过了,把 filter_backends 设置成 None 就可以了。
仔细看生成的接口文档,发现有 2 个接口的返回内容是错误的。
一是 GET /posts/{id}/comments/,最初我们发现这个接口文档的响应是一个单一的评论对象,原因我们上面也分析了,drf-yasg 根据 detail=True 误地将其作为返回单一资源的接口处理了。随着为其添加更多信息,告诉 drf-yasg 这是一个返回资源列表的接口,问题也就顺便解决了。
二是 GET /posts/archive/dates/,这个接口的返回内容应该是一个日期列表,但是文档中显示的竟然是博客文章列表。drf-yasg 推断的响应类型是正确的,但内容不对。原因也很明显,这个接口对应的 action 是 list_archive_dates,drf-yasg 在这个 action 中没有找到解析响应结果的序列化器(Serializer),所以它跑去视图集 PostViewSet 中去找了,结果找到了 PostListSerializer,然后把这个当成了接口返回的内容进行解析了。
由于这个接口返回的仅仅是一个简单的日期列表,并不涉及到序列化器,因此这里我们不使用指定 serializer_class 属性值的方式,而是使用 swagger_auto_schema 装饰器,直接告诉 drf-yasg 接口返回的响应:
# filename="blog/views.py"class PostViewSet(
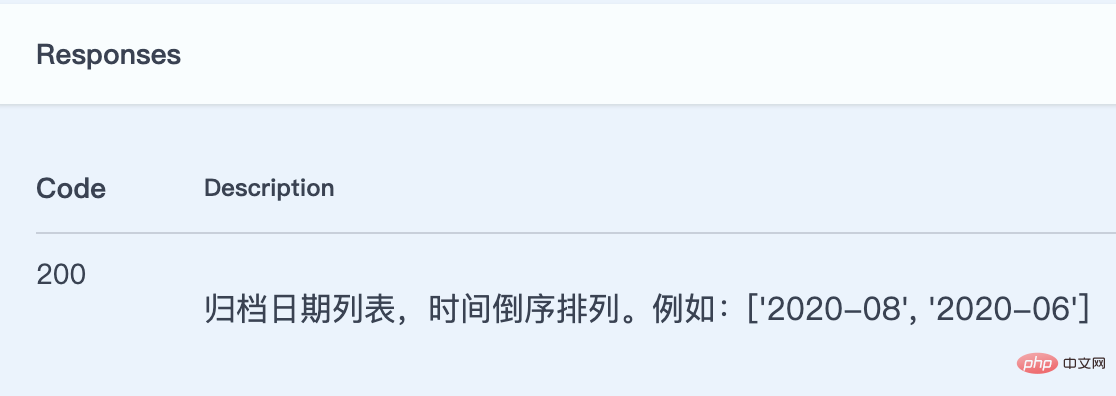
    mixins.ListModelMixin, mixins.RetrieveModelMixin, viewsets.GenericViewSet):        @swagger_auto_schema(responses={200: "归档日期列表,时间倒序排列。例如:['2020-08', '2020-06']"})    @action(
        methods=["GET"],
        detail=False,
        url_path="archive/dates",
        url_name="archive-date",
        filter_backends=None,
        pagination_class=None,
    )    def list_archive_dates(self, request, *args, **kwargs):
# ...复制代码responses 参数的值是一个字典,字典的键是 HTTP 响应码,值可以是一个序列化器,这样 drf-yasg 会拿这个序列化器去解析接口响应的参数;也可以是一个字符串,drf-yasg 会把字符串直接当做接口响应结果写入文档中。看看修改后的效果:

至此,我们就有了一套比较完善的博客接口文档了,而且大部分内容均由 drf-yasg 为我们自动生成,省去了不少手写文档的麻烦。
小贴士:
drf-yasg 的官方文档对于这个库的使用方法写的不是很清晰,这篇文章中列出的一些用法都是从源码中看出来的。如果你在使用过程中遇到了问题,首先尝试分析问题的原因,然后顺藤摸瓜去找到相关的源码,看看库的内部是如何处理你所遇到的问题的,这样就可以针对性地给出解决方案了,这篇教程中列出的很多问题以及最后给出的解决方案,都是使用的这种方式。
想了解更多编程学习,敬请关注php培训栏目!
The above is the detailed content of See through the management interface documentation. For more information, please follow other related articles on the PHP Chinese website!