What are the common application scenarios of nginx?
nginx main application scenarios
1. Reverse proxy
(Recommended tutorial: nginx tutorial)
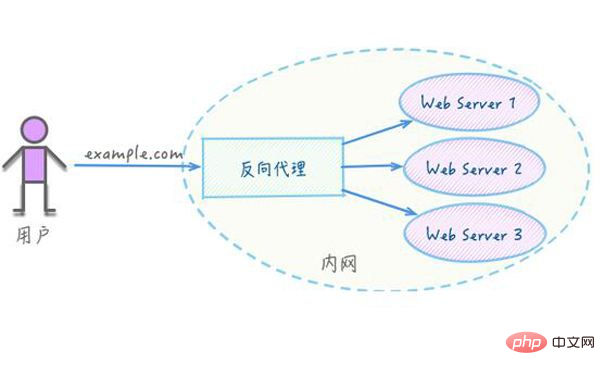
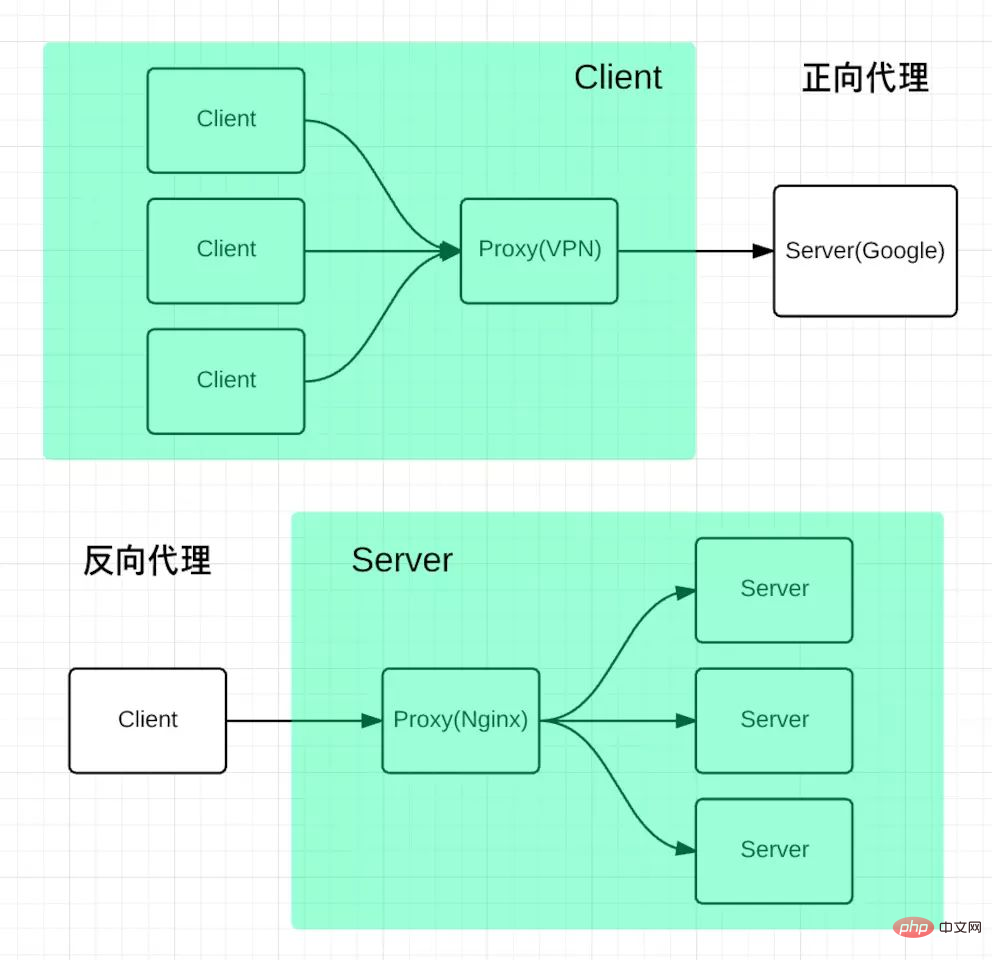
Reverse proxy should be the most common thing Nginx does. What is a reverse proxy? The following is what Baidu Encyclopedia says: The reverse proxy (Reverse Proxy) method refers to using a proxy server to accept the Internet. The connection request is then forwarded to the server on the internal network, and the result obtained from the server is returned to the client requesting the connection on the Internet. At this time, the proxy server appears as a reverse proxy server to the outside world. To put it simply, the real server cannot be directly accessed by the external network, so a proxy server is needed. The proxy server can be accessed by the external network and is in the same network environment as the real server. Of course, it may also be the same server and port. Just different.

Key command: proxy_pass; For example, transfer localhost port 80 to localhost port 8080
<span style="color: #000000;">server {
   listen 80;
    server_name localhost;

    location / {
        proxy_pass http://localhost:8080;
        proxy_set_header Host $host:$server_port;
}<br>} </span>2. Load balancing
Load balancing is also a commonly used function of Nginx. Simply put, when there are 2 or more servers, requests are randomly distributed to designated servers for processing according to rules. Load balancing configuration generally needs to be configured at the same time. Reverse proxy, jump to load balancing through reverse proxy. Nginx currently supports 3 built-in load balancing strategies, as well as 2 commonly used third-party strategies
Key commands: upstream; such as allocating requests from localhost port 80 to localhost 8080 and localhost 8081
Load scheme:
1), weight weight: session sharing must be implemented, otherwise the user session will be out of sync, causing the user to log in again
    upstream test {
        server localhost:8080 weight=9;  #请求的 90% 进入到8080服务器
        server localhost:8081 weight=1;  #请求的 10% 进入到8081服务器
}2), ip_hash: Each request is allocated according to the hash result of the accessed IP, so that each visitor has a fixed access to a back-end server, which can solve the session problem
upstream test {        ip_hash;
        server localhost:8080;
        server localhost:8081;
}3), fair (third party): press Requests are allocated based on the response time of the backend server, and those with shorter response times are allocated first.
upstream test {        fair;
        server localhost:8080;
        server localhost:8081;
}4), url_hash (third party): Ask the hash result of the URL to allocate requests so that each URL is directed to the same back-end server. It is more effective when the back-end server is cached
upstream backend {        hash $request_uri;
        hash_method crc32;
        server localhost:8080;
        server localhost:8081;
}5), Default: allocate to different machines at once according to time
upstream test {
        server localhost:8080;
        server localhost:8081;
    }
    server {
        listen       80;
        server_name  localhost;
        client_max_body_size 1024M;

        location / {
            proxy_pass http://test;
            proxy_set_header Host $host:$server_port;
        }
}3, WEB server
Nginx itself is also a static resource server. When there are only static resources, You can use Nginx as a server. At the same time, it is also very popular now to separate static and dynamic resources, which can be achieved through Nginx. First, let’s take a look at Nginx as a static resource server.
In this way, if you access http://localhost, you will access it by default #index.html under the ##E://www/data directory, if a website is just a static page, then it can be deployed in this way
root When there are only static resources, you can use Nginx as the server
server {
        listen       80;
        server_name  localhost;

        location / {
               root   e:/www/data;
               index  index.html;
           }
} Forward proxy , meaning a server located between the client and the origin server (origin server). In order to obtain content from the origin server, the client sends a request to the proxy and specifies the target (origin server), and then the proxy forwards the request to the origin server and The obtained content is returned to the client. Only clients can use forward proxies. When you need to use your server as a proxy server, you can use Nginx to implement forward proxy, but currently Nginx has a problem, that is, it does not support HTTPS
upstream test{
       server localhost:8080;
       server localhost:8081;
    }

    server {
        listen       80;
        server_name  localhost;

        location / {
            root   e:/wwwroot;
            index  index.html;
        }

        # 所有静态请求都由nginx处理,存放目录为html
        location ~ .(gif|jpg|jpeg|png|bmp|swf|css|js)$ {
            root    e:/wwwroot;
        }

        # 所有动态请求都转发给tomcat处理
        location ~ .(do)$ {
            proxy_pass  http://test;
        }

        error_page   500 502 503 504  /50x.html;
        location = /50x.html {
            root   e:/wwwroot;
        }
}The above is the detailed content of What are the common application scenarios of nginx?. For more information, please follow other related articles on the PHP Chinese website!

Hot AI Tools

Undresser.AI Undress
AI-powered app for creating realistic nude photos

AI Clothes Remover
Online AI tool for removing clothes from photos.

Undress AI Tool
Undress images for free

Clothoff.io
AI clothes remover

AI Hentai Generator
Generate AI Hentai for free.

Hot Article

Hot Tools

Notepad++7.3.1
Easy-to-use and free code editor

SublimeText3 Chinese version
Chinese version, very easy to use

Zend Studio 13.0.1
Powerful PHP integrated development environment

Dreamweaver CS6
Visual web development tools

SublimeText3 Mac version
God-level code editing software (SublimeText3)

Hot Topics
 How to allow external network access to tomcat server
Apr 21, 2024 am 07:22 AM
To allow the Tomcat server to access the external network, you need to: modify the Tomcat configuration file to allow external connections. Add a firewall rule to allow access to the Tomcat server port. Create a DNS record pointing the domain name to the Tomcat server public IP. Optional: Use a reverse proxy to improve security and performance. Optional: Set up HTTPS for increased security.
 How to run thinkphp
Apr 09, 2024 pm 05:39 PM
Steps to run ThinkPHP Framework locally: Download and unzip ThinkPHP Framework to a local directory. Create a virtual host (optional) pointing to the ThinkPHP root directory. Configure database connection parameters. Start the web server. Initialize the ThinkPHP application. Access the ThinkPHP application URL and run it.
 Welcome to nginx!How to solve it?
Apr 17, 2024 am 05:12 AM
To solve the "Welcome to nginx!" error, you need to check the virtual host configuration, enable the virtual host, reload Nginx, if the virtual host configuration file cannot be found, create a default page and reload Nginx, then the error message will disappear and the website will be normal show.
 How to deploy nodejs project to server
Apr 21, 2024 am 04:40 AM
Server deployment steps for a Node.js project: Prepare the deployment environment: obtain server access, install Node.js, set up a Git repository. Build the application: Use npm run build to generate deployable code and dependencies. Upload code to the server: via Git or File Transfer Protocol. Install dependencies: SSH into the server and use npm install to install application dependencies. Start the application: Use a command such as node index.js to start the application, or use a process manager such as pm2. Configure a reverse proxy (optional): Use a reverse proxy such as Nginx or Apache to route traffic to your application
 How to register phpmyadmin
Apr 07, 2024 pm 02:45 PM
To register for phpMyAdmin, you need to first create a MySQL user and grant permissions to it, then download, install and configure phpMyAdmin, and finally log in to phpMyAdmin to manage the database.
 How to communicate between docker containers
Apr 07, 2024 pm 06:24 PM
There are five methods for container communication in the Docker environment: shared network, Docker Compose, network proxy, shared volume, and message queue. Depending on your isolation and security needs, choose the most appropriate communication method, such as leveraging Docker Compose to simplify connections or using a network proxy to increase isolation.
 How to generate URL from html file
Apr 21, 2024 pm 12:57 PM
Converting an HTML file to a URL requires a web server, which involves the following steps: Obtain a web server. Set up a web server. Upload HTML file. Create a domain name. Route the request.
 What to do if the installation of phpmyadmin fails
Apr 07, 2024 pm 03:15 PM
Troubleshooting steps for failed phpMyAdmin installation: Check system requirements (PHP version, MySQL version, web server); enable PHP extensions (mysqli, pdo_mysql, mbstring, token_get_all); check configuration file settings (host, port, username, password); Check file permissions (directory ownership, file permissions); check firewall settings (whitelist web server ports); view error logs (/var/log/apache2/error.log or /var/log/nginx/error.log); seek Technical support (phpMyAdmin


